If you are a blues guitarist who spends 15 to 20 minutes jamming over a backing track every practice session, only to finish feeling vaguely dissatisfied and unsure whether you have actually improved, you are not alone.
This is one of the most common frustrations I hear from blues guitarists at all levels. You put the time in, you load up a backing track, you play through your ideas — and yet you are never really sure whether you are genuinely getting better, or simply playing the same licks and ideas in the same parts of the fretboard.
Part of the problem is that improvisation can feel like something that exists outside the reach of deliberate practice. How do you actually practice improvisation in a way that feels structured and allows you to measure your progress?
If you’ve found yourself asking this question in the past, then this lesson is for you.
Rather than approaching improvisation in a vague, open-ended way, here are 3 exercises that use structured limitation to force you to move beyond your comfort zone and continually sharpen your improv skills.
This will stop you from noodling and help you to get the most from your practice time.
I cover each of these exercises in the video above, and in the article below you’ll find a bit more detail on the scales used so you can practice them more easily.
Why most improvisation practice does not work
Before we look at the specific exercises, I think it’s worth noting why your improvisation practice might not have worked in the past.
In my experience of coaching blues guitarists of different levels from all over the world, it often comes down to one thing:
Most players approach improvisation in performance mode from the very first note — attempting to play a complete, expressive solo every time they pick up the guitar.
Whilst this sounds like a sensible approach, without any specific constraints, it’s easy for your brain to default to autopilot. You return to the same licks, positions and techniques as always. So you end up repeating the same ideas and habits, rather than actually establishing new skills.
As such, all of these exercises have one thing in common – they narrow your options significantly, which forces you to think in new ways, try new ideas and focus on how you are playing rather than what you are playing.
These shifts are significant and this is where real and lasting improvement tends to come from.
Exercise I: The 4 note solo
This is perhaps my favourite of the three exercises, and I would argue it is one of the most effective blues guitar improvisation exercises for developing phrasing, dynamics and musical expression.
The concept is straightforward. You choose just four notes and you do not leave them for the duration of your improvisation. That is the only rule.
How to set it up
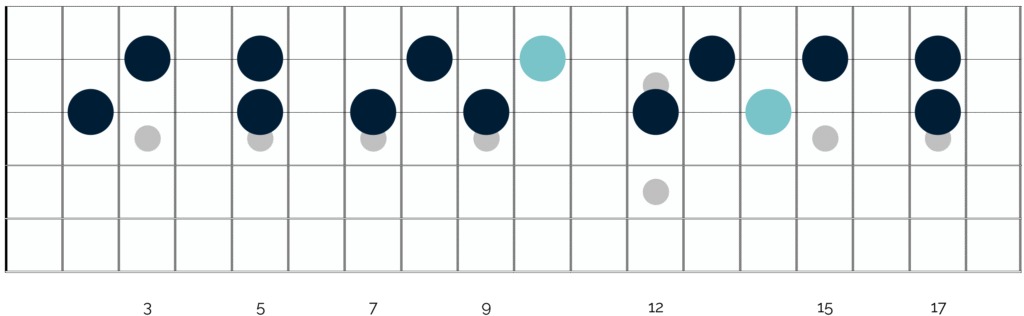
Head to the first shape of the minor pentatonic scale and pick out just four notes from the middle of the shape. In the key of A which we’re working in here, these four notes are as follows:

The tonic note of A is highlighted here in light blue.
The “rules” of this exercise are as follows – you can do whatever you want with the notes. So you can bend them, slide between them and use double stops, hammer ons and pull offs.
However, you have to stay put in that single position and work within the boundary of just those four notes.
Why it works
When you remove the option of moving all over the fretboard, you are forced to make every note sing and create music with limited melodic information.
Phrasing becomes everything. So does dynamics, timing and the way you articulate each note.
These are the things that separate a great blues solo from one that is technically competent but forgettable.
These are also often the things that get neglected when you get too focused on navigating between scale shapes and positions.
Taking it further
Once you are comfortable in this position lower position, you can get more from the exercise by taking the four notes and shifting them up an octave. In the key of A, this will put you in the following position on the fretboard:
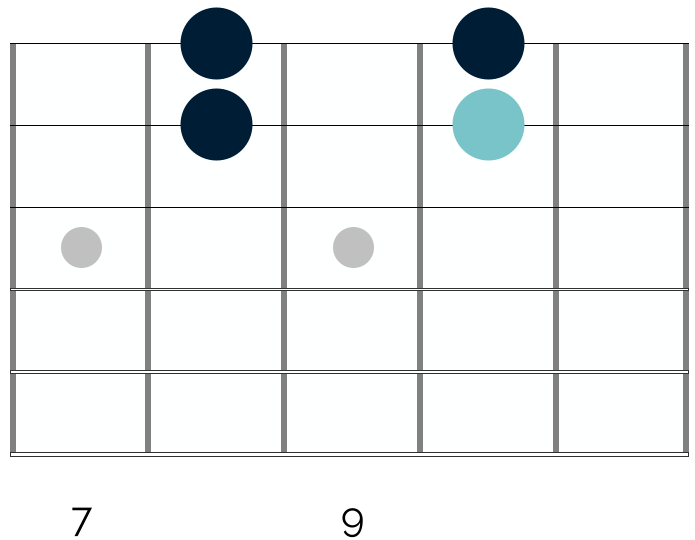
These four notes are exactly the same as those on the 5th and 7th frets. As such, all of the techniques and phrases you used to target those notes in the lower octave will work perfectly here.
Now though you can move beyond creating individual phrases and can think about constructing a solo – starting in the lower position and building intensity as you move up into the higher octave.
Crucially, you can do this without any of the mental overhead of navigating the whole fretboard.
This second step of the exercises also illustrates something important about blues guitar: the same notes played in a different octave do not sound the same.
The ideas feel fresh, even though the notes are identical. This is one of the key ways that great blues guitarists get so much mileage out of a relatively small number of notes, and incorporating this exercise allows you to experience this first-hand.
Exercise II: Single-string soloing
Most guitarists think about the fretboard vertically — with scales running from the lower strings to the higher strings and back again.
That is a perfectly natural approach and it sounds great. However, the guitar also works laterally, with the notes of any given scale running up and down along each individual string.
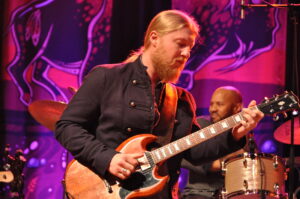
Playing in this lateral way is how you get those fluid, vocal, almost slide-guitar-like lines in the style of players like Derek Trucks, Duane Allman and Ry Cooder, amongst others.
Suddenly altering your perspective on the instrument is challenging though, and switching overnight to approaching your solos like a slide player is likely to lead to confusion and overwhelm.
That’s where the single-string solo comes into play.
How to set it up
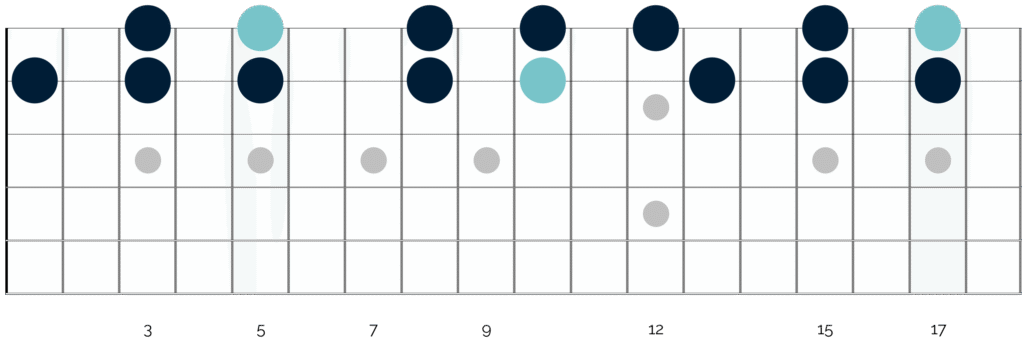
In the key of A, I would recommend trying this on the B string to begin with. If we take the notes of the A minor pentatonic scale and play them laterally up and down this one string, you end up with the following:
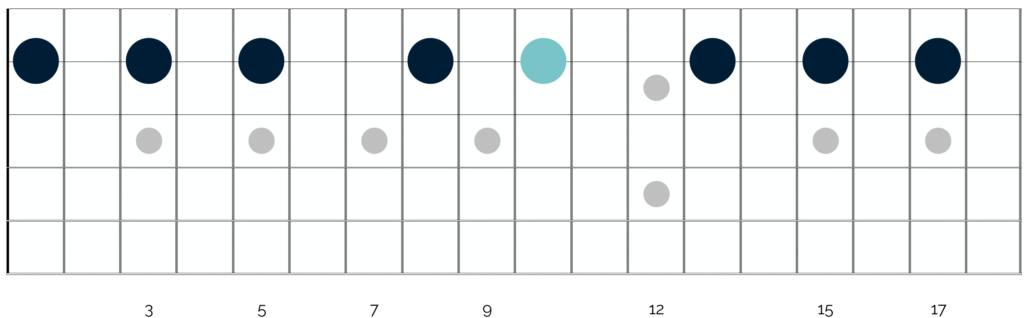
Your task is to solo using only that one string — navigating laterally up and down without borrowing notes from adjacent strings.
Why it works
Confining yourself to a single string forces you to phrase in a completely different way to how you might normally.
You will find yourself reaching for slides more naturally, and you will need to think more carefully about where the next note in the scale sits and whether a bend can take you there.
Over time, this exercise will help you develop a much more intuitive understanding of how scales lay out horizontally across the neck, which is a very useful skill to develop.
It is also an excellent exercise to turn to if you feel that your improvisations have become stale. It is very difficult to fall back on your usual licks when you are restricted to one string.
Taking it further
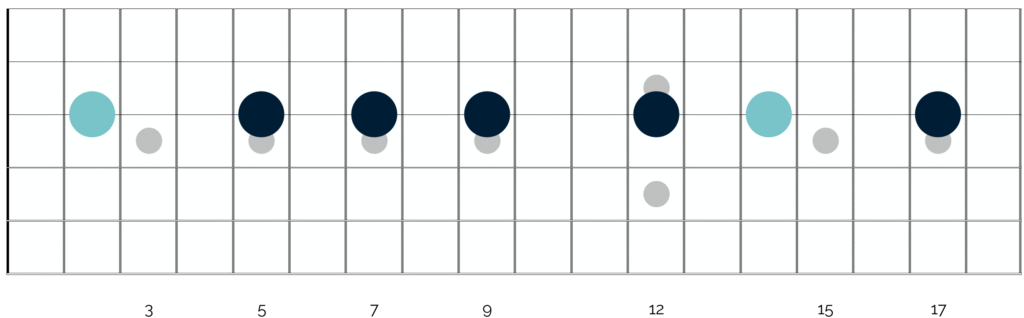
Once you are comfortable on the B string, I would recommend shifting this exercise out to the G string and the high E string. The patterns you encounter will be similar, but the notes appear in different positions and the string tension changes how certain techniques feel and sound — all of which opens up new creative possibilities.
Here is how the same exercise looks on the G string:
And this is what it looks like on the high E string:
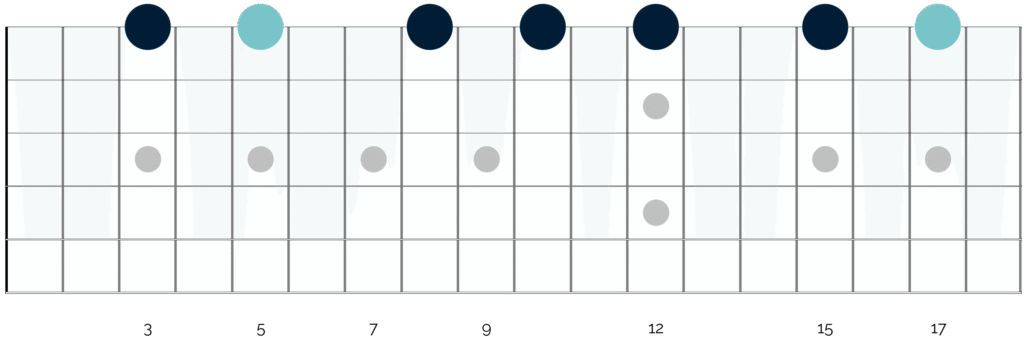
Trying the idea across each of these strings in turn is a great next step once you feel comfortable on the B strings.
And when you feel ready to take things a step further, try working across string pairs: the G and B strings together, and then the B and high E together.
The notes on the G and B strings are as follows:
And here are the notes as they appear on the B and E strings:
As soon as you add another string into the mix, your options for movement across the neck increase exponentially.
This makes this next step a slightly more advanced idea, and one which I wouldn’t rush to until you feel confident executing the idea on a single string.
When you do feel ready though, it’s a great way to expand on the single-string concept and develop even more fluid and expressive lines.
Exercise III: Technique rounds
As blues guitarists, we all have a default mode when we improvise. A go-to bending style, a favourite position on the fretboard, a handful of phrases that appear in our playing without us even really thinking about it.
Technique rounds are designed to break those patterns by asking you to commit to a single expressive technique for an entire round of improvisation.
How to set it up
Choose one technique — slides, bends, hammer-ons or pull-offs — and make it the dominant feature of everything you play during that round.
So if you choose slides (as I do in the video above), then you pack as many slides into your playing as possible and you actively try not to include other techniques.
If a little pull-off or bend appears here or there, that’s fine. However the overriding intention should be to focus on just one technique, and seeing how much mileage you can get from that single technique.
Why it works
When you commit to a single technique in this way, you will explore its possibilities far more deeply than you would during a normal improvisation session.
You discover new patterns of movement, new ways of phrasing and new ideas that you would not have stumbled upon otherwise. Slides and bends in particular have an enormous range of expressive potential, and this exercise is a great way of tapping into that.
It also makes practice feel energising and exploratory rather than mechanical.
There is a significant difference between actively pushing into unfamiliar territory and grinding through another session of backing track improvisation on autopilot.
Taking it further
Once you are comfortable with single-technique rounds, you can start to combine two techniques in this focused way within individual phrases.
So work on licks that combine bends and slides together, for example, or hammer-ons with bends. The aim is not to use both in every phrase, but to start making their combination feel natural and musical.
When you have got that working well, you can try combining three ideas within a single phrase — a hammer-on into a bend into a slide, for example.
Taking this very focused approach will feel a little contrived and unnatural at first, but it will do so much to help you discover new patterns of movement and help you get a lot of mileage out of every phrase you play.
How to structure your improvisation sessions
I personally like to structure my improvisation sessions in two parts.
The first is an exploratory phase, where you work through one of the exercises outlined here.
The idea in this part of your practice is that you push into unfamiliar territory, give yourself permission to make mistakes, and focus on a specific musical skill.
The goal here is not to sound polished — it’s to tread new ground and push beyond your comfort zone.
The second part of our improvisation practice is a performance phase. Once you have completed your exploratory work, you put a backing track on and try to bring everything together into a natural, flowing solo.
This is where the improvisation exercises will start to pay off. The slides you developed during your technique rounds will begin to appear more naturally, and you will begin to extract more mileage from every note, even as you start to play across the whole fretboard.
You can try all of these exercises out over this backing track:
Superstitious Blues In A Minor Backing Track
However all of these exercises are moveable – so you can try them out over tracks in different tempos, styles and in different keys.
As a final and important point, it’s worth noting that you don’t need to work through all three of these exercises in each session.
Instead, pick one exercise, spend a week or two really getting to grips with it, and then move on to the next. This will help you to build confidence with each approach, and keep practice varied and interesting.
Final thoughts
Each of these exercises encourages creativity through constraint.
When you have the whole fretboard available to you, it’s easy to start focusing on just the notes that you are playing, rather than how those notes sound.
But blues is all about feel and expression. B.B. King, Albert King, Peter Green and so many other legends in the genre constructed their solos using just a handful of notes in contained sections of the fretboard.
Yet their solos always sound so vocal and expressive because they focus on what really matters – note choice, dynamics and technique.
These improvidations exercises are designed to help you develop that same quality in your own playing.
So give them a go, and good luck!
Take your time with each one, and let me know how you get on in the comments below.


Responses