If you feel that your blues guitar solos sound repetitive and stale, then you’re not alone.
So many guitarists that I speak with feel dissatisfied with their solos, which they often describe as being repetitive or boring.
There is a whole range of different ways that we can resolve this issue. However, the “go-to” option for most guitarists is to try and learn new musical material.
They set about studying new scales, learning licks and working on their arpeggios – and they often blame the minor pentatonic scale as being the reason that they end up cycling through the same handful of ideas in their improvisations.
The reality though, is that in most cases using a single scale is not to blame for repetitive sounding solos. It’s typically not about the scale we use, but rather how we approach it and target the notes in our playing.
And with that in mind, in this lesson I’m going to share five techniques that will inject new life into your blues guitar playing.
If you feel like you’ve been soloing on autopilot, then this is the lesson for you.
We’ll be working in the key of B minor using just the first and second shapes of the minor pentatonic scale.
However all of the ideas here are moveable, so you can shift them into any key and any position on the fretboard when you feel comfortable to do so.
Best of all, none of this requires speed. So if you don’t yet have the ability to play very fast, then each of these will help you create momentum and add excitement to your solos, without pushing the pace.
Let’s get into it!
I – Double stops
Double stops are one of the most effective and accessible ways to add depth and texture to your blues playing.
A double stop is simply when you combine two notes on different strings and play them simultaneously.
There’s a lot of theory you can explore here — different string combinations produce different intervals, and each interval has its own character and feel.
To begin with however, I’d recommend taking a simplified approach. Start with these two classic double stop combinations:
The tonic notes of B are highlighted here in light blue, with the two notes of the double stop being shown in yellow.
You can play these by barring your first finger across the two strings and playing them together. If you add a little bit of vibrato to the double stop, you’ll immediately create a beautiful and very classic blues sound.
The second double stop that I’d recommend starting with is as follows:
This second double stop sits between the first and second minor pentatonic shapes. As such I’d recommend playing this with your third finger on the G string and your middle finger on the B string.
In this way you can slide into the shape from one or two frets below, and then connect it with the first pentatonic shape.
Once you’ve built confidence using these double stop shapes, start experimenting with different note combinations within the minor pentatonic scale.
You’ll create a whole range of different sounds and flavours in your playing, and immediately move you beyond some of the more traditional blues licks you are creating with single note lines.
Keep experimenting and you’ll be amazed at the different sounds you create!
II – Rakes
Rakes are a very under-utilised technique that can add a percussive, textured quality to your playing that sounds completely different from standard picked lines.
Players like Rory Gallagher used rakes extensively in their blues playing, and you’ll also hear them throughout a lot of Mark Knopfler’s playing — the iconic intro to Sultans of Swing being just one obvious example.
If you are totally new to the technique, then a rake is simply where you drag or brush your pick (or fingers) across multiple strings in a single motion.
The key to creating the right sound is the coordination between both hands: as the pick moves across the strings, you lift the fingers on the fretting hand to mute each string in turn in a rolling motion.
At the same time, you bring the picking hand down with you to dampen the strings as you go.
This combination of movement stops you from producing a full chord sound and instead creates a percussive burst that finishes when you reach your target note.
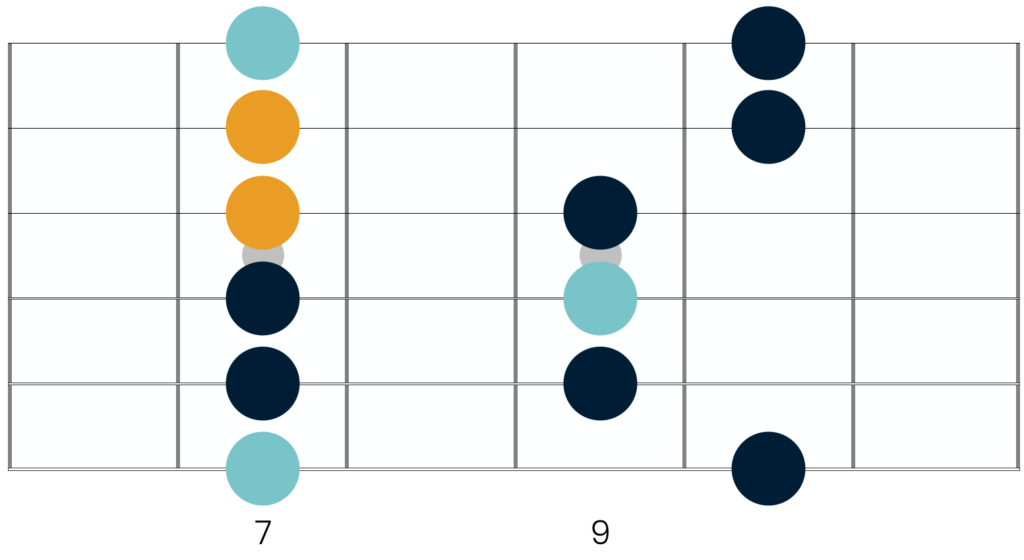
In the key of B minor, a great starting position to practice your rakes is in the first position of the minor pentatonic scale:
Start with your third finger on the 9th fret of the D string and your first finger across the 7th fret. Lift the third finger and then roll the first finger as you move across the strings.
I personally also like to use rakes to target minor triads across the top three strings. In the key of B minor you’ll find these in the following positions:
The triad shape that is shown above built from the 4th fret also appears an octave higher, built from the 16th fret. This is the shape that I illustrate in the video above.
These triad shapes give you an excellent focus point in various different positions across the fretboard, and raking into each one gives your phrasing a cool, distinctly different flavour.
It takes a bit of coordination to get right, but it’s well worth the effort.
III – Big Bends
String bending is a fundamental technique in blues guitar.
This is partly because it immediately adds a vocal and expressive feel to your playing. However it’s also because it is such a nuanced technique with so many possibilities.
You might already be using a variety of bends in your playing, but here are two lesser-used bending techniques that can add a different flavour to your solos:
The tone-and-a-half bend
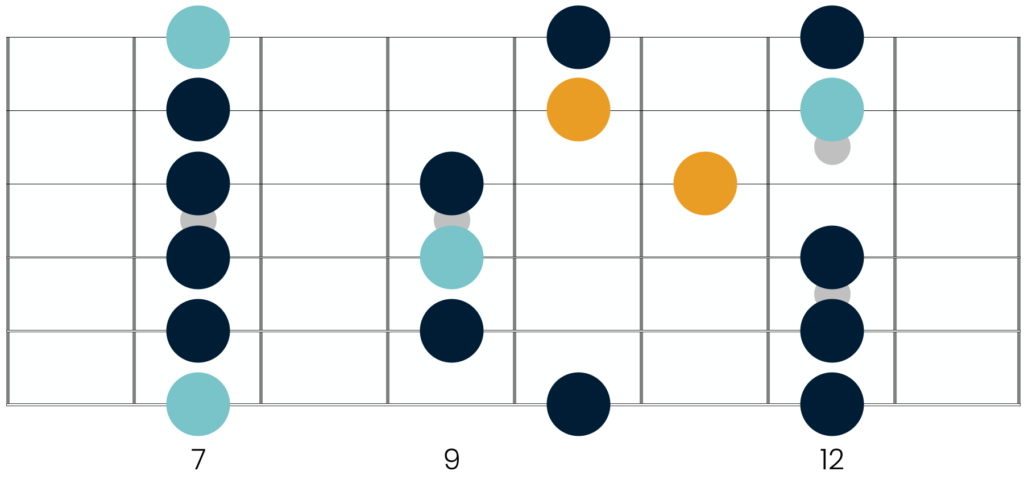
There are 5 individual intervals in the minor pentatonic scale – 1 b3 4 5 b7.
Some of these notes (like the b3 and 4th, and the 4th and 5th) are separated by just a single tone – or two frets on the guitar.
However the tonic (1) and b3, and the 5th and b7 are separated by a tone-and-a-half, or three frets on the guitar.
You can see this in the diagram below showing the first and second shapes of the minor pentatonic scale:
The tonic notes of B are highlighted in light blue and the 5th intervals are highlighted in yellow.
This means that if you want to bend either of these notes you have to push the pitch of that note up three frets for it to reach the next note of the scale.
The increased distance between the two notes already adds a different feel and character to the bend. And this difference in character is amplified by the fact that you have to execute the bend assertively.
If you don’t then you end up targeting a pitch between the note being bent and the target note, creating a tense and dissonant sound (and not in a cool or bluesy way!)
The double bend
This one takes a bit more fretting-hand strength.
If you take either the b3 or the b7 intervals, you can perform a big double bend – pushing it up a tone, letting it come back down to the starting pitch and then pushing it up two tones (four frets!)
This is challenging, so it is likely to be an idea you only execute higher up the fretboard, where there is less tension across the strings.
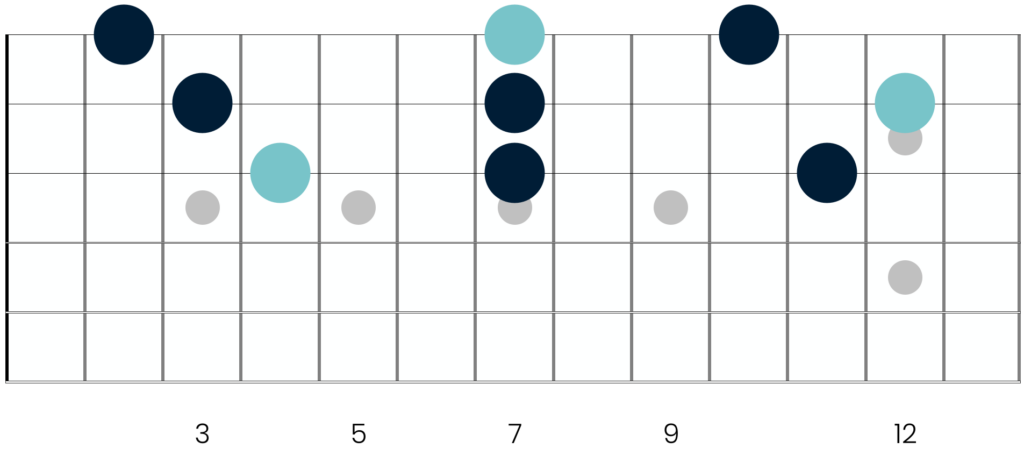
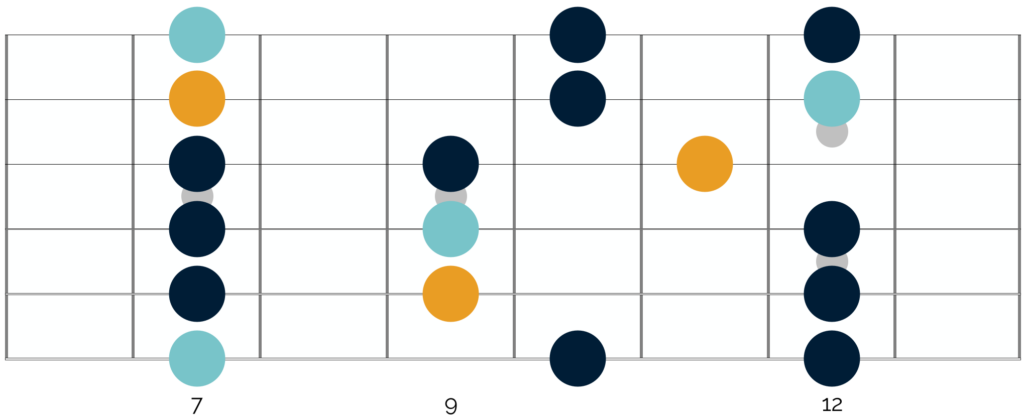
In the key of B, I’d recommend trying this in the third and fourth shapes of the minor pentatonic scale, as shown on the following diagram:

The notes that I would recommend targeting with this technique are highlighted in yellow.
When you bend the b7 up in this way, you do move out of the strict minor pentatonic framework briefly. However the note you land on (the major 2nd interval) is a very stable note which you can target in both a major and minor blues context.
It is difficult to execute this idea at first (both in terms of strength and hitting the correct pitches), but stick with it, and it will add real energy and expression to your improvisations.
IV – Unison Bends
Unison bends are a close relative of the double stop, and in my opinion they’re one of the most tension-filled, exciting sounds you can produce on a blues guitar.
They’re a staple of British blues rock, and a technique you hear a lot in Eric Clapton’s early playing with Cream, and in Jimi Hendrix’s playing.
Here’s how they work: you play two notes simultaneously, then bend the lower note (in terms of pitch) up to match the pitch of the higher note.
The initial dissonance between the two pitches creates tension, which resolves beautifully as the bend reaches its destination.
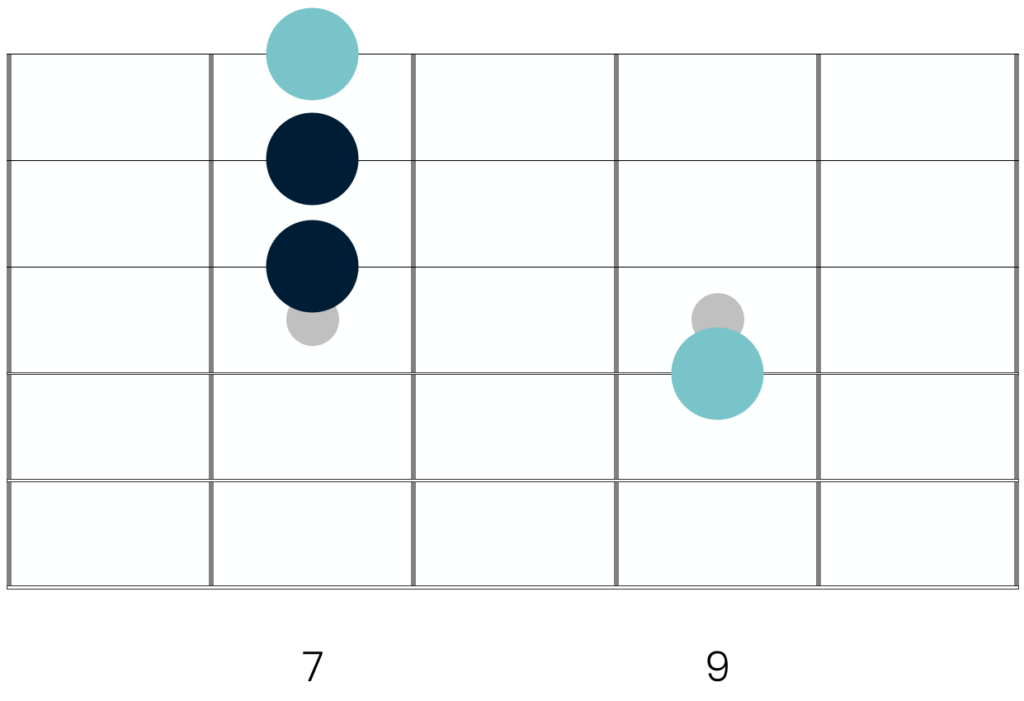
In the first shape of B minor pentatonic, a classic unison bend position would be:
- First finger on the 7th fret of the B string
- Third finger on the 9th fret of the G string (with the middle finger supporting it behind at the 8th fret)
- Play both notes together and bend the G string up a tone (2 frets) until the two notes are in unison
For this to work, the note on the higher string (the B string here) has to stay static. If it moves while you’re bending the other string, the tension will never resolve as the note being bent won’t reach its target pitch.
Once you’re comfortable with the basic unison bend, you can start to play around with what I call the “deconstructed” version — alternating between the static note and the bent note independently.
Here you jump back and forth between the static note and the bend, creating a beautiful bluesy tension in the process.
Once you feel comfortable with the positions I outline above, try experimenting and shifting this idea into other positions of the minor pentatonic scale.
V- Tap Bends
Tap bends are the rarest technique on this list, and for that reason alone they’re worth adding to your blues toolkit.
They’ll jump out of the mix in your solos and immediately grab the attention of your listeners, whilst creating the smooth and vocal quality you hear in solos like John Mayer’s “I Guess I Just Feel Like” and the Allman Brothers’ “Soulshine“.
The technique goes like this: you play a bend and while the bend is still ringing, you use a finger from your picking hand to tap a note three frets higher on the same string. You then release the tap and let the bend come back down.
In the key of B minor, try this in the first pentatonic shape:
- Bend the 9th fret of the G string with your fretting hand
- While holding the bend, use the middle finger from your picking hand to tap the 12th fret
- Release the tap, then let the bend come down
You can apply the same idea on the B string — bending the 10th fret and tapping the 13th — or on the high E string using the same frets.
What makes tap bends so effective is their fluidity.
When you add a note to a bend by picking another string, there’s always a clear separation between the two sounds as you pick each note.
With a tap bend however, the transition is fluid and seamless — it has a vocal, expressive quality that’s hard to achieve any other way.
Putting it all together
Well there we have it, five techniques that you can use to bring new life and interest to your blues guitar solos.
The most compelling blues solos aren’t necessarily the fastest or the most complex — they’re the ones that make your listeners feel something. And these techniques will help you do just that.
The goal isn’t to cram all five into every solo — it’s to have them available as options, so your playing has more colour and you never feel limited by your approach.
All of the examples here have been contained within the first and second shapes of the minor pentatonic scale, just in the key of B. However you can target them in all of the pentatonic shapes and in any key in which you might be playing.
Give them a go, and let me know how you get on! 😁


Responses