Playing the guitar quickly has never been a natural strength of mine. For some reason still unknown to me, my fingers just don’t want to move very fast.
Over the years I have tried a huge range of different guitar exercises to try and get quicker.
Yet despite these efforts, it has only been in the last 6 months (of a 20+ year playing career!) that I have really made big improvements in how quickly I can play.
I contribute this significant improvement to 2 factors.
The first, is that I have focused on just 8 main guitar exercises.
I have put these together through some trial and error and I have found that when combined together, these exercises will help you build speed that you can actually use when you are soloing or improvising.
They will help you develop a well rounded skill set, and speed that you can use in lots of different soloing and improvising situations.
Secondly, I incorporated these exercises into my practice routine more effectively than I have done in the past. And this has made a huge difference to my playing.
In this article, I have outlined 8 key guitar exercises that will help you to play faster.
I also look at how you can incorporate these exercises into your practice routine for the best results.
Opening thoughts
Before you dive in to these exercises though, I think it’s worth asking yourself why you want to play faster. I also think it’s worth asking whether trying to develop speed is the best use of your practice time.
I only ask this, because truthfully, I don’t think that you need to develop speed to be a killer blues guitarist.
After all, if you think about a lot of the most famous blues guitarists of all time, very few of them play fast.
This is definitely true of the ‘Three Kings’ and also of most of the early American bluesmen. The focus of these earlier guitarists was on note placement, vibrato and the quality of their touch and feel.
If you want to emulate these guitarists – and develop a tasteful, melodic and expressive style – then I would argue that you are better off focusing on other elements of your technique.
In my opinion, there are 2 main reasons you might want to develop speed:
The first, is if you want to emulate the style of your favourite guitarist. Over the the last 50 years, there have been some very notable blues guitarists that play fast.
Rory Gallagher, Jimmy Page, Stevie Ray Vaughan, Gary Moore, Walter Trout, Joe Bonamassa, Eric Gales – the list goes on and on.
So if you want to sound like any of these players and emulate their style, then you need to get faster.
The second, is that having the ability to play quickly does make you more versatile. Even if you favour a slower, more melodic style, it is great to have the option of executing a fast lick or run.
Modern blues guitarist Josh Smith is a great example of a player who uses speed sparingly, but does so to great effect.
In this sense, developing speed is like adding another colour to your musical palette. You don’t have to use it a lot, but it is there if you want it.
How to practice these guitar exercises
If you decide then that you want to get faster, try adding the following exercises into your practice routine.
As you will see below – all of these exercises are variations of 1 main exercise. As a result, there are some key elements of all of these exercises that are the same.
So when you are going through them:
Use a metronome
This is an essential tool if you want to get faster. All of the exercises here require a metronome, so if you don’t have one, I would recommend you add one to your setup.
Metronomes come in a whole range of different styles – from the more traditional mechanical metronomes, to electronic metronomes, to apps.
You can even buy watches that pulse on your wrist to help keep you in time!
Personally I use Metronome Online. It is free, has all of the features that I need, and there is a great dashboard where you can track your practice time and set yourself daily goals.
Use alternate picking
This is a crucial skill to develop if you want to get faster. So when you go through all of these exercises, make sure that you are always alternating your picking.
If you don’t, then you will struggle to really develop speed and your progress will stall quite quickly.
Focus on progress
The BPMs that I have used in this article are just examples.
For some of you they will be too low, and you’ll have to crank the BPM right up. For others, the BPMs here might prove challenging.
Try not to worry about what other people are doing or what you think you should be doing.
Just focus on your own journey, and making progress. It doesn’t matter if you are working up from 61 to 62 BPM, or from 161 to 162 BPM; the progress is the important part!
Focus on precision
Guitarists like Stevie Ray Vaughan and Gary Moore sound so good because they never compromise precision for speed. Even when their playing is fast, it is never sloppy.
Don’t chase speed at the expense of your playing. You want your playing to be fast, tight and controlled; not loose and sloppy.
Take your time progressing through these exercises.
It is better to consolidate each exercise at a particular tempo before you try to push the pace and play them more quickly.
Exercise 1 – the foundation
All of the guitar exercises outlined in this article are variations on this first exercise. So it is very important to really get this one under your fingers. The idea here is to play 4 notes for each click of the metronome.
Don’t use any hammer ons or pull offs; pick each note individually. Work your way up the neck by moving up 1 fret every time you reach the high or low E string.
So, in the example below, after playing the 2nd fret on the low E, you move up 1 fret, and start the pattern again from the 3rd fret. Go all the way up the neck until you hit the 15th fret. Then work your way back down the neck to the beginning.
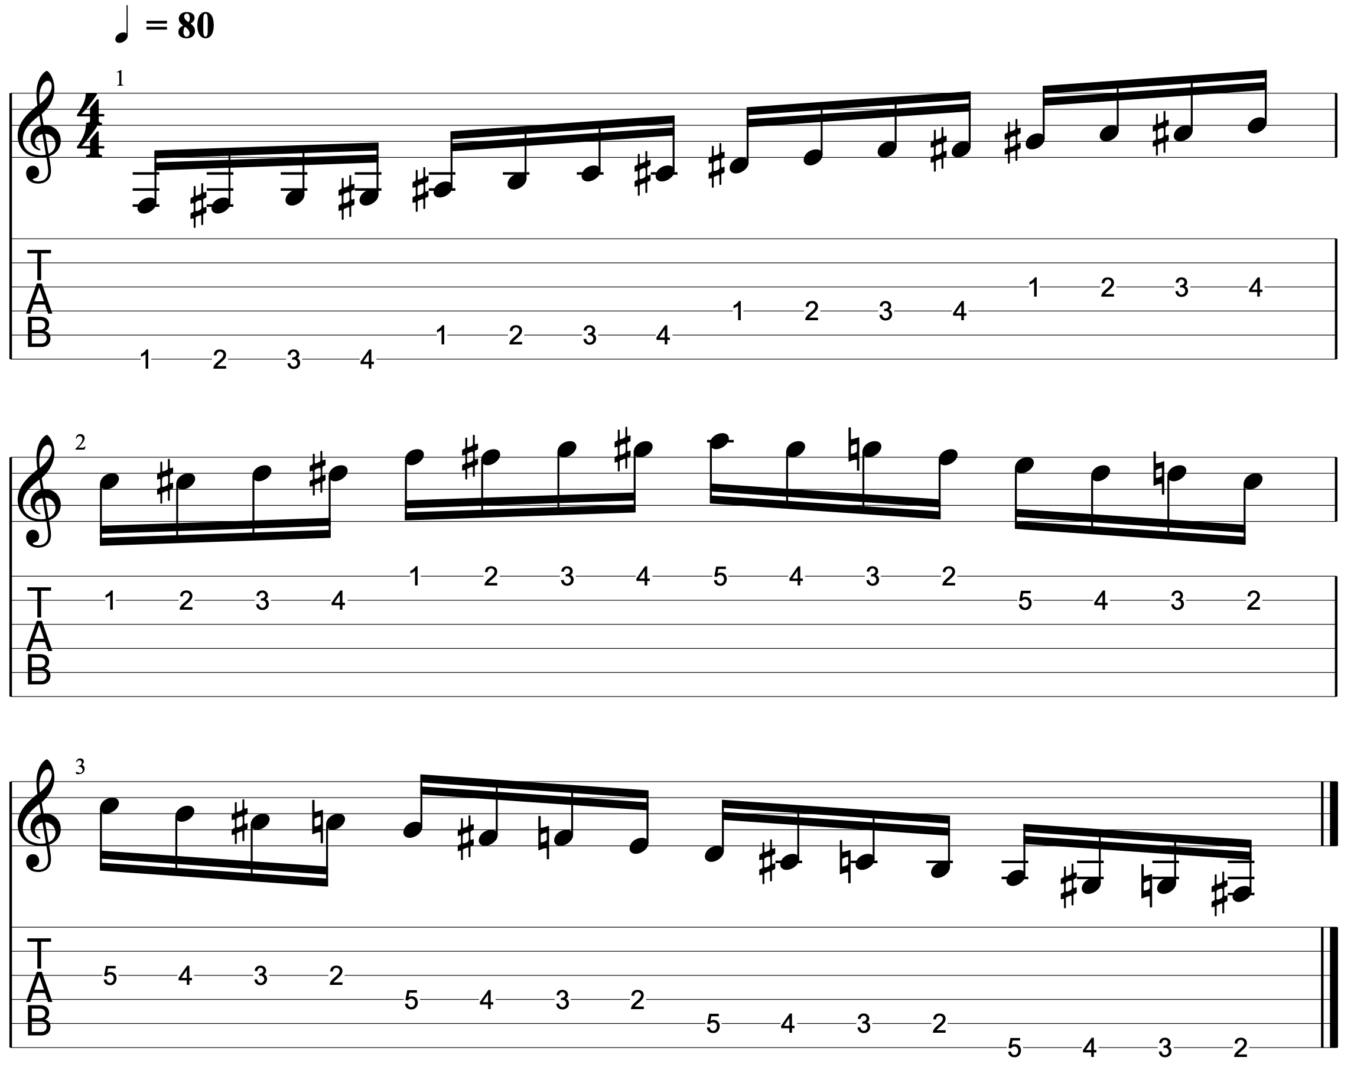
At 80 BPM, this is what this guitar exercise sounds like:
When you first practice it, start at a tempo that is comfortable.
You should be able to play all the way up and down the neck, keeping time with the metronome and playing all of the notes with precision. Once you can do that, up the tempo by 1 beat.
Repeat the exercise until again you can play up and down the neck in time. Practice again until the new pace is comfortable and then up the tempo again by another beat.
This is an amazing exercise for building speed and really provides the foundation for everything else outlined here. So get to grips with this before you move on to the others listed here.
Exercise 2 – String skipping
This exercise follows the exact same format as above. The only difference here is that you are skipping between strings, rather than playing up and down the strings in order.
When you are soloing in a ‘real world’ situation, it is common to skip between different strings, and this exercise helps you to develop the skill to execute this technique at speed.
This is what the exercise looks like:

At 80 BPM, this is what it sounds like:
As before, the idea here is to play 4 notes for each click of the metronome.
Don’t use any hammer ons or pull offs; pick each note individually. Work your way up the neck by moving up 1 fret every time you reach the high or low E string.
Exercise 3 – Descending runs
This third exercise is a more drastic variation on the first, but one which is very important in helping you tackle fast descending runs on the same string.
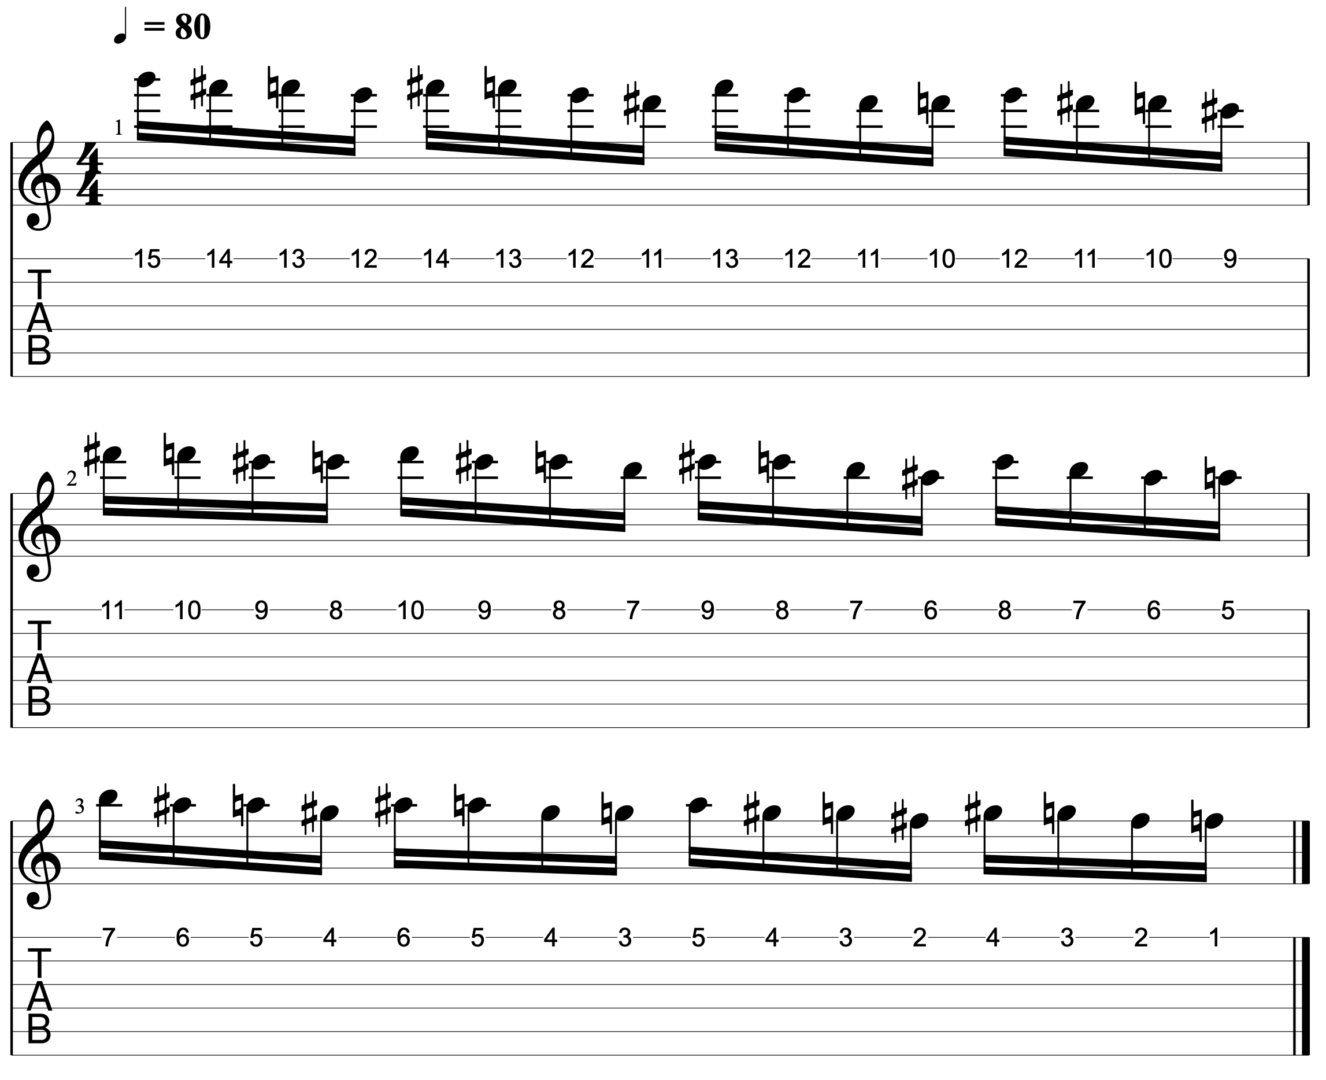
At 80 BPM, this is what this sounds like:
As before, the aim here is to play 4 notes for each click of the metronome.
Start on the high E string and work your way down from the 15th fret until you get to the 1st fret. At this stage, pause briefly and then repeat the exercise again but on the B string.
Repeat the exercise across all 6 strings.
Exercise 4 – Legato technique
You can adapt each of these 3 guitar exercises to improve the speed of your legato technique.
Many of the blues guitarists that do play fast – like Gary Moore and Rory Gallagher – use a lot of hammer ons and pull offs. As such it is a great technique to improve in your playing.
Although a legato style of playing is easier on your picking hand, it poses a different challenge for your fretting hand.
You need to have the strength and dexterity to fret each note without picking, and to do so whilst keeping time and playing at speed.
The good news is that you can build your legato technique by simply making 1 adjustment to each of the exercises outlined above.
So instead of alternate picking every note, all you need to do is play each string once and use hammer ons and pull offs to fret the notes.
You can apply this to all of the exercises above, but I have illustrated what it looks like when you use the legato technique on the ‘Foundation Exercise’:

At 80 BPM, this is what this sounds like:
As with the previous exercises, the idea here is to play 4 notes for each click of the metronome. Except here you are not picking each note individually.
You are picking once for every set of 4 notes. On the way from the bottom strings to the top, you use hammer ons. Then on the way down – from the top strings to the bottom – you use pull offs.
You can apply the same idea to both exercise 2 and exercise 3. The only difference is that in exercise 3, you will be using pull offs when you descend the string.
If you then wanted to use hammer ons, I would recommend reversing the direction of the exercise.
In this way, you would start on the 1st fret, and play a series of hammer ons until you had worked your way up to the 15th fret.
Exercise 5 – Scale patterns at speed
If you are playing a fast blues guitar solo, you are likely to be using the major and minor pentatonic scale shapes, as well as the shapes of the blues scale.
So it is worth practicing these in a way that helps you to develop speed when playing all 5 of these basic scale shapes.
As with the first guitar exercises listed here, the idea here is to play 4 notes for each click of the metronome.
Again, in this exercise you start at a low fret on your guitar and work your way up the neck until you reach the 15th fret.
The difference is that you play 1 scale shape up and down the neck, and repeat the exercise using all 5 shapes of the scale.
Personally I like to play the shapes of the blues scale – which is one of the main scales I use in my improvisations. The scale you choose is up to you though – you can also do this with any scale of your choosing.
However, starting with shape 1 of the blues scale, this is what this exercise looks like:
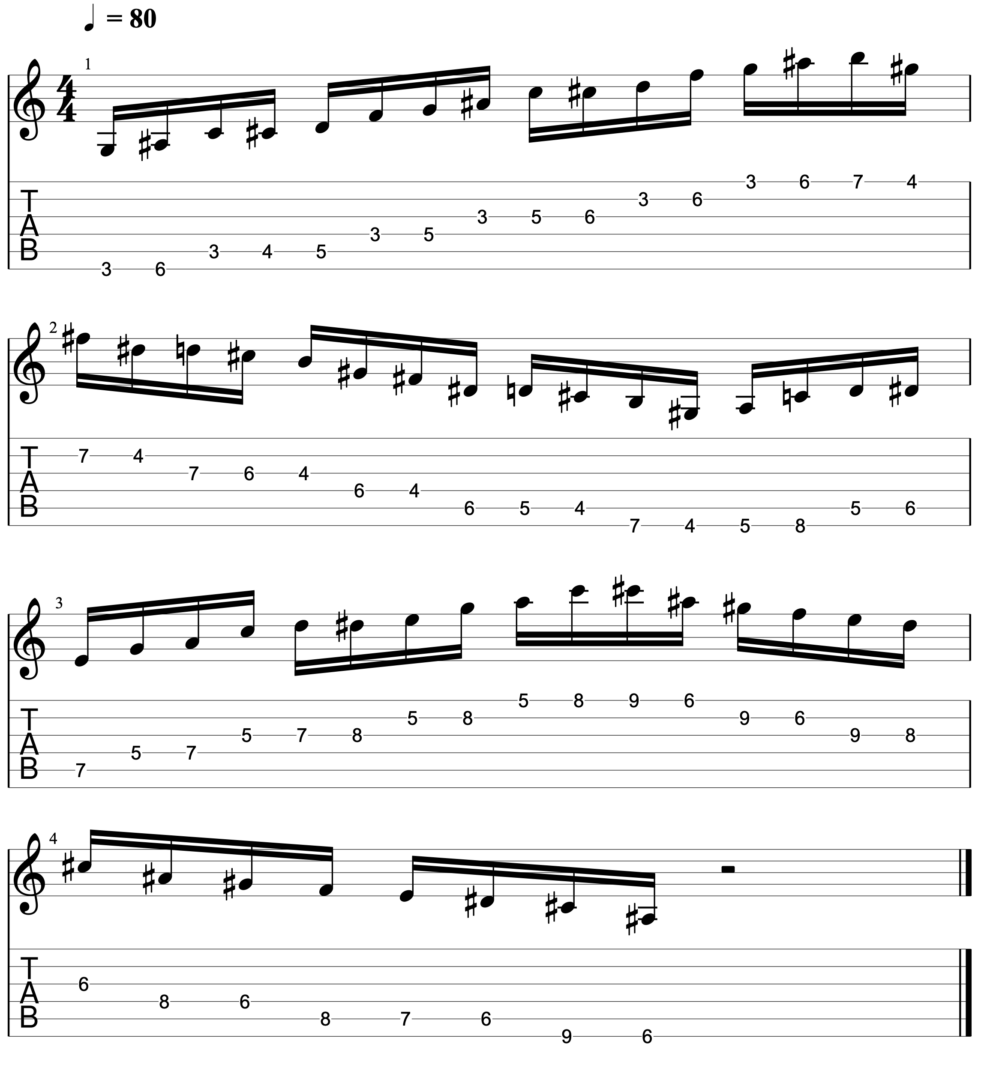
And at 80 BPM, this is what it sounds like:
Once you have gone up the neck and back down to the starting point using shape 1 of the scale, repeat the exercise with shape 2 of the scale.
Do this until you have gone through all 5 shapes of the pentatonic scale or the blues scale.
This is an amazing exercise because it not only helps you to get quicker, but it gets you used to playing all of your scales, all over the neck of your guitar.
Exercise 6 – ‘Bursting’
This is a brilliant exercise that I have adapted from guitar teacher Steve Stine. In this video here, Stine shows how he implements this technique and his reasons for doing so.
In short he states that once you have worked your way up to a high tempo using exercises like those above, there will come a point where you hit a wall.
You will plateau and you just won’t be able to keep notching the metronome up to higher tempos.
This is where ‘bursting’ comes in. The idea here is that you purposefully stretch yourself to play at a speed that is actually beyond your reach.
So instead of trying to play at a level that is comfortable and where you are always locked in with the metronome, here you are trying to push the metronome to a level where you can’t keep up.
To practice this exercise, set the metronome around 20-30 beats higher than normal.
The structure of the exercise is almost identical to the first 3 listed here. The key difference is that with this adaptation of ‘bursting’, you take a break between groups of notes.
This is what the exercise looks like in practice:
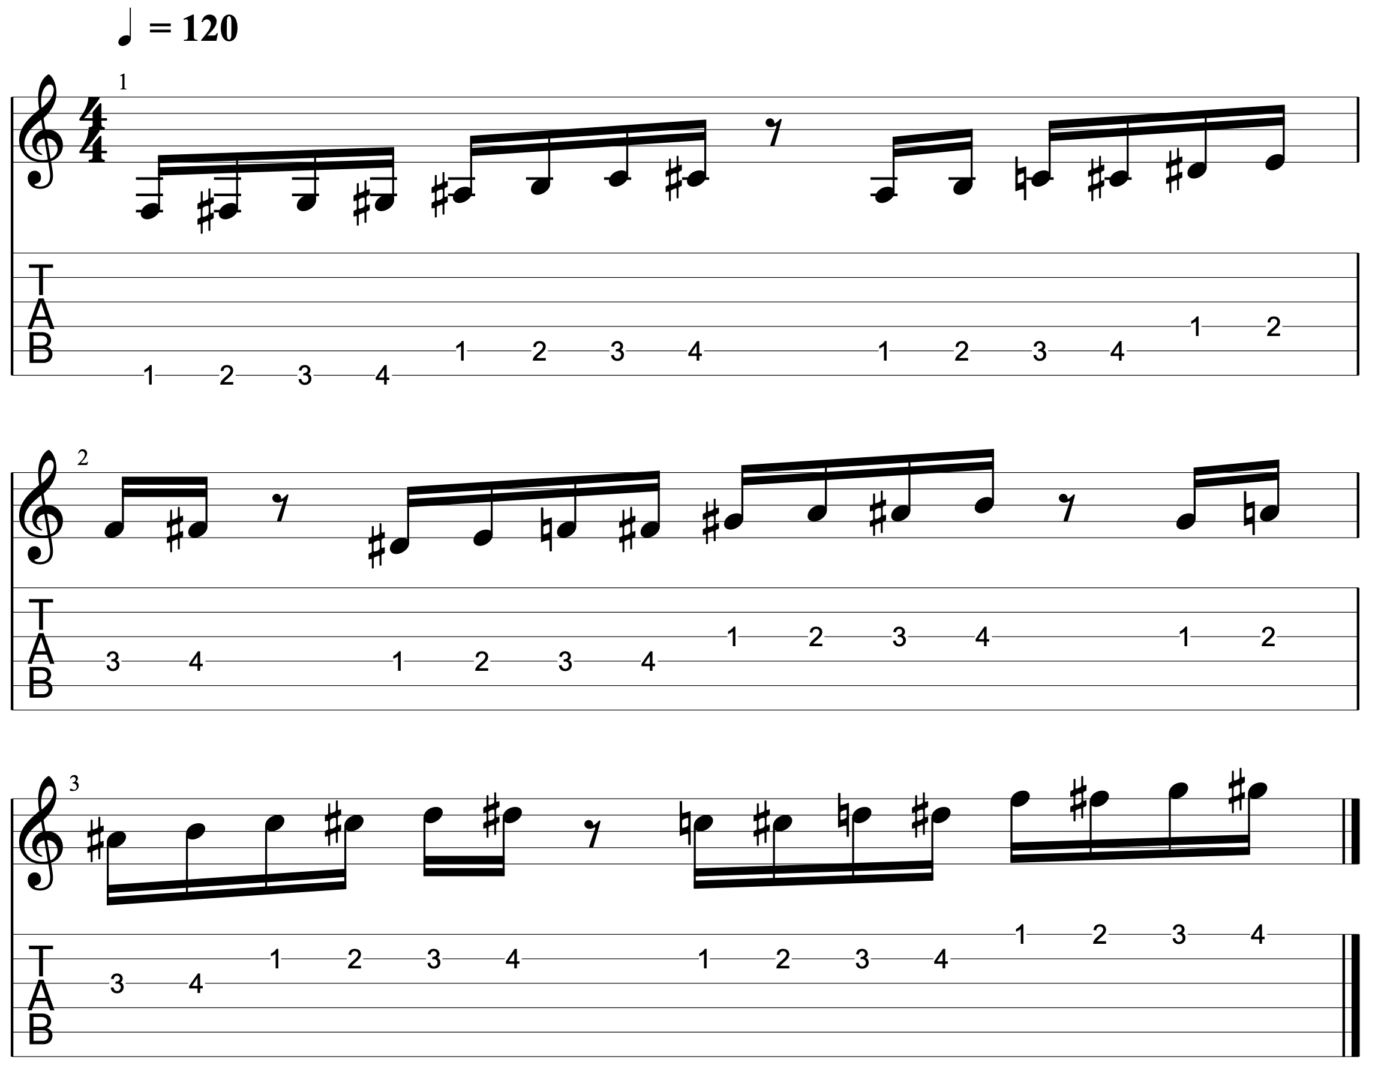
And at 120 BPM (40 BPM higher than the previous exercises), this is what it sounds like:
As before, you can work your way up the neck to the higher frets, but I would not recommend going all the way up and down the neck. This is because unlike the previous exercises, ‘bursting’ is quite fatiguing.
I cover how you can incorporate this and all of the other exercises into your practice routine in more detail below.
In short though, this is not an exercise you can practice for the same duration as those listed above.
The other key difference with ‘bursting’, is that your playing is going to get quite loose. It is not like the other exercises, where you are really aiming to be locked into the click of the metronome.
Don’t worry, that is the idea here.
You are trying to push yourself and to break through a plateau. If you combine this with the exercises above, you will attack the challenge from both sides, which will help you to improve your ability to play fast at a quicker rate.
Exercise 7 – Building finger strength
One of the biggest factors that is preventing you from getting quicker, is your finger strength. Generally speaking, most guitarists have strong index and middle fingers, but quite weak ring and little fingers.
This can really hold you back and prevent you from getting up to playing at fast speeds. Luckily, there are a couple of guitar exercises that can help you build finger strength and increase your speed.
This first one I again need to credit to Steve Stine, as this is an exercise I adapted from this video, which I stumbled on around 5 years ago.
This is what the exercise looks like in practice:
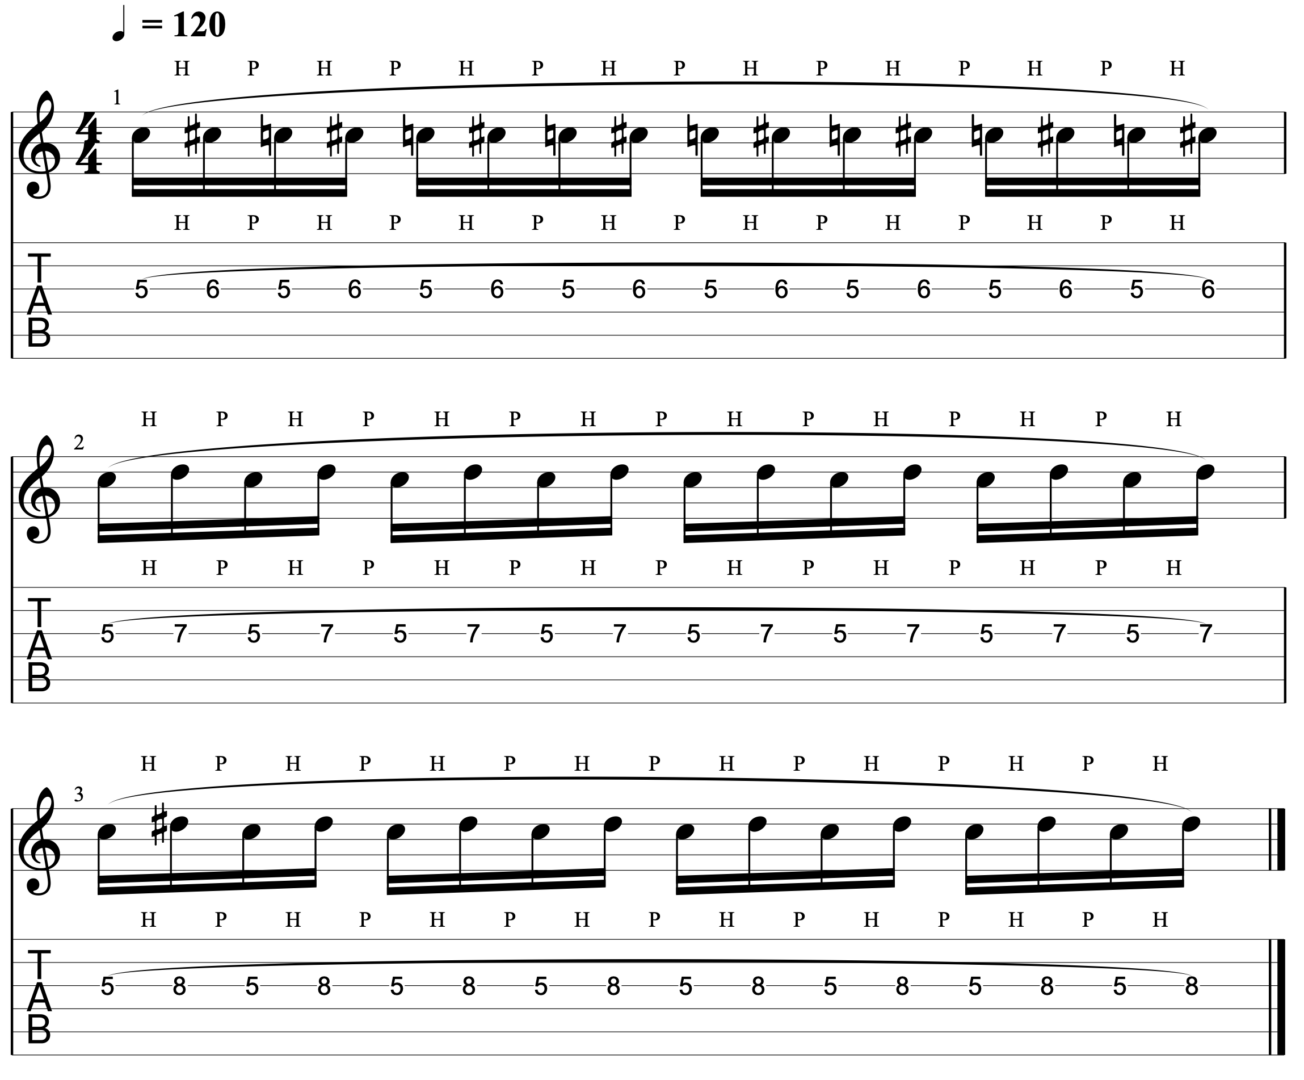
And at 120 BPM, this is what it sounds like:
The idea here is to only pick the string once for each group of notes. This forces you to apply pressure with your fretting hand, to ensure that the note actually rings out.
Once you have gone through the note groupings above, you can restart the exercise. This time though, start with your middle finger. So hammer on from the 6th to the 7th fret, then the 6th to the 8th.
You can perform this exercise as I have above, or in the way that Steve Stine does – which is to try and play each group of notes for 20 seconds.
Personally I alternate between the 2, and use Stine’s method as a way of finishing off my practice sessions (because my hand is normally in tatters after it!)
Exercise 8 – Strengthening the weakest link
The final exercise here is also designed to strengthen your fingers.
Specifically, it is designed to strengthen your weakest fingers, which are hampering your efforts to play faster.
For most guitarists, this will be their ring and little fingers. However, you can apply this exercise to any of your fingers.
In essence, it follows the exact same format as the ‘Foundation Exercise’.
The only difference is that instead of playing 4 notes per string, you play 2, and you play these 2 notes with your weakest fingers.
So for example if you are trying to strengthen your ring and little fingers, then in the exercise below, you can play all of these notes using those fingers. It looks like this:
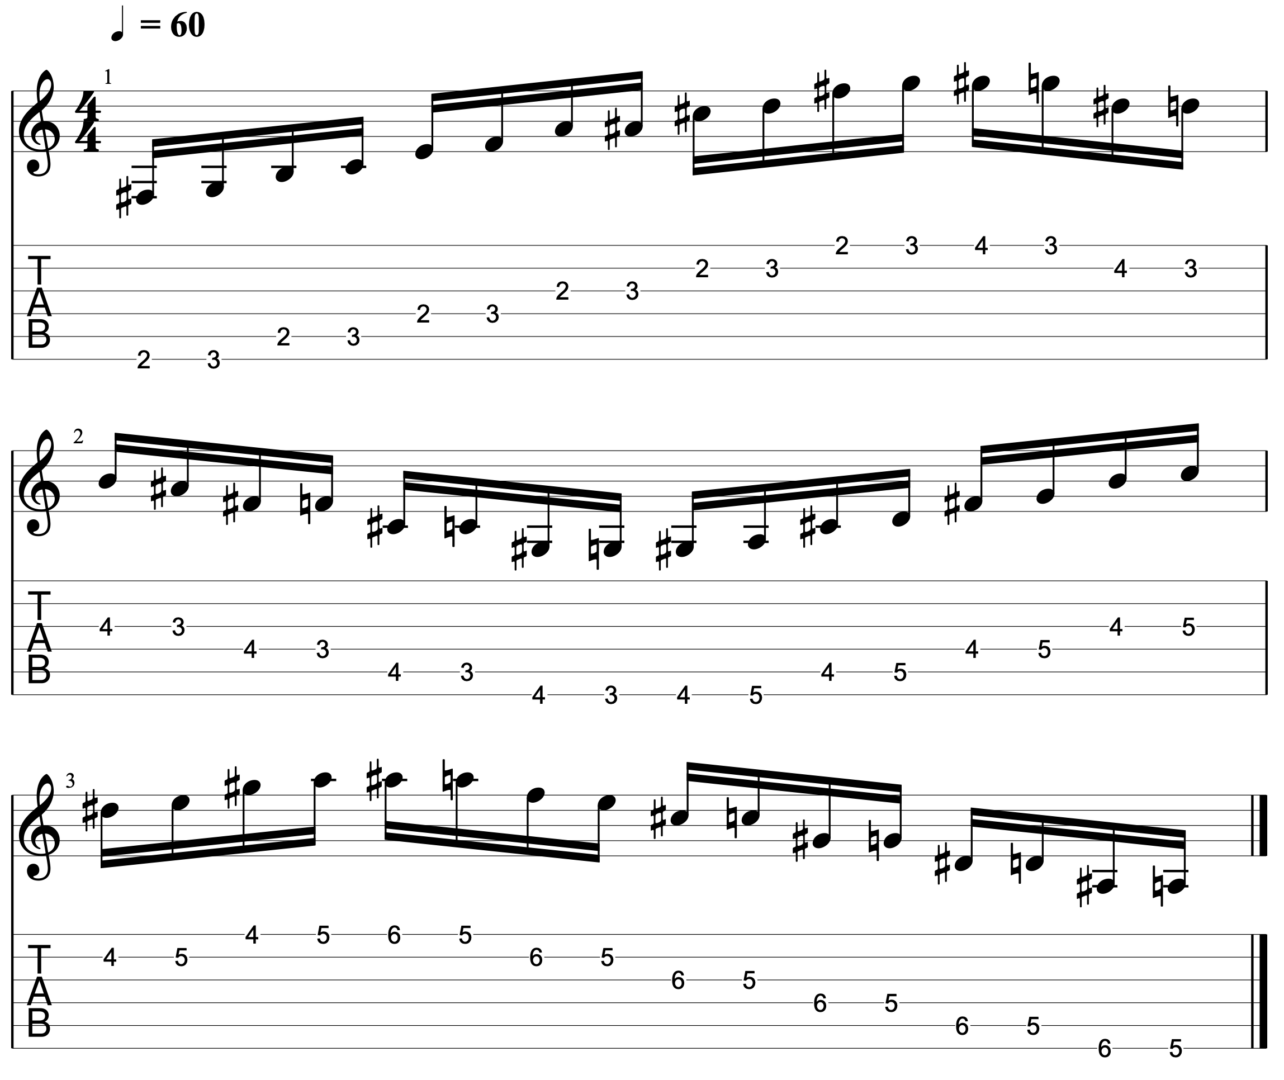
And at 60 BPM, this is what this guitar exercise sounds like:
The BPM here is lower than in all of the other exercises, because it is much more challenging to play this at speed.
Guitar exercises like this really show you just how strong your dominant fingers are compared to your weaker fingers.
Of all of the exercises outlined here, this is the one that I find most difficult.
It really tires my fingers out, so I usually put it at the end of my practice routine. Otherwise I find my fretting hand to be pretty much useless afterwards!
How to establish a practice routine
You can know all of the best guitar exercises in the world; but they will make little difference if you can’t incorporate them properly into your practice routine.
How much time you dedicate to them will largely depend on how much time you have to practice, and how high up the aim of playing faster is on your list of priorities.
Having said that, regardless of your current practice routine there are a few rules that are applicable and which are worth following:
Be consistent
The guitar exercises listed here are designed to build strength, dexterity and coordination in both of your hands. So it is difficult for them to be effective if you only include them in your routine on occasion.
That is not to say you have to dedicate every practice session to becoming a shredding machine. Just aim for at least 10 minutes per day. If you can do more, great! If not, then just aim to be consistent in those 10 minutes.
It might not seem like much, but it will all add up over the course of weeks and months.
Warm up
Before you try any of these guitar exercises, make sure you have warmed up properly. You want to have your hands ready for the workout you are going to put them through.
If you go in cold, they probably won’t be very responsive. Warm up with some rhythm playing, by working on your timing, or by playing through scales. Then move on to the speed work.
Keep things varied
Each of the guitar exercises listed here serves a slightly different purpose. When combined together, they will help you develop speed that you can use to craft varied and interesting solos.
After all, there are very few – if any – effective guitar solos that just involve endless chromatic runs up and down the neck.
Make sure you keep varying the exercises you are playing.
This will help you to develop speed that you can use across a range of different techniques – like string skipping, descending runs, legato runs etc.
In an ideal world, you would practice all of these guitar exercises in every session. If that is not an option for you however, choose a different exercise or a couple of exercises every day and cycle through them in that way.
Structure your sessions
Always put the finger strengthening exercises at the very end of your practice sessions. These are physically tiring exercises, and they will leave your fretting hand in pieces.
In fact, I usually find that my hand is almost useless if I do some of those exercises back to back.
Put them last and really give your fretting hand a solid workout, before resting up and letting it recover for the rest of the day.
Be patient
Last and perhaps most importantly, do not rush this process.
It takes time and consistent effort to develop speed, and at times this can be frustrating. Stick with these guitar exercises though, and over time you will totally change the pace at which you can play.
Even if you are only able to increase the BPM you play at by 1 notch per week, over the course of 1 year, you’ll be able to play 52 BPM faster than when you started!
So keep going and the small improvements you make will all add up and make a huge difference in the long run.
Well there we have it, 8 guitar exercises that will help you to play faster. What are your favourite guitar exercises? A
dd them in the comments below or send me an email on aidan@happybluesman.com. I’d love to hear them!
Images
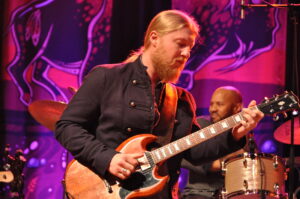
Feature Image – Joe Bonamassa (Credit: Neil Lupin/WENN. Contributor: WENN Rights Ltd / Alamy Stock Photo)


Responses
Another excellent article, Aidan. Very helpful!
Thanks very much man, I really appreciate it and I’m so glad to hear that you’re finding the articles helpful! 😁
Thanks for these exercises, I’ll get right on them!
HOWEVER, I noticed this post was created on
September 7, 2020.
Does this mean I’m receiving musical secrets from the future? 😳
Sounds great to me Steve, and please do let me know how you get on with them!
Well I guess I’ve been rumbled…
But make sure you keep an eye out on the page, because it’s the only way to ensure you get these blues guitar and gear tips months before they become publicly available to anyone else! 😆
Aidan,
Thank you for these exercises I’m going to work them. Looks like a great workout.