Learning to navigate around your guitar fretboard is difficult.
In fact, the challenge that it presents is so great, that most guitarists don’t even attempt it.
For others, just thinking about how and where to start with learning the logic of the guitar fretboard causes them to feel overwhelmed.
I speak partly from personal experience here.
For many years I didn’t understand how to navigate around my guitar fretboard. So whilst I was still able to play various chords, guitar solos and even improvise – I wasn’t able to move around my fretboard confidently.
As such, I stuck to the small sections of the neck where I felt comfortable.
This worked quite well for a number of years. However because I didn’t know how to move beyond these ideas, my playing soon stagnated.
My improvisations sounded repetitive, and I quickly became frustrated by playing the same notes in the same areas of my guitar fretboard.
To remedy this, I tried to learn some guitar theory to help me ‘unlock’ the guitar fretboard.
Yet I struggled with that too. I found the theory dense and difficult to apply to my playing.
There seemed to be so much information to work through to get to the point where I could move around the fretboard and play with a greater level of freedom.
Thankfully, with time and effort, I was able to get to grips with the material. I feel fortunate that I did, because it changed the way I played my guitar playing.
The benefits of this knowledge are profound.
So if you are feeling stuck in a rut with your playing, or frustrated that you are ‘locked’ into certain patterns, learning the material outlined here will help you to move up to the next level.
In this article then, I have outlined the key benefits of this knowledge. I have also covered the 5 ways that you can ‘unlock’ your guitar fretboard.
In the interest of full disclosure, there are a lot of fretboard diagrams to work through here. There is also some music theory.
Don’t let this put you off. I learnt the hard way, and wasted a lot of time battling through dense music theory books.
So to save you time and frustration, I have condensed all of that information down into the essential steps you need to take to develop a deeper understanding of your guitar fretboard.
Whilst developing this knowledge does require hard work and effort, it is actually surprisingly easy to understand how your guitar fretboard works once you learn a few of the fundamentals.
The benefits of understanding your guitar fretboard
Before we look at the steps you need to take to understand your fretboard, I think it is first worth highlighting the benefits of developing this knowledge.
For whilst a huge number of the guitarists I encounter want to develop a greater understanding of their instrument, very few of them fully consider why they want to learn theory.
It is partly this which makes it difficult for them to get to grips with the concepts outlined here.
Learning music theory as a purely academic exercise is unlikely to lead to success. This is especially true if you are playing for fun.
For most guitarists, learning guitar theory is not as much fun as learning songs, jamming or playing with other musicians. As such, the likelihood of staying focused on theory when you are balancing guitar playing alongside all of your other commitments is very unlikely.
That is, unless you fully understand the impact that it can have on your playing.
So before we dive into the 5 steps outlined below that will help you to unlock your guitar fretboard – I think it is worth emphasising the benefits of understanding this material.
Understanding the logic of your guitar fretboard will help you to:
- Play in all 12 musical keys without fear of hitting the wrong notes or playing out of key
- Move confidently around the neck of your guitar when improvising and soloing
- Play chords in different areas of your guitar fretboard, to create different feels and chord voicings
- Solo all over your fretboard, and create your own patterns, without having to rely on the same old licks and phrases
If you then find yourself struggling with motivation when you are trying to learn these ideas, keep these points in mind.
The information laid out here is not intended to be learnt as an academic exercise. It is intended to help you improve as a guitar player.
So whilst learning this material might not be as fun as learning your favourite guitar solo, it will take your playing to the next level.
With that in mind, let’s get into it!
Here are the 5 key steps you need to take to unlock your guitar fretboard:
1. Learn the musical alphabet
The first step to unlocking your guitar fretboard, is to learn some of the fundamentals of music.
Don’t worry, we’re not going to get super deep into the theory here. However learning some of the basics will go a long way in helping you to unlock your guitar fretboard.
All of the notes that you encounter in Western music are represented by a letter from the alphabet.
Unlike the alphabet that we use to construct words though, within the musical alphabet, there are only 7 letters. These are as follows:
| A | B | C | D | E | F | G |
G represents the end of the musical alphabet.
So once you reach the letter or note of G, the alphabet resets and you end up back at A. In other words, the musical alphabet does not contain the notes of H, I or J etc.
As a result, you will not find the notes of H, I or J on your guitar fretboard. You will however find the notes of A, B and C etc.
Having said that, there are some additional notes you need to consider.
This is because Western music contains 12 notes and not 7. Yet as you may have noticed, the letters A – G account for only 7, rather than 12 notes.
Sharps & flats
The remaining 5 notes are accounted for by what are called sharps and flats.
Sharps are denoted in music with the following symbol: #. Flats are denoted in music with the following symbol: b.
Sharps and flats are notes that exist in between many of the notes listed above. For although the letters noted above sit next to each other in the actual alphabet, they do not sit directly next to each other in a musical context.
Most of the notes of the musical alphabet are separated by what are known as tones (often also referred to as ‘whole steps’).
There is a tone between the notes of A and B for example, and the same is true for the notes of C and D and D and E etc.
These tones are made up of 2 smaller semitones (often referred to as ‘half-steps’).
Most of the letters of the musical alphabet are separated by two semitones. They do not sit directly next to each other.
This then begs the question, what exists between the notes of A and B?
The answer here, is a note that is one semitone higher than the note of A, and one semitone lower than the note of B.
We call this either A# (A sharp) or Bb (B flat). This is the note that exists between the notes of A and B.
It is just one note, but it can be named in two different ways. This is a little confusing at first.
Oddly enough though, I find that using a mathematical example makes this easier to understand (who would have thought!?)
Let’s imagine for example that A is 1 and B is 2.
A# or Bb is the note that sits directly in the middle of these two notes. So we can view it as 1.5.
You can add 0.5 to 1 (A) and get 1.5 (A#). Equally, you can subtract 0.5 from 2 and also get 1.5 (Bb).
The end point is exactly the same. It is just that the process we have used to reach it is different.
It is the same with naming sharps and flats. A# and Bb are the same note and they sound exactly the same. We have just chosen to name them differently.
In an actual musical context – when you are playing in a key – it is not quite so straightforward. This is because there is a naming convention which dictates when it is appropriate to call a note A# and when Bb etc.
There is no need to worry about that yet. For now, the most important thing to remember is that the pitch of these two notes – and those similar to them – are the same.
The chromatic scale
When we add in all of the sharps and flats that exist between the notes of the musical alphabet, we end up with the following 12 notes:
| A | A#/Bb | B | C | C#/Db | D | D#/Eb | E | F | F#/Gb | G | G#/Ab |
There are a few key points to note here.
The first of these is that not all of the letters of the musical alphabet have sharps and flats.
Specifically, there is no B# or E#.
By extension then, there is no Cb or Fb. They do not exist. B# is just the note of C, and Fb is just the note of E.
The 12 notes in the table above are the only notes that you will encounter in Western music.
Between each of these notes is a semi-tone. So between A and A# is a semitone. Between A# and B is another semitone.
As a result, between A and B there is a tone. However between both B and C, and also E and F, there is only a semitone. This is because there is no B# or E#.
This is important to remember.
When I first learnt this material I found it difficult to remember which notes were missing sharps and flats. The trick I used was to recall my favourite Beatles song – ‘Let it BE‘.
Hopefully that works for you too. If not though, try and create a different trick that will help you to remember that neither B or E have sharps.
When you take the notes from the table above and play them in order, one after the other, you end up with what is known as the chromatic scale.
This scale contains all 12 notes used in Western music, and each note of the scale is separated by a semitone.
2. Experiment with the chromatic scale on your guitar fretboard
It is difficult to fully grasp these ideas out of context. When you apply them to your guitar fretboard, understanding the theory becomes much easier.
This is what the chromatic scale looks like when we start on the note of A – the first note in the musical alphabet:
By looking at the chromatic scale laid out in this way, there are two initial points we can deduce about our guitar fretboard. These are as follows:
- Each fret on the A string represents one semi-tone. So every time you move up or down 1 fret, you are moving up 1 semi-tone. Likewise, if you move up or down 2 frets, you are moving up or down a tone.
- By the time you reach the 12th fret on the A string, you have played all 12 notes used in Western music. By extension, you have also played all 12 notes in the chromatic scale.
Now luckily, these points apply to every string on your guitar fretboard. So you don’t need to learn any new rules or logic when you are playing on different strings.
On every string, when you move up or down 1 fret, you are moving up or down 1 semitone.
Again, no matter which string you start on, by the time you reach your 12th fret, you have played all 12 notes of the chromatic scale.
The only difference is that on each string, you start the chromatic scale on a different note.
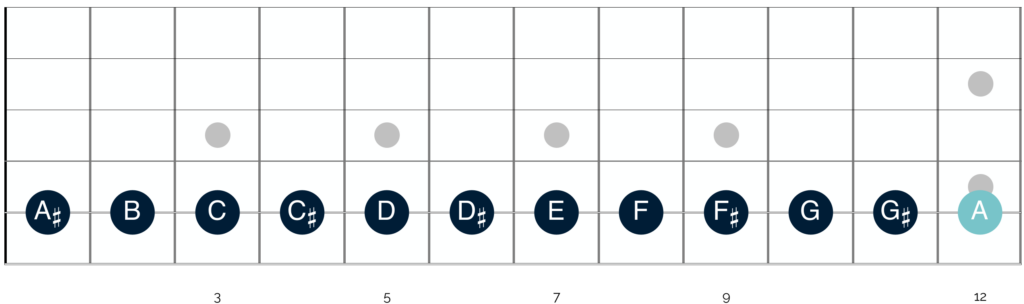
Let’s look at this on the low E string:
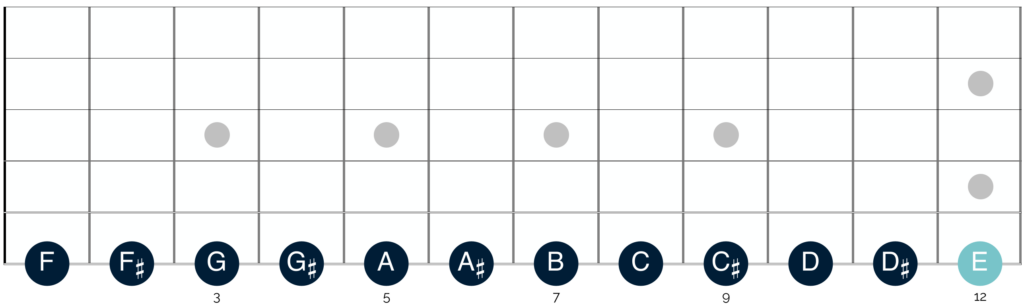
Again here you can see that there is a neat logic to the structure of the guitar fretboard.
You start with the note of E when you play the open string and then every time you move up 1 fret, you move up to the next note in the chromatic scale.
Again, by the time you reach the 12th fret, you have covered all of the 12 notes that are used in Western music.
Beyond the 12th fret
At this stage, you might be wondering what happens beyond the 12th fret of the guitar fretboard.
The good news here is that the pattern of notes is nice and easy to learn.
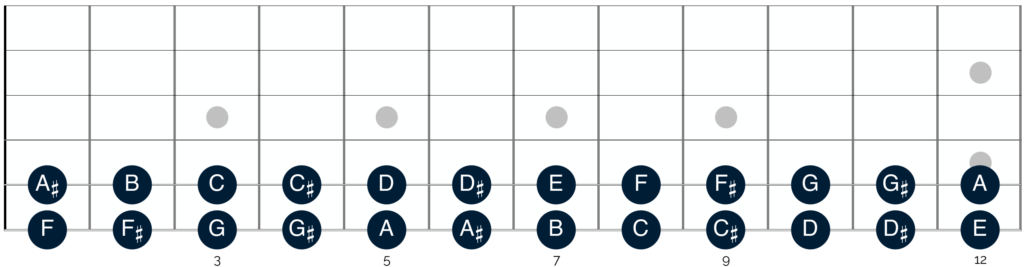
As noted above – and as you can see from the neck diagrams – by the time you reach the 12th fret, you have returned to the note of the chromatic scale on which you started.
It is for this reason that on both diagrams the tonic note of the scale is highlighted in light blue.
On the low E string for example, you start by playing the open E string. By the time you reach the 12th fret, you are back on E. This is the same note, but now you are playing it one octave higher.
However in the context of the chromatic scale, the note is the same. So then, are the notes that follow.
In other words, the order of the notes after the 12th fret are exactly the same as those before the 12th fret.
Let’s look at this on the low E string:

As you can see, the notes on your guitar fretboard repeat themselves after the 12th fret.
To best illustrate the point, the diagram above shows a guitar with 24 frets. If you play a guitar with 24 frets, then you can play 2 octaves of the chromatic scale, on every string.
Even if your guitar has 21 or 22 frets though, you can still view your guitar fretboard as being split into two parts.
It is for this reason that on the vast majority of guitar fretboards, there are two fret inlays at the 12th fret.
3. Keep it simple
Learning the fundamentals outlined so far and being able to trace the notes of the chromatic scale across the different strings of your guitar is a massive breakthrough.
However there are a few more steps you need to take to be able to navigate around your guitar fretboard with freedom.
After all, just knowing which notes are used in Western music and having an understanding of how the chromatic scale is constructed does not give you the knowledge you need to move around your fretboard in a real world playing context.
It is when trying to understand this next piece of the puzzle that a lot of guitarists get overwhelmed.
They take the ideas outlined above and try to learn every single note on the guitar fretboard. Yet this approach is almost certain to fail.
An average guitar has 22 frets and 6 strings. So if you take this approach, you have to learn 132 different notes.
That is a lot of information to take in, especially when you consider that you are most likely also trying to remember different chord shapes, scales, and riffs, as well as solos from your favourite songs.
Even if you have a very strong memory, going through the process of trying to memorise all of the individual notes on your guitar fretboard will be both difficult and time consuming.
Instead, a much better approach is to learn a smaller number of essential notes on the fretboard.
Once you have done this, then you can learn the various different patterns and connections between these notes and others which appear on the the neck of your guitar.
Start low
In my opinion, the only notes on your guitar fretboard you need to commit to memory at first are those on your low E and A strings. You don’t even need to learn all of the notes on those strings.
In fact you only need to learn the notes up to the 12th fret. This is because as noted above, your guitar fretboard essentially repeats itself beyond the 12th fret.
There are four main reasons I recommend learning the notes on these strings:
- The root notes for barre chords are on the 6th and 5th strings. So if you know the notes on these strings, then you can move barre chord shapes all over the neck of your guitar. And this allows you to play a variety of different chords with ease.
- The root notes for your scales also start on the 6th string. So if you know the shapes of the minor and major pentatonic scales, as well as the blues scale, then learning the notes on the 6th string will enable you to move these shapes all over your guitar fretboard.
- You have two E strings on your guitar. So when you learn the notes on your low E string, you are also learning the notes on your high E string at the same time.
- Finally and most importantly, you can build a whole range of different connections across your guitar fretboard, using the notes on the E and A strings as your starting point. So learning the notes on these strings will help you to find the same notes all over your fretboard, without having to memorise every single note.
I will address the last of these points in much more detail below. For this is the final and significant step you need to take to unlock your guitar fretboard.
However, before even reaching that point, you can make huge progress by just learning the notes on the low E and A strings.
So with that in mind, let’s have a look at the specific notes on these strings:
Learning these notes can be a little tricky at first. After all there is still quite a lot of information here, even if it much less when compared with trying to learn all of the notes on the guitar fretboard.
As such, I recommend breaking this challenge up into small chunks. Dedicate some portion of your practice routine to learning the notes on your low E string.
Additionally, try and incorporate learning these notes into your playing. For example, if you are playing a riff that starts on the low E string, pause and try to recall which note you are playing.
If you do this regularly, you will be surprised at how easy it is to learn these notes.
Take your time to really get to grips with the notes on the low E string. Then once you are comfortable with them, you can move on and repeat the same process on your A string.
4. Establish initial fretboard connections
One additional way of learning the notes on these strings more easily is to learn some of the initial connections on your guitar fretboard.
For example, if you look at the diagram above, you will see that many of the notes that appear on the 6th string, also appear on the 5th string. They just appear in different positions.
By looking at the relationship between these notes you can start to develop a firmer understanding of your fretboard’s structure.
Let’s look at some of these in detail:
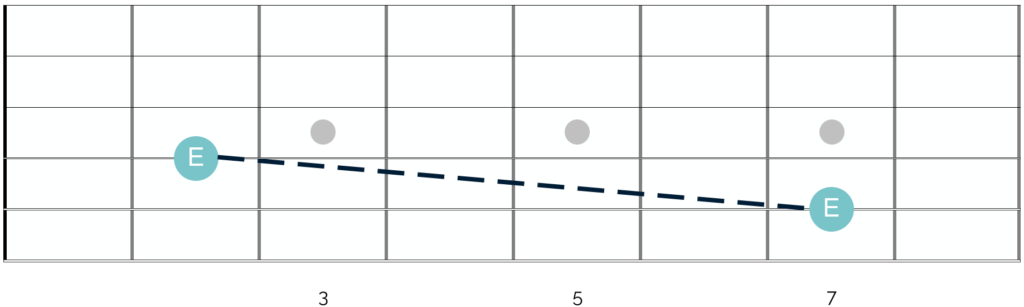
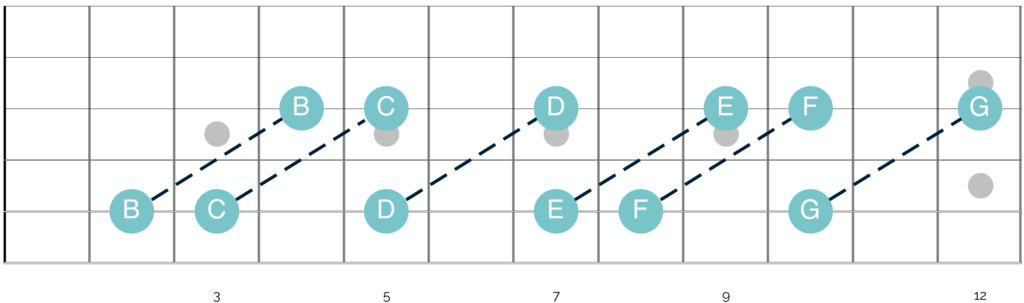
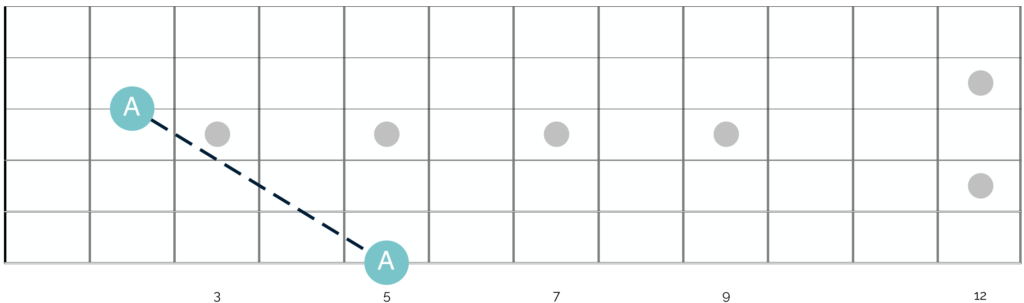
One string up, five frets back
If you take any note on your low E string, you will find the same note at the same pitch on your A string, 5 frets lower:

This is also true when using open strings. If you play the 5th fret on the E string, then you are playing the note of A. This is the same note as the open A string.
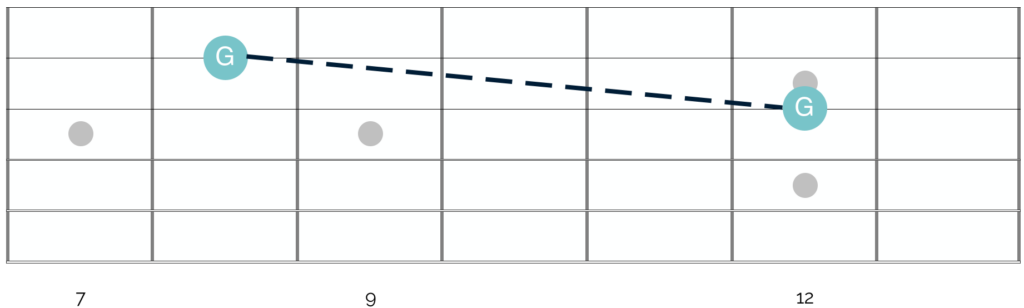
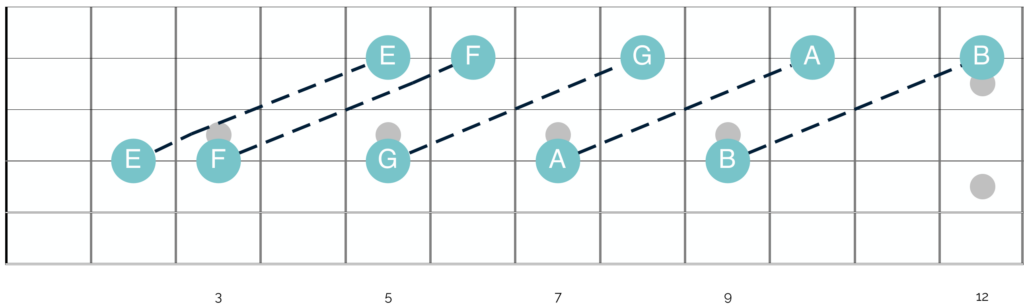
One string up, seven frets up
If you take any note on your low E string, you will find the same note on your A string, 7 frets higher. Unlike the example above, this note is not the same pitch; it is a whole octave higher:

Again this connection also exists when you use open strings. If you play the 7th fret on your A string, you are playing the note of E. This is the same note as the open E string, just one octave higher.
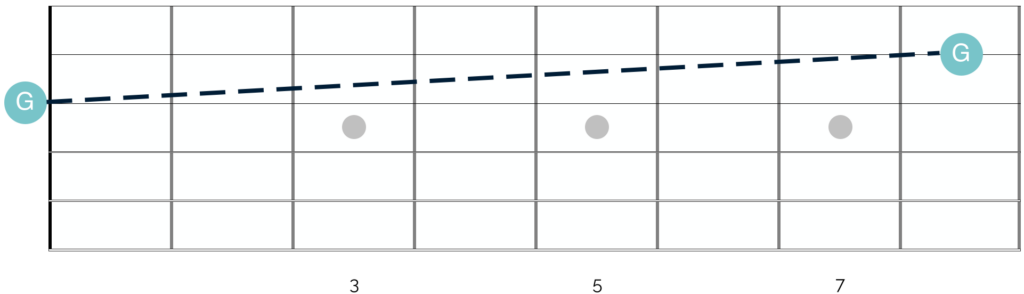
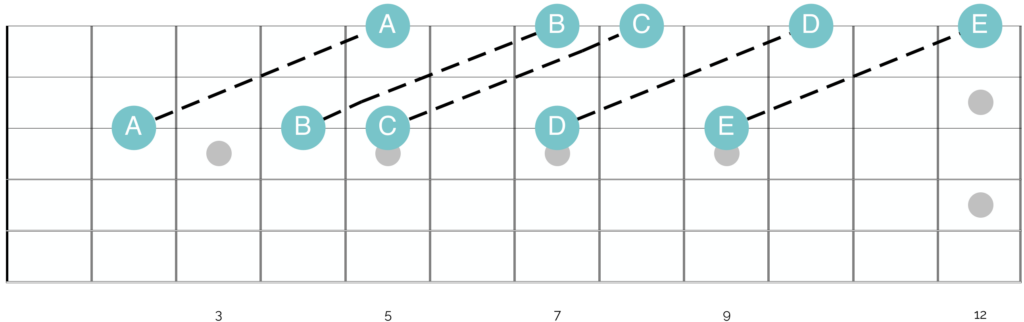
Same string, twelve frets up
Finally, if you take any note on either the low E or A string, you will find the same note on the same string, 12 frets higher. This note is a whole octave above the original note:
This connection also exists when using open strings. The notes at the 12th fret on both the E and A strings are the same as the open strings, they are just one octave higher.
Moving beyond the E and A strings
The great news, is that the connections you find between the notes on the E and A strings are the same on the other strings.
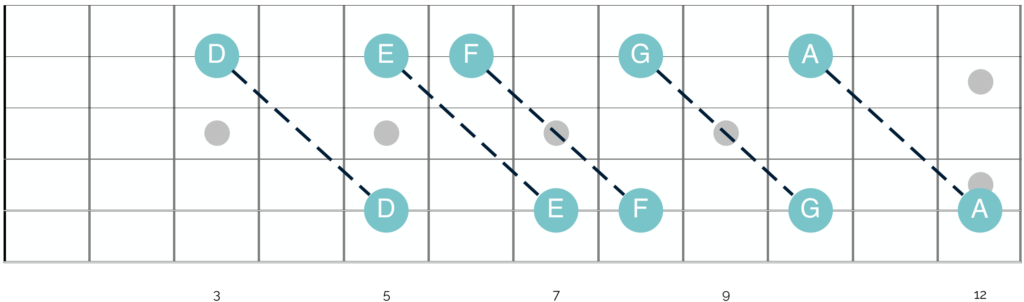
We can see this by looking at some of the connections between notes on the A and D strings:
Here you can see the same rules apply as noted above. If you take a note on your A string and move one string up and 5 frets down, you will find the same note.
Although it is not shown on the diagram above, if you take a note on your A string and move one string up and 7 frets up, you will also find the same note on the D string.
You can apply these connections to all of the strings on your guitar fretboard.
So if you take one of the notes highlighted on the D string in the diagram above, you will be able to build the same connections starting with the notes on that string.
In this way, if you know the notes on your low E and A strings, you can find a lot of different notes all over your guitar fretboard just by using these initial patterns.
The G and B strings
One thing to watch out for when you are experimenting with these connections, is your B string.
For although the connections listed above also exist on this string, they are not quite the same.
This is because your B string is tuned one half step lower than your other guitar strings.
As a result, you need to account for this when you try to make connections from the G string to the B string.
When moving from the G to the B string, you only need to move back 4, rather than 5 frets:
Conversely, if you want to move from the G to the B string and go up, you need to move 8, rather than 7 frets:
These differences only exist between the G and B strings. The fretboard connections between the D and G strings are exactly the same as noted above.
The same goes between the notes on the B and high E strings.
Likewise, the connections on the B string itself are the same as the other strings. So if you take any note on the B string, you will find the same note 12 frets higher.
5. Use octave shapes
The final and significant step that will help you to unlock your guitar fretboard, is to learn octave shapes.
As the name suggests, these are shapes that connect the same notes across different octaves.
For whilst you can move up octaves on the same string (by playing a note and then moving up 12 frets), you can do the same by moving across different strings.
This helps you to build more practical connections across your guitar fretboard.
So instead of having to jump up 12 frets on the same string, you can move in a more economical way between chords or when soloing.
There are a number of different octave shapes to learn and in my experience the easiest way to learn these is to group your strings together into pairs.
Octave shapes built on the E and A string
The first octave shape is one that you can build from notes on your low E and A strings.
If you take a note on one of these strings and move 2 strings up and 2 frets up, you will find the same note, 1 octave higher.
This is what this octave shape looks like:
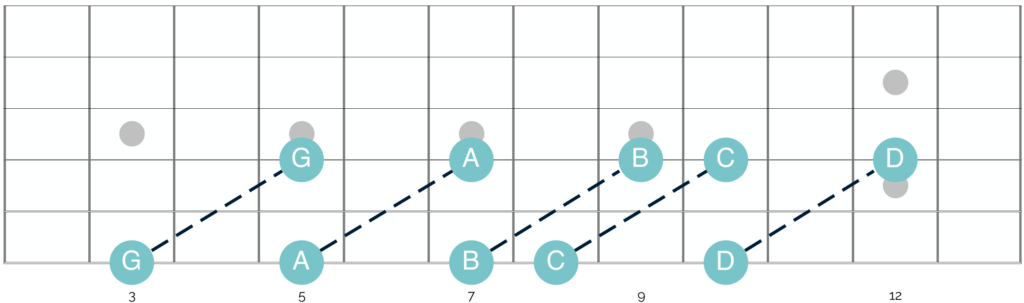
You can apply this shape to any note on your low E and A strings and when you do, you will find the same note, an octave higher.
This is an immensely useful octave shape. In fact it is one which, when combined with the additional shapes shown below, will really help you to unlock your guitar fretboard.
Octave shapes built on the D and G strings
The next octave shape to learn is built from notes on the D and G strings. It is as follows:
Here there is a slightly bigger stretch, as you have to move two strings up and three frets along.
Despite the stretch, it is crucial to learn this octave shape. This is because it allows you to connect the notes on your low E and A strings with the same notes in a totally different part of your guitar fretboard.
Octave shapes built on the B and E strings
The final octave shape is built from notes on your B and E Strings. It is as follows:
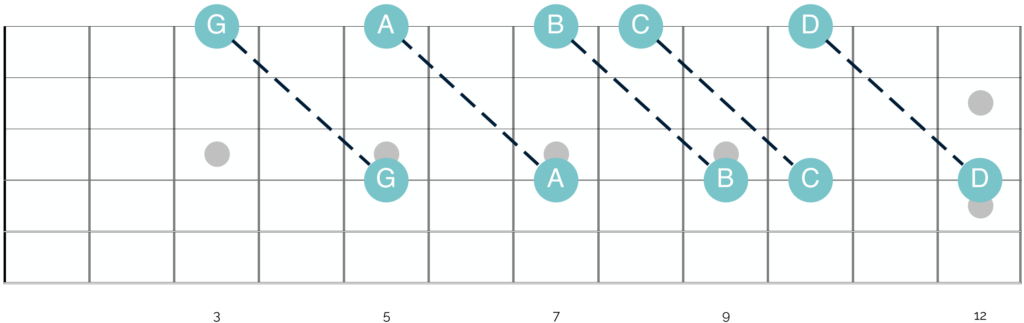
Again, there is a bigger jump for your fingers here, as you are crossing 3, rather than 4 strings.
Yet despite this, it is worth learning this shape. It will allow you to move across large sections of your fretboard elegantly, without having to rely on moving up and down scale shapes.
Octave shapes built on the G string
At this point it is worth noting that this same shape can be applied to the G string. This is as follows:
I prefer to view this as a ‘bonus’ shape.
Especially when you are getting to grips with this material, I think it is easier to learn the octave shapes by grouping them in pairs.
In this way you can learn the octave shapes that are built from notes on the E and A string, and then the D and G strings etc. There is a neat logic to this which makes them easier to learn.
The second reason, is that this shape is a little more awkward compared with many of the other shapes. There is a bigger stretch, which makes it a little less practical in a playing context.
Nevertheless, it is an additional shape that you can use to navigate across your guitar fretboard. So it is definitely worth learning and committing to memory.
How to learn your octave shapes
When you look at the octave shapes as they are laid out above, it is difficult to appreciate just how important they are in helping you to navigate your guitar fretboard.
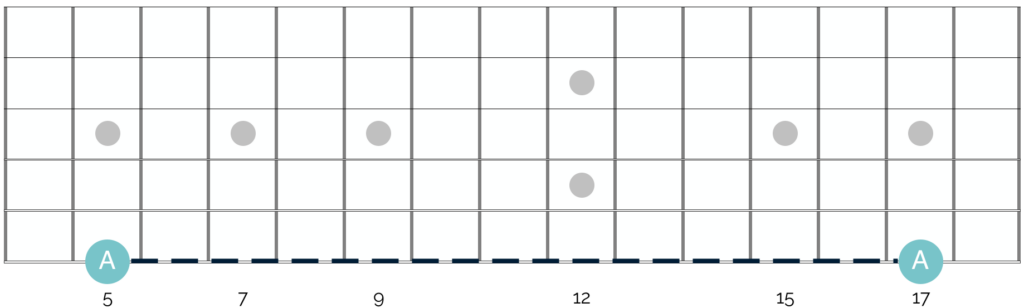
This changes when you visualise them on your fretboard however:
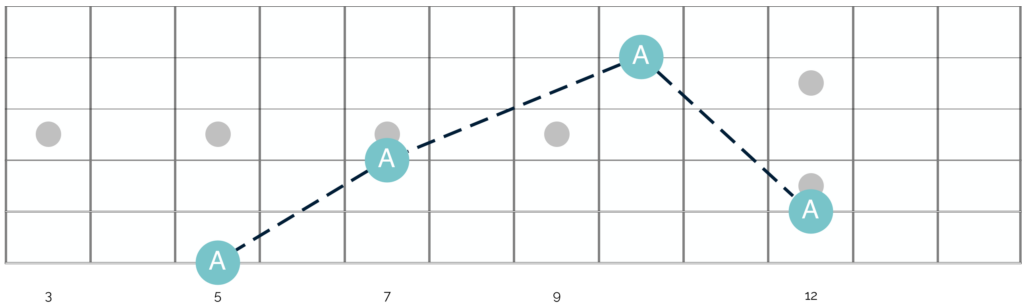
As you can see with octave shapes, you can quickly find 4 different notes of A in just one small section of your fretboard.
We can take this one step further, by looking at these shapes across a much larger section of the fretboard:
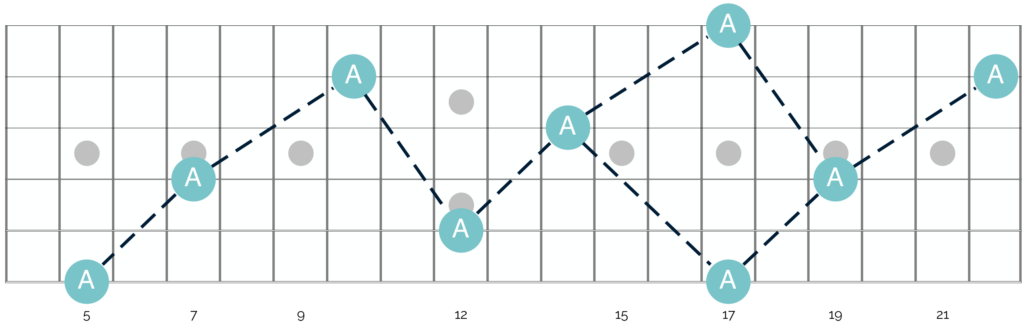
Learning all of these notes from memory would be very challenging.
However by combining your knowledge of the notes on your low E string with your knowledge of the octave shapes, you can very quickly connect all of these notes together.
There are just two further things to keep in mind here:
The first of these is that the open strings can be included in these octave shapes.
So although it is not shown on the diagram above, using octave shapes you could connect back from the starting note of A on the E string to the note of A on the D string, and then from there to the open A string.
The second is that there are certain points on the guitar fretboard where 3 of the same note converge in the same area. You can see this on the diagram above at the 17th fret.
This is just because the notes on both the high and low E strings are the same.
So if you follow an octave shape onto either of the E strings, that exact same note will appear on the other side of the guitar fretboard.
The same is true no matter which note you pick. The only difference is the position on the fretboard where these notes appear.
Practice exercises
The best way to get to grips with these shapes is to practice moving between them.
I recommend doing this across the entirety of your guitar fretboard.
Pick a note on one of the first frets on either the low E or A strings, and then follow that note all the way to the top of your neck using octave shapes. Try this with a variety of different notes.
To start with, just work up your guitar fretboard. Don’t worry too much about working your way back down to the beginning.
Once you have done that with a range of different notes on your low E and A strings, you can make the exercise more challenging in a number of ways:
Firstly, you can work your way down from the top of your guitar fretboard, back to your starting note.
For example, if you start on the note of G on your low E string, you can work all the way up to the note of G on either your 22nd or 24th fret.
You can then pause, before working your way back down the guitar fretboard to the G at the 3rd fret on your low E string. This is much more difficult than just travelling up your fretboard.
Secondly, you can choose a note either in the middle of your fretboard, or a little higher up. So instead of starting low down on the neck, you can pick a note higher up on the fretboard.
You can then try tracing your octave shapes one way on the fretboard before pausing and returning to the starting note. Then you can go the other way.
This will help you to practice using octave shapes in a way that is more reflective of a real playing situation.
Finally – and only if you feel comfortable with both your octave shapes and the notes on your low E and A strings – you can try starting this exercise with notes on different strings.
Initially you may need to take a moment to work out which note you are starting on. However if you go through this process enough, you will quickly start to develop awareness of the other notes on other strings.
Putting it all together
Well there we have it – the 5 key steps you need to take to unlock your guitar fretboard. Although I have tried to really focus in on the essential information, there is still a lot to take in here.
So don’t try and tackle all of this at once. If this material is new to you, really break it down into small chunks. These are the steps I would recommend going through:
- Learn the notes of the musical alphabet, and get to grips with the role of sharps and flats
- Apply the chromatic scale to your guitar fretboard, and experiment with playing it on the low E and A strings
- Once you have done that, learn the notes on the low E and A strings. Start with the E string and take things slowly
- Once you have learnt the notes on the low E string, repeat the same process with the notes on the A string
- When you are at the point where you know the notes on the low E and A strings, start learning some of the initial connections that link the notes on these two strings
- Finally and once you feel comfortable moving through those shapes, you can turn your attention to your octave shapes. Learn them following the diagrams above and then go through the practice exercises outlined above
The key to success here is to break down this challenge into small and manageable chunks.
This material is not easy, and if you try and rush through it or take on too much at once, you are likely to get overwhelmed. Instead, focus on working through this slowly but consistently.
If you do this, you will be amazed at how quickly you can navigate proficiently around your guitar fretboard. At this point your guitar playing will go up to a whole new level.
Good luck! Let me know how you get on, and if you have any questions on the subject please do get in touch.
Drop a note in the comments section below, or send me an email on aidan@happybluesman.com. I’d love to help!
Images
References
Hello Music Theory, People, Guitar Theory For Dummies, Spinditty, Wikipedia, Masterclass


Responses
This study is AMAZING! I’ve been playing guitar for years without knowing many of the things you cover in this tutorial. I will adopt this in my practice starting today.
Thank You so much.
Ed
Thank you so much for taking the time to write such a kind comment Ed, it really means a lot. I am very glad to hear that you found it helpful, and please do let me know if I can help further in any way – you can reach me whenever on aidan@happybluesman.com 😁