If your slow blues rhythm playing sounds a bit lifeless, it might not have anything to do with your chord voicings.
In fact it could be totally related to what you’re doing (or not doing!) between the beats.
When they first start working with dominant 7th chords, most guitarists strum across all six strings and let them ring.
In isolation this can sound fine, but at 60 beats per minute in 12/8, there’s a lot of space in each bar — and if you’re just strumming full chords and holding them down, things can start to drag very quickly.
It’s also not a great option if you’re jamming with other musicians. With all six strings ringing out, you are likely to clash with anyone else playing chords and create a slightly muddy rhythm part in which all of the different instruments run into one another.
The good news is that you don’t need to add licks or complex movements to make your rhythm playing more engaging.
Three techniques will immediately lift the quality of your slow blues rhythm playing, and we’re going to cover all of them here.
Opening thoughts
In the video above I’m jamming over “Texas Flood” in standard tuning. This turns it into a pretty standard 12 bar blues, which runs as follows:
I IV I I
IV IV I I
V IV I/IV I/V
In each instance you see a “/” it indicates that multiple chords appear in a single bar. So in both bars eleven and twelve, you play two chords, rather than simply holding onto one chord as you would in a regular 12 bar progression.
So the main 12 bar includes a quick change, and the turnaround breaks into more rapid chord movements rather than the simpler V → IV → I → V pattern you’d typically encounter.
In the actual track there isn’t a lot of rhythm guitar. Stevie Ray Vaughan doesn’t play any chords and mostly just throws licks over a bass line that outlines all of the harmony.
However it is because of this that it works so well as a template for slow blues playing. You have the drums and bass on the track bringing the groove, and you can work on your rhythm playing over the top.
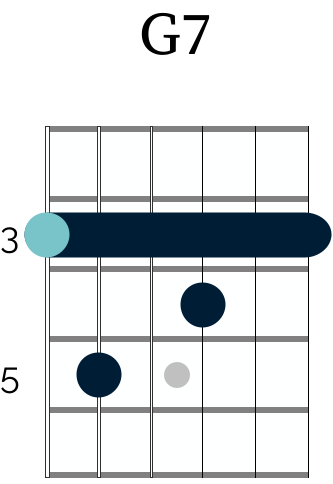
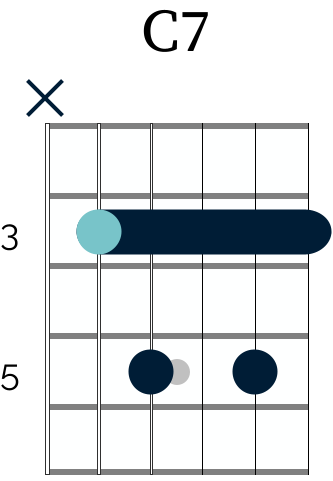
The chord voicings that I use throughout the lesson are as follows:
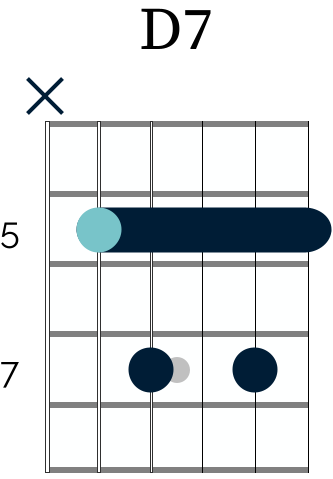
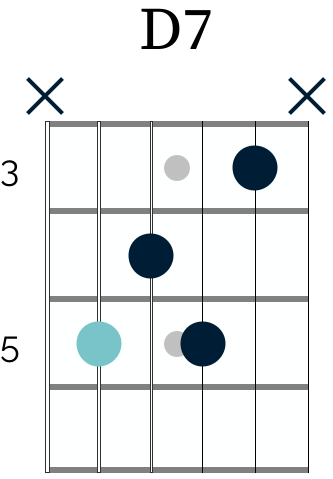
However you can (and should) mix things up, and also think about playing the C7 and D7 using these voicings:

Now with those points covered, let’s look at three different ways we can bring these chords to life!
Step I: Splitting the chord
The most common approach when players first start working with dominant 7th shapes is to strum across all six strings and let the chord ring.
In isolation this can sound fine, but in a band context it can create a “wall of sound” where everything starts to clash and muddy together.
Splitting the chord is a great way to get around this.
Rather than playing all of the strings at once and holding everything down, you target different parts of the chord across different beats.
One of my favourite ways of doing this is hitting the bass strings on beat one and adding a stab on the top strings on beat two, like this:
Beat one → bass strings
Beat two → top strings stab
And you can repeat the exact same thing on beats three and four, providing you with a framework for playing across each bar.
That textural split between the bass and treble strings creates movement and interest without you having to play any additional notes. It immediately brings your rhythm playing to life compared to just playing full strums of the chords.
You can push this further by isolating just the root note on the beat rather than the full bass strings, and then adding the stab on top.
The song “Strange Brew” by Cream is a great example of this, as the whole rhythm part is built around Clapton hitting the root of each chord, before playing a stab and then adding a little riff into the mix.
As you gain confidence with this, you can even use the Hendrix/SRV thumb-over technique to fret the root note while your other fingers play a chord fragment above it. If this technique is new to you, then you can find out more in this lesson here.
This frees your fretting hand to move around and create embellished rhythm parts that mix chords and lead.
If that feels like a stretch for you right now, just start with the bass note and stab approach. It will build your precision and set you up well for more complex rhythm ideas in the future.
Step II: Muting & control
In the same way that repeatedly strumming all six strings of a chord can create a muddy and cluttered sound, letting chords ring out for too long has the same effect. Each chord runs into the next, and the rhythm part can lose definition.
We’ve already been muting throughout the first step to keep those chord stabs tight. Now though, we can start to be more intentional in our approach.
After each stab on the treble strings, bring your picking hand down to stop the chord from ringing out. This stops the chord from ringing out for too long, and creates a sense of groove, even at a slow tempo.
This is even more important if you’re playing alongside a lot of other musicians. It allows you to find your place in the mix and add something meaningful, rather than just clashing with another guitarist or a keyboard player.
Step III: Dynamics
Once the chord splitting and muting are in place, dynamics can take things to the next level.
When you’re focusing on your chord shapes and playing in time, it can be easy to end up playing everything at the same volume.
However, this can make your rhythm playing sound mechanical in the same way that playing every note of a solo at the same volume makes lead playing sound lifeless.
There are two main approaches worth experimenting with here:
The first is to play the root note or bass strings more loudly, and then the stab on the treble strings slightly quieter. This places the emphasis on the downbeat and works well in riff-based blues songs.
The second is the reverse: the bass end of the chord sits back a little in the mix, and the stab comes through with more emphasis.
That contrast gives the rhythm part a lift and creates a push-pull feel that works really well in a slow 12/8 context like “Texas Flood”.
Beyond that, I would recommend varying your overall dynamic level across the 12 bars.
Play some parts a little louder, and others quieter. Don’t lock into one volume setting and hold it — let your playing breathe and respond to what the music is doing around you.
Step IV – Vary the rhythmic placement
One final bonus idea worth noting is that alongside the dynamics, you can also vary the rhythmic placement of the chord splits.
This idea connects directly back to the chord splitting we covered in Step I, and it’s something I touch on later in the video after demonstrating the full approach over the track.
As well as varying which strings you hit and how hard you hit them, you can also vary the rhythmic placement of the splits themselves.
In step I we looked at quite a symmetrical framework in which either the root note of the chord or a chort stab is being played on beats 1, 2, 3 and 4.
However you can also delay the bass note so it falls just before the next beat rather than on it. So instead of playing the bass note on “3” you can play it on the “a” before 3, for example.
This creates a slight push that adds forward momentum to your playing and stops the rhythm part from feeling predictable.
It’s a small shift, but it creates more movement — and it builds your ability to place rhythmic ideas intentionally, rather than just falling into a fixed pattern.
Putting it all together
Each of these ideas is relatively simple in principle, but they take time to actually integrate into your playing.
They’re also concepts you’ll use constantly across a wide range of blues contexts and not just in a slow blues like “Texas Flood”.
So be patient as you practice these ideas. Focus on one technique at a time before combining them, and pay attention to how each one changes the feel of the rhythm part.
Let me know how you get on in the comments, and have fun putting all of this together.
See you next time!


Responses