One of the best ways to add spice and variety to your blues guitar solos is to look closely at the techniques that you are using in your playing.
The blues is all about nuance and feel. It is not about how many different scales or notes you can play. In fact, the majority of famous blues guitar solos are constructed using nothing more than the minor pentatonic, major pentatonic and blues scales.
As such, if you want to construct emotional and interesting guitar solos, you need to focus on your technique.
I appreciate that this is so obvious it is hardly worth stating. Technique is a crucial part of learning to play the guitar. And this is not just in the blues, but across all genres. So if you want to improve as a guitar player, you have to work consistently on your technique and make it a key part of your practice routine.
If you want to improve as a blues guitar player however, I think it is worth taking this one step further. In my belief you have to look at lead guitar techniques at a granular level if you want to execute them effectively in your playing.
This is partly because the techniques most used in the blues – like vibrato and bending – are highly nuanced and deceptively challenging. However it is also because these techniques have the potential to totally transform your playing. So they are worth the effort and frustration!
Even if you feel that you have a solid grasp of these techniques though, I still think it is worth looking at and assessing the techniques you use most frequently in your guitar solos. It is easy to become reliant on a handful of techniques. And if you are not careful, this can make your solos sound boring and repetitive.
It is this second point that I will be focusing on today. Here I will be looking at 5 techniques that you can use in your guitar solos to make them more interesting and varied.

If you are just getting started on lead blues guitar, then these techniques are likely to be new to you. In which case you can implement them in your playing straight away. This will add greater depth to your solos and allow you to get more mileage from all of your licks and phrases.
Conversely, if you have been improvising and playing the blues for some time, I suspect that you will be familiar with these techniques. However that doesn’t mean that you are necessarily using them with any frequency.
Challenge yourself to implement these techniques in novel ways. Mix them into your playing and you will soon break out of the creative rut in which you might be stuck.
So with that in mind, let’s get into it! Here are 5 techniques that you can use to spice up your blues guitar solos:
Technique I – targeting the tonic note
Regardless of the key in which you are playing, targeting the tonic note works well as a way of resolving your licks and phrases. The tonic note acts like a tonal ‘home base’.
There is no tension when you play this note. It creates a moment of perfect consonance and sounds totally resolved. For this reason, it is a great note to target as a way of finishing your phrases.
As noted in the video, there are 3 different tonic notes in the first position of the minor pentatonic scale. Highlighted in light blue on the diagram below In the key of A, these are as follows:
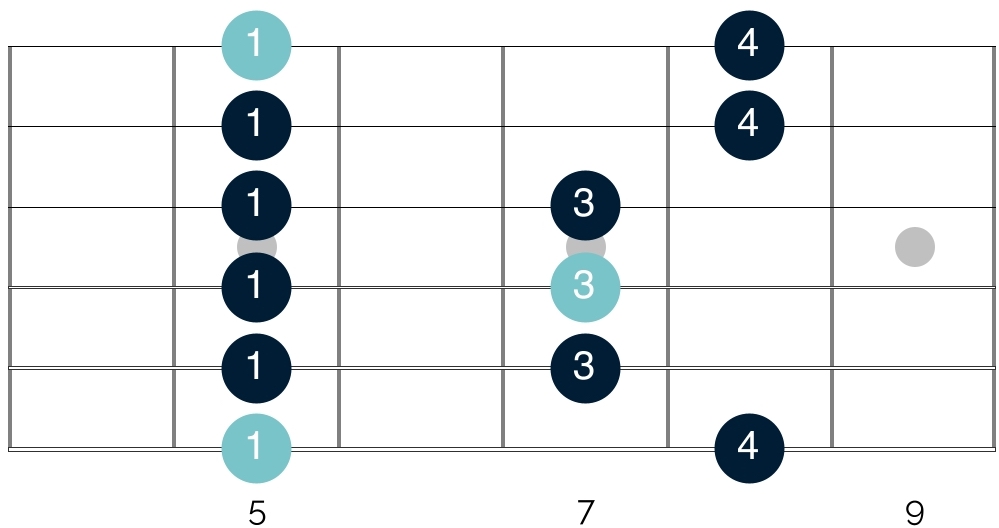
To mix things up when you are improvising, try to focus on the tonic note on the high E string. And if you want to take things one step further and tip your hat off to B.B. King, then target the same note one octave (12 frets) higher. In the key of A, this note is found at the 17th fret.
This is an idea that you can apply all over your fretboard in a range of different keys. In the key of D for example, the tonic notes in the first shape of the minor pentatonic scale are as follows:
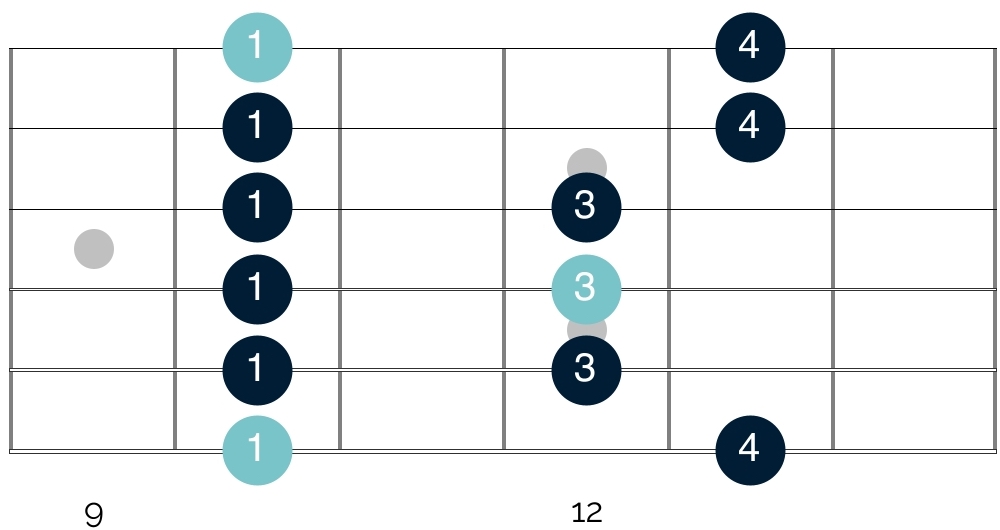
Hopefully you can see that the position of the tonic notes within the minor pentatonic shape are the same, regardless of the key in which you are playing.
The only difference is where that shape appears on your fretboard. As such, once you feel comfortable with the idea of targeting the tonic on your high E string, you can easily implement this in all of your improvisations.
Technique II – pre-bending
This is one of my favourite ways to bend. I think it is a greatly under-utilised technique amongst blues guitar players. Yet it is one that will both improve the quality of your improvisations, and also develop your musical ear.
Pre-bending is quite a challenging technique, as it requires you to have an appreciation of pitch. You need to be aware of the pitch of the note that you are targeting.
Not only this, but you need to be able to target this note straight away. You can’t bend up to it from a lower pitch and use the sound of the bend to guide you to the target note. You have to hit that note straight away.
The mechanics of this also change with your left hand, depending on the note you are bending and where it appears on your fretboard. For example, pre-bending at the 7th fret on the G string will require a different amount of force with your fretting hand, compared with pre-bending at the 13th fret of the B string.
This makes pre-bending a challenge at first. However it is worth the effort. Stick with it and experiment with the technique all over your fretboard. And before long you will be able to use these bends interchangeably with regular bends.
As a final point, in the video I mistakenly used Eric Clapton’s solo in ‘While My Guitar Gently Weeps‘ as an example that features a lot of pre-bends. However having recently relearned the solo (for some future Happy Bluesman content!) I discovered that in fact it does not contain any pre-bends.
The very expressive sound of the solo is a result of Clapton’s brilliant technique, as well as how he picks the bends. Funnily enough though, pre-bends are a technique that George Harrison uses a lot in his playing.
Harrison’s solo in The Beatles song ‘Something‘ provides just one example of how he uses the technique. A number of additional examples of blues and rock guitar solos that feature pre-bends are as follows:
As you can see from the above list, Slash utilises pre-bends in a lot of his slower and more melodic solos. And hopefully you can hear how they make these particular solos sound more expressive and emotional.
Technique III – grace notes
Effective blues guitar is all about expression. It is about trying to convey emotion and feeling through your playing. At a macro level, the way to do this is to break out of the rigid structure of the fretboard.
If you just play notes at different frets without manipulating them in any way, you will struggle to solo in an expressive and bluesy style.
This is because the most expressive blues guitar solos are those that mimic the human voice. And the human voice does not move in fixed tones and steps like the frets on your guitar. It undulates and moves across a broad range of micro tones.
This is why techniques like bending, sliding and vibrato are so widely used in the blues. They target all of the micro tones that exist between the frets on your guitar. And this makes your playing sound more expressive.
Grace notes function in much the same way. They break up the clear transition between the frets on your guitar. And this can transform simple phrases and make them sound much more interesting.
As noted in the video, modern blues guitarist Chris Buck uses grace notes to brilliant effect in his playing. You can hear this in songs like ‘Tell Me How It Feels‘ by Cardinal Black and ‘Slow Train‘ by Buck & Evans.
These are just two examples. Grace notes are a signature part of Buck’s sound. And he uses them in almost all of his solos. This gives his playing a very smooth and legato feel, which sounds amazing.
If you want to study grace notes and Buck’s technique in more detail, then in this video here, guitarist Ross Campbell examines grace notes and how Buck uses them in much greater depth.
Either way, I would recommend experimenting with them in your blues guitar solos. Not only will they give your playing a smoother feel, they will also enhance the sound of some of your simpler phrases.
Technique IV – multiple pitch bends
In my opinion, there are 3 distinct advantages of adding multiple pitch bends to your solos.
Firstly, they will instantly make your playing more expressive. As noted above, when you bend your strings, you target all of the micro tones that exist between frets. Adding multiple pitch bends to your playing will target more of these micro tones, and give your improvisations a real vocal quality.
Additionally, they will do a lot to increase your repertoire. You will be able to get more mileage out of all of your phrases. And this will bring life back to some of your ‘go-to’ phrases which might be starting to sound a little repetitive and stale.
Lastly and significantly, they will help you to create an Albert King vibe in your solos.
Albert King is the master of multiple pitch bends. He uses them a lot in his playing and combines them with big multi-tone pitch bends. And in doing so, he is able to get huge amounts of mileage out of a small handful of notes.
You can see this by looking at the ‘Albert King Box’ that I play in the video. Here are the notes of the box:
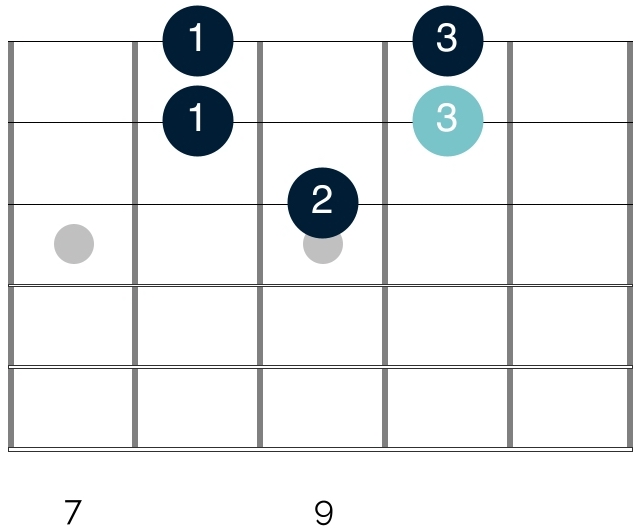
This box shape is nothing more than the top 5 notes of the second position of the minor pentatonic scale (with the tonic note of A shown in light blue). And yet by targeting these notes with multiple pitch bends and big two tone bends, Albert King extracts a huge amount out of these notes.
King uses this box shape and multi-pitch and multi-tone bends in almost all of his songs. They are his signature techniques and they define his playing style. Just some of the many examples of songs in which he combines these ideas can be found in the following songs:
Unlike in the video – where I play multiple bends following a single pick of the string – King often picks each bend individually. However he does this in quick succession and stacks them on top of each other. This creates a very cool and bluesy sound, and is a great way of building intensity throughout your solos.
Heavily inspired by Albert King, Stevie Ray Vaughan went on to adopt the same technique in many of his guitar solos. The lead guitar playing in the songs ‘Change It‘ and ‘Texas Flood‘ provide just two notable examples.
If you are looking for a slightly more laid back or smoother sound though, I would recommend listening to David Gilmour’s solo in ‘Another Brick In The Wall Pt. 2‘.
Gilmour executes a series of multiple pitch bends throughout the solo. However in most instances he does so with a single strike of the string. This creates a very melodic and smooth sound, and is a great technique to add to your blues guitar solos.
Technique V – rakes
All of the techniques covered up to this point could be considered ‘classic’ blues guitar techniques. For although some of them are not used that much, they all have a distinctly bluesy sound and feel.
I don’t think is strictly true of this last technique. Rakes sound more percussive in nature, and typically appear more frequently in rock music. In fact they have some similarities with techniques like sweep picking, which are commonly found in genres like heavy metal.
It is precisely because of this though that I think they can work so well in the blues. They are not a typical blues guitar technique. And you can use this to your advantage in one of two ways:
Firstly, you can use rakes to give a more percussive and aggressive edge to your solos. Rory Gallagher does this to great effect in his solo on the Taste song ‘What’s Going On‘. Stevie Ray Vaughan also uses it throughout the song ‘Tin Pan Alley‘ to add some bite to his playing as the intensity of the song increases.
Alternatively – you can use rakes as a more effective and interesting method of travelling between notes on different strings. This helps you to break up the sound of the scale shapes that you are moving across. And this prevents your solos from sounding like you are just playing up and down different scales.
Mark Knopfler uses a rake in this way in his opening solo in the song ‘Sultans Of Swing‘. David Gilmour does the same in his first solo in ‘Comfortably Numb‘, as well as in ‘Another Brick In The Wall Pt. 2‘.
As with all of the techniques outlined here, experiment with this idea in your blues guitar solos. See what suits your playing style and then work on incorporating it into your improvisations in the long term.
Incorporating these techniques in your guitar solos
Perhaps with the exception of the first technique outlined here, each of these techniques is complex and nuanced.
You could spend a lifetime of practice on pre-bends, grace notes and multiple pitch bends, and still have material to work on and discover. It is partly for this reason that guitarists like Albert King are so revered. They executed these techniques in masterful ways which few guitar players have done before or since.
As such, don’t feel you need to get to grips with and feel comfortable with all of these techniques straight away. In fact I would advocate taking each technique one by one and experimenting with them in your guitar solos individually.
See how you get on, and then decide whether each technique is one that you ultimately think sounds good and suits your style. If it does, then brilliant! Continue to work on and consolidate it, with that granular focus I discussed at the start of this article.
If not, then move on. Keep experimenting with and exploring the different ideas outlined here. Then just stick with those techniques that you enjoy playing and which enhance the sound of your guitar solos.
Regardless of which technique(s) you are working on though, keep thinking about how you can extract as much out of each one as possible.
To help with this, I would recommend practicing these techniques as part of the phrasing exercises outlined in this article here. This will ensure that you focus on each of them individually. And in turn this will help you to incorporate them in your playing more effectively.
As a final and significant point, it is worth noting that your playing will really step on when you combine these ideas together. This will add depth to your improvisations and allow you to get much more mileage from your ‘go-to’ phrases and licks.
So as soon as you start to feel comfortable with the techniques listed above, start working on playing them together in your solos. Do this slowly and with the same granular focus that you approached the individual techniques, and your playing will totally transform.
Good luck! Let me know how you get on, and if you have any questions at all that I can help with, please do send them over. You can post them below, or reach me on aidan@happybluesman.com. I am always around and happy to help 😁


Responses
Masterful job of analyzing why certain finger techniques creates emotional expression and add options within the basic parameters of pentatonic progressions. I found the pace perfect, and that is not common. I found the lessons to be spot on – really practical for playing with more and more refinement of emotional vocalization via the guitar. Bravo!
Thank you so much for taking time to write such a kind comment Allen, it made my day! I am so glad to hear that you found the lessons helpful, and I hope they give you some ideas to work through when practicing and improvising. If you do ever have any questions though, or if I can help with any element of your playing, please just let me know. You can reach me whenever on aidan@happybluesman.com and I am always around and happy to help 😁
Really outstanding tips illustrated in a wonderful way. Some of the best stuff I’ve watched in a while – and I watch a lot lol!
Wow Gery, this made my day! 😁 Thank you so much for taking the time to write such a kind comment, it really means a lot. I am very glad to hear that you found the videos helpful and please do let me know if you ever have any questions. You can reach me on aidan@happybluesman.com and I am always around and happy to help. Thanks again!
Thank you very much for this guide!!! Really good tips. My solos sound already better. However everytime i bend the string on top is sounding too… I’ve tried several ways but i still can’t get a clean sound. Is there any tips or other ways to do this?
And again ty sm for this amazing guide