When it comes to lead guitar techniques in the blues, there is none more important than bending. It is of fundamental importance to the genre. And it is essential if you want to be able to play in a soulful and expressive style.
Bending plays such an important role in the blues because it helps you to target all of the micro tones that exist between the frets on your guitar. This allows you to break out of the rigid structure of your fretboard. And it is this which gives your playing a more expressive feeling, as it helps you to mimic the human voice.
The human voice does not move in fixed tones and steps like the frets on your guitar. It undulates and moves across a broad range of micro tones. And bending helps you to move across this same broad range of tones.
Bending also offers a huge amount of potential in your playing. This is firstly because of the different parameters you can alter with each bend.
The pitch of your bend, the speed with which you bend, and whether you allow a bend to come down or not all alter the feel in your playing. And so even when you stick within the framework of a ‘standard’ bend, you can create a broad range of different sounds and feels.
The potential that bending offers only increases when you start to look at different types of bends. There are a wide variety of these that you can use in your playing. And each of them has the potential to change the feel of your solos and improvisations.
Within a blues guitar context, unison bends are amongst the most important of these. In today’s article then, we are going to look in depth at this technique. We are going to look at exactly what unison bending is, how it functions and how you can implement it in your playing. So with that in mind, let’s get into it!
An introduction to unison bends
As noted above, bending is so widely used by blues guitarists, as it helps them to create a vocal and expressive feel in their solos. And many of the different types of bends function in a similar way. Pre-bending for example is so effective because it creates an even more vocal and expressive sound in your playing.
Unison bends are at the other end of the bending spectrum. Unlike pre-bends – which have a vocal and expressive quality – unison bends produce a more intense and aggressive sound. It is for this reason that you hear them more commonly used in British blues and blues rock music. Just some examples of songs and solos that utilise unison bends are as follows:
- Highway Chile – Jimi Hendrix
- Crossroads (Live) – Cream
- The Stumble – John Mayall & The Bluesbreakers
- The Ocean – Led Zeppelin
- All Along The Watchtower – Jimi Hendrix
These are just some of the many examples out there. And if you also like rock music, then you will hear guitarists like Slash, Angus Young and others use unison bends a lot in their playing.
So before we dig into exactly what unison bends are and how they actually function, I would recommend listening to some of the songs in the list above.
And if you want to hear the sound of a unison bend very clearly, I would listen to Highway Chile by Hendrix. The riff that Hendrix plays at the beginning of the song is composed solely of unison bends. And this will help you to hear very clearly how the technique sounds.
Now though, let’s turn our attention to understanding what unison bends are and where on the fretboard we can play them. We will also look at how we can use these bends practically in our playing to add a different feeling to our improvisations
Understanding unison bends
As noted in the video above – a unison bend represents a way of essentially connecting the same note on two different strings.
And so at this stage it is worth looking at and understanding how notes connect across different strings. This might sound quite challenging. But actually there is only one piece of ‘theory’ you need to know to be able to understand how unison bends work. And it is as follows:
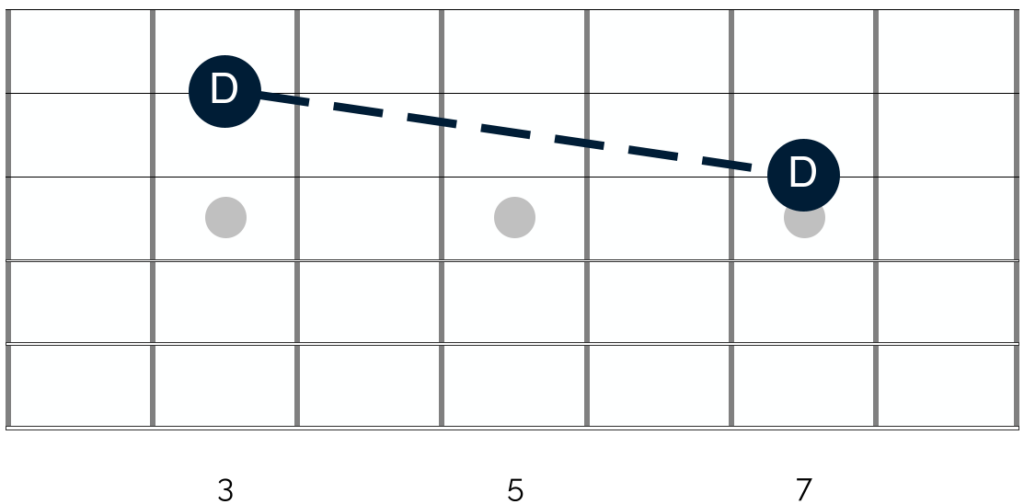
If you take any note on one of your strings, you will find the same note, at the same pitch, one string up and 5 frets back. This is as follows:

The only exception to this is the G string. As a result of your guitar’s tuning, the relationship to the B string is slightly different. And so here you will find the same note on the B string, 4 frets back, rather than 5. This is as follows:
This is important to understand, because whenever you play a unison bend, you are connecting notes like those shown above. Let’s look specifically at the bends that I illustrate in the video:
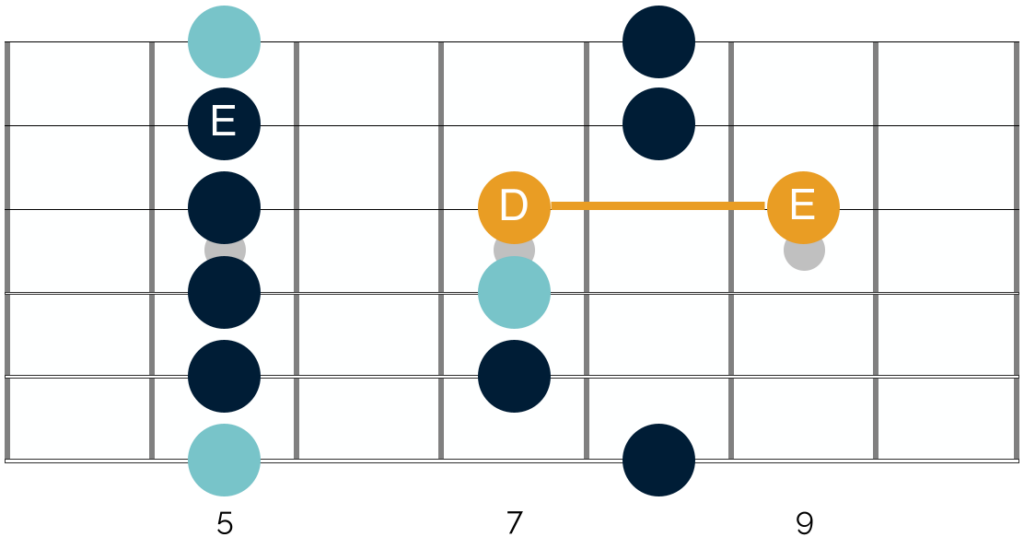
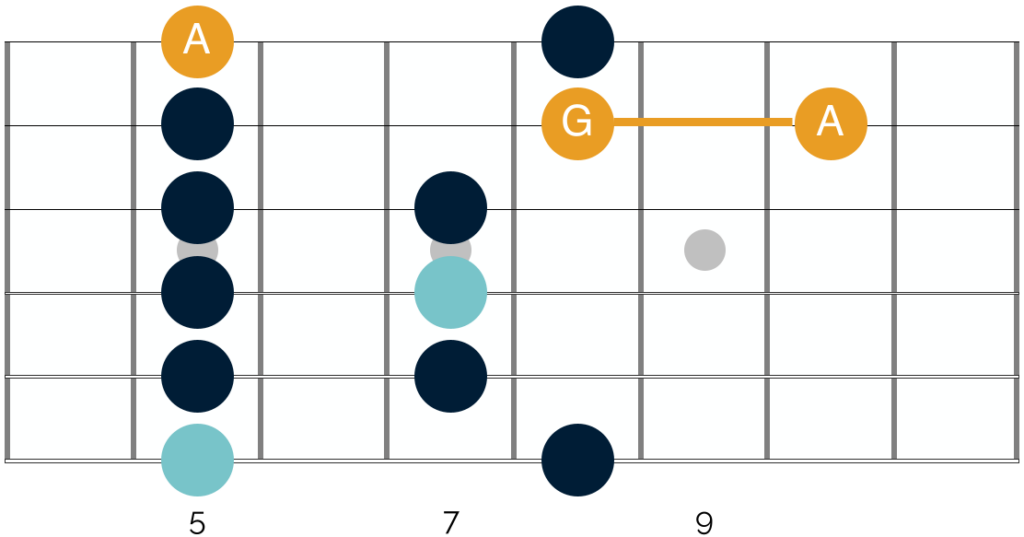
This diagram shows the first shape of the A minor pentatonic scale. The notes highlighted in light blue are the tonic notes of A. And the target note that we are bending is shown in yellow at the 7th fret on the G string. In the unison bend we are playing this note alongside the note of E on the B string.
When you start the unison bend, your listener will hear the notes of D and E together. After that they will then hear a certain tension, as you start to alter the pitch of the note of D.
Finally, when you reach the top of the bend, you will effectively be playing the same note on two different strings. This will produce a resolved and consonant sound, following the tension of the bend itself.

Executing unison bends – Pt. I
Understanding this relationship between notes on different strings allows you to execute this idea all over the fretboard. All you need to do is make sure that the note you are holding stable and the pitch that you are bending to are the same.
If you are bending any note on the G string, then the difference between your target note and the held note will be 4 frets, as follows:
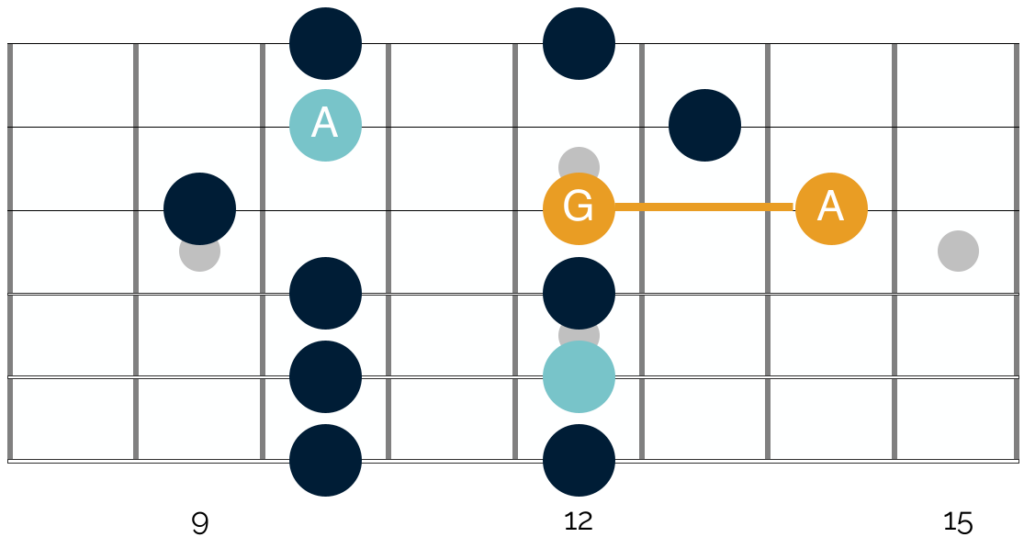
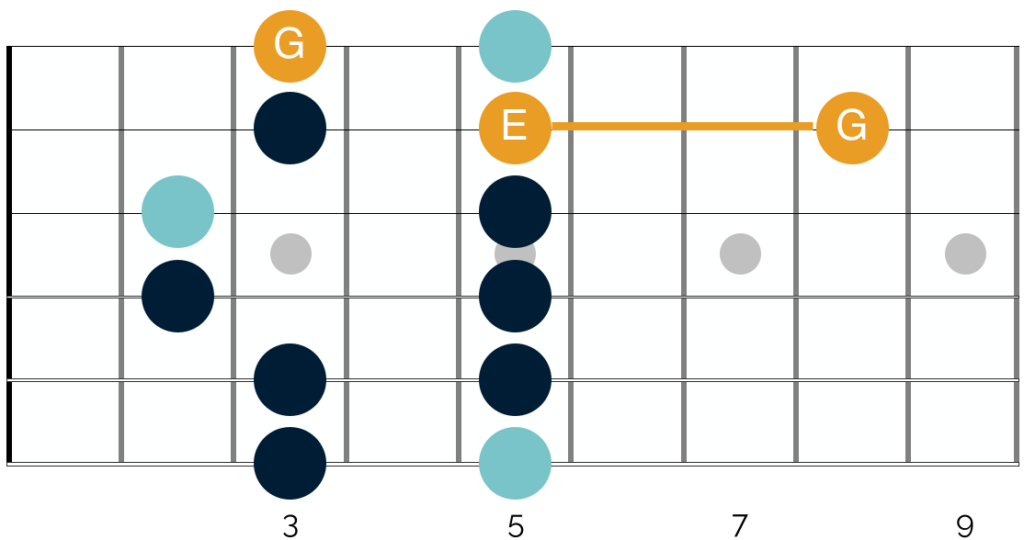
Here we have moved up to the third shape of the A minor pentatonic scale. The note we are bending in this example is the note of G. We are playing that alongside the note of A on the B string, and then pushing the bend up to the note of A.
As you can hopefully see though, the relationship between the notes on the G and B strings is the same as above. And so the bending approach also remains the same.
This approach has to change when you execute unison bends on strings other than your G string. This is because as noted above, there are 5 frets separating the notes on these other strings.
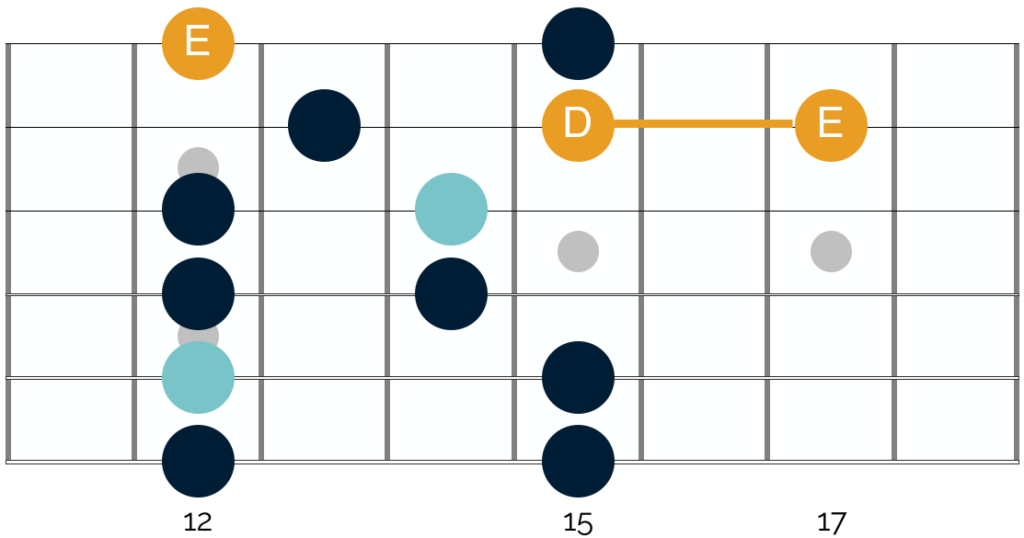
This means that if you want to execute unison bends across these strings, you have to look to connect notes that are separated by 5 frets, rather than 4. We can see this if we stick in shape 3 of the A minor pentatonic scale but move to the B and E strings:
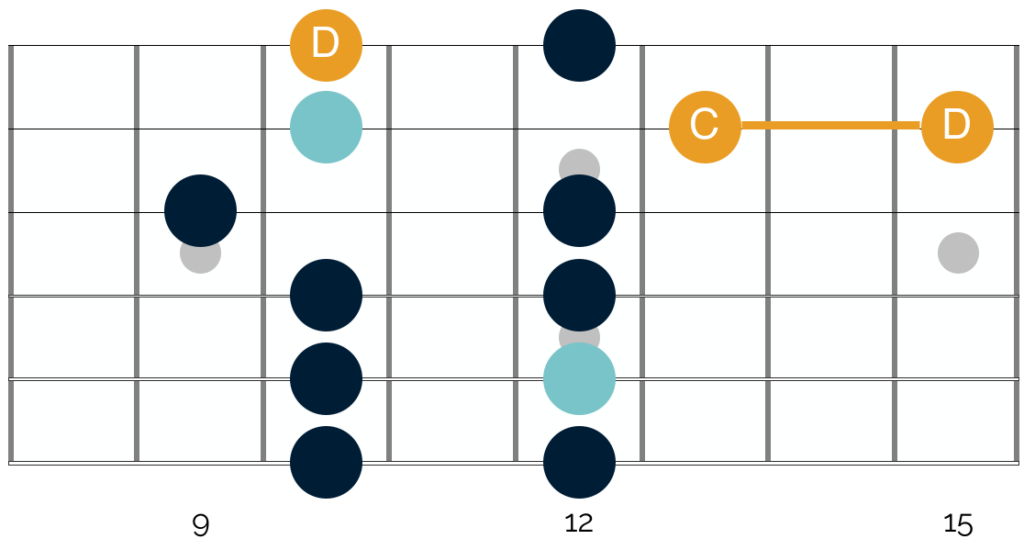
The premise of the bend remains the same. The note we are bending here is the note of C. We are playing that with the note of D on the E string, and then pushing the bend up to the note of D. However as you can hopefully see, unlike the previous examples these two notes of D are separated by 5 frets, rather than 4.
Executing unison bends – Pt. II
Now the good news, is that you don’t have to think about this in depth every time you execute a unison bend. This is because the structure of the minor pentatonic scale will ensure that you join the right notes together when bending. We can see this by returning to the first shape of the A minor pentatonic scale:
As in the previous example – when you execute this unison bend, there are 5 frets that separate the note of A on the B and E strings. However you don’t need to think too much about this when deciding which notes to join up in the unison bend.
All you need to do is take your target note and join that with the first available note on the next string up.
In the example above, the note of A at the 5th fret is the only viable option as part of your unison bend. If you were to play the 8th fret on the A string and bend that alongside the same fret on the B string, you would not be executing a unison bend.
You would in fact be executing a double stop bend. This is a different technique and creates an entirely different sound.
By just keeping this idea in mind, I hope you can appreciate how to execute these bends in various positions of the minor pentatonic scale. To help though, let’s look at this idea in another section of the fretboard:
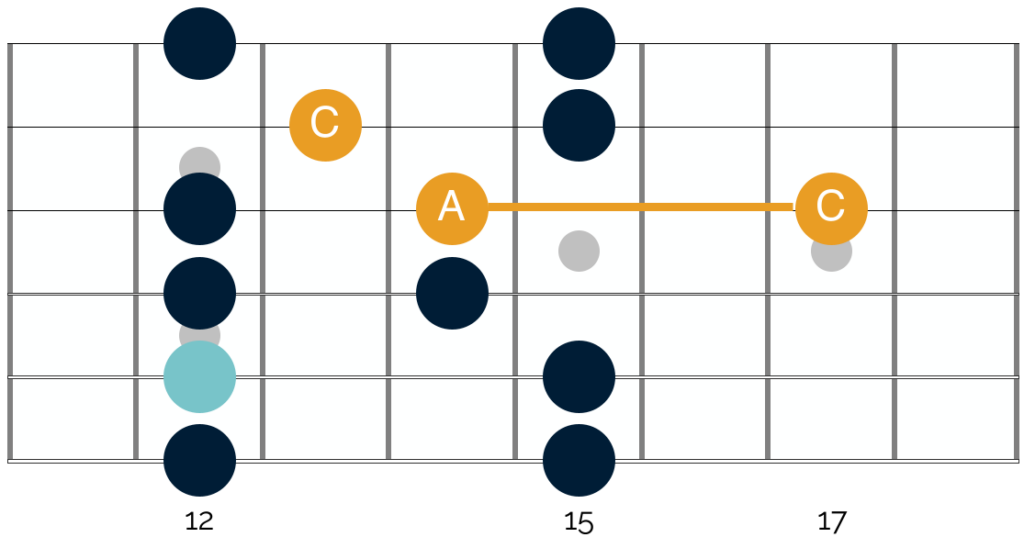
This shows shape 4 of the minor pentatonic scale. The note that we are targeting with our bend is the 15th fret of the B string. The first available note on the next string is the 12th fret on the E string. And so this is the note to add into your unison bend.
Exceptions to the rule
This rule will set you on the right path the majority of the time. However, as is always the case with the guitar, there are exceptions of which you need to be mindful.
If we take the example above, we can see that simply targeting a note and combining it with the next available note, one string up, will not always work. Let’s look at this on the fretboard:
Targeting a unison bend between the notes on the G and B string here is a challenge. The two notes are close together, and so force you to use certain fingerings (most likely your first finger on the B string and your middle finger on the G string).
This isn’t problematic in itself. However when you consider that you need to bend up a tone and a half on the G string to reach your intended pitch, things become a bit more complicated. The fingering is awkward and it is challenging to execute cleanly.
There are further similar examples. And again the limitation here is practical. Let’s look at this in a different shape of the A minor pentatonic scale:
Combining these two notes is challenging. As above, you need to bend the note on the B string up a tone and a half to execute this bend precisely. And this is very difficult to do, given the amount of tension across this part of the fretboard.
Taking a practical approach
At this point, you might understandably be feeling a little overwhelmed. The good news though is that you don’t need to scrutinise your unison bends in as much detail as I have done here.
The information provided above aims to give you the fullest picture possible. This will help you to understand how unison bends function, and give you a framework for using them in your playing.
When you are first starting out though, keep things nice and simple. Take the standard bends that you include in your playing, and try turning them into unison bends. The majority of them will sound great. And in this way you will be up and running with this new and interesting bending technique.
Conversely, some of your bends will not work so well. And in those instances I would recommend using the information above to understand why. This will help you to ‘diagnose’ your unison bends and make sure you are utilising them effectively.
Avoiding common mistakes
When going through this process, you might find areas on your fretboard where you think there are unison bends that should work, but for whatever reason, they don’t sound quite right.
If you have checked that the notes you are trying to combine fulfil the criteria highlighted above, then there is likely to be one of the following elements affecting the quality of your bends:
Pitch of the bent note
As discussed at length in this article here, failing to hit your target pitch will have an impact on the quality of your bends. This is more pronounced with unison bends.
When unison bending you have the target note being played simultaneously alongside the bent note. And so if you over or undercook the bent note, you will create a dissonant and harsh clash between the two notes being played.
Speed of the bend
As noted in the video, unison bends are so effective because they produce a tense and unresolved sound initially, which then resolves once you hit your target note. As also noted in the video, if you spend too long on the bend, it can produce an overly tense sound.
And so broadly speaking, you want to execute your unison bends at a slightly quicker pace. This will ensure that the tension is fleeting. And this will add a bluesy feel to your playing, rather than one which is dissonant or unpleasant.
Pitch of the held note
Lastly and significantly, it is worth scrutinising the finger that you aren’t bending. In my experience this is one of the elements that players really struggle with when they are getting started with unison bends. And this makes sense.
When you play a unison bend you need to execute two separate ideas with the fretting hand at the same time. Specifically, you need to bend with one finger, whilst keeping the other held on a note.
This second point is crucial. You need to keep the stable note as still as possible. If you don’t, you will kill the quality of their unison bends. This is simply because you will be offsetting the pitch of one of the notes.
So even if you bend up to the correct target pitch, the other note that you are playing is now at a different pitch. And this creates the unwanted dissonance and tension noted above. When this happens, the bend never resolves. It remains sounding tense throughout.
As such, when you are working on your unison bends, pay close attention to what is happening with the note that you aren’t bending. This will ensure that your bends achieve the resolution that is necessary to their proper function.
De-constructed unison bends
Once you feel comfortable executing unison bends in a variety of areas of your fretboard, you can ‘de-construct’ them. I illustrate what this looks like around the 3.30 minute mark of the video above.
Strictly speaking, these are not unison bends. Yet they function in much the same way. And they also produce the same aggressive sound.
The key difference here is that you don’t play both strings together. Instead you bend the target note, and then move to the higher string and play the stable note.
This creates a similar but subtly different sound. Your listener will hear a bend, the target note and then the target note again, this time played on a different string.
You can also reverse this idea. In other words you can play the stable note, then move down to the lower string to execute the bend. In this way, your listener will hear the target note, a bend moving up to the target note and then the target note again, this time played on a different string.
You can add further variety here by altering how many times you play each note. You can play each bend twice, and each stable note once. Or vice versa. As always, experiment and explore different ideas to find what works best for you.
Whichever approach you take, this works particularly well when you repeat the idea in quick succession and at speed. You can create a cascade of bends and notes, which gives your playing a very intense and aggressive sound. And you can use this to great effect in your solos.
To help here, I would recommend adding a bit of overdrive to your guitar tone. This will add more weight to the technique and increase its intensity. It will also serve the purpose of these bends, which is to add some bite to your improvisations. You can hear this technique used to great effect by Gary Moore in the solo in his song ‘Still Got The Blues‘.
Closing thoughts
Well there we have it. Everything you need to know to get started using unison bends in your playing. As noted throughout this article, unison bends create a particular sound in your solos.
This might not always be appropriate. And so once you feel comfortable with the mechanics of unison bending, be sure to pay attention to their application.
Whenever you learn a new technique, it is tempting to start using it a lot. Yet when it comes to unison bending, you have to tread carefully. Playing a lot of unison bends in a slow blues context is like adding intense spice to a normally mild dish.
The bends will be out of place and will not serve your purpose of crafting an interesting and impactful solo.
Conversely, if you are playing in a heavier blues rock context, unison bends make a great choice. They will add a different sound to your playing and will improve the quality and depth of your solos.
So in the same way in this article I recommended using your ear to assess the pitch of your bends, I would recommend using it here to establish when to use the different bends that are now in your tool kit.
This will move you into a position where you are improvising and playing in a more sophisticated way. And this will do a lot to improve the quality of your blues guitar solos.
Good luck and let me know how you get on in the comments below! 😁


Responses