Effective blues guitar is all about expression. It is about trying to convey emotion and feeling through your playing. At a macro level, the way to do this is to break out of the rigid structure of the fretboard.
If you just play notes at different frets without manipulating them in any way, you will struggle to solo in an expressive and bluesy style.
This is because the most expressive blues guitar solos are those which mimic the human voice. And the human voice does not move in fixed tones and steps like the frets on your guitar. It undulates and moves across a broad range of micro tones.
This is why bending is so widely used in the blues. It targets all of the micro tones that exist between the frets on your guitar. And this makes your playing sound more expressive.
It is also because bending offers so much potential. Not only are there a wide variety of different bends you can play, there are a number of parameters you can alter within these bends to change their sound and feel.
As such, if you want to develop as a lead blues guitarist, it is worth paying close attention to your bending. And the first step here is to properly understand and be able to execute the fundamentals of string bending.
This will do a lot to improve the quality of your blues guitar solos. It will also provide you with solid foundations on which you can build and execute more advanced bending techniques.
In this article then, we are going to look at two broad areas.
The first of these is pitch. We will look at bends that move across different pitches, and cover ways that you can make sure your bends are always in tune.
We will then look at bending within the minor pentatonic scale. This will help you to understand which notes you should target when bending to stay in key. Finally, we will look at some ways you can move outside of the minor pentatonic framework.
So with that in mind, let’s get into it! Here are the fundamentals of bending:
Establishing Pitch
In my experience, bending accuracy is one of the biggest obstacles that prevents blues guitarists from soloing effectively. Over the years I have worked with guitarists who play and improvise very well. And yet their solos really suffer because of their bending accuracy.
As noted in the video above, bending inaccurately makes your guitar playing sound like a singer who is singing out of tune. It sounds a little odd and diminishes the overall impact of your performance.
So adjusting this and making sure you are always bending accurately will do a huge amount to improve the quality of your lead guitar playing.
When it comes to bending accurately, there are two main challenges which guitarists face:
The first of these is practical. To bend with accuracy requires positioning your fretting hand and fingers in a certain way. Failing to do so can make it very difficult to generate enough force on your bends. And this will cause your bends to often fall flat.
This is a separate topic and one that is beyond the scope of this article. It is however one I address in a separate video lesson that is contained within the full ‘Ultimate Guide To Bending Part I‘ course from which these videos are taken. You can access this course in full in The Blues Club.
The second, significant challenge is actually understanding and appreciating that you are targeting a particular pitch every time you bend a string.
In my experience this is something that most guitarists – and even those who have been playing for a while – don’t often think about. Instead they just think about moving their strings when they bend.
Taking this approach is problematic, because it gives you hit and miss results. Sometimes you will hit your target note. Other times you will be off the mark. And without knowing which pitch you are aiming for at any given moment, you won’t really have a mechanism for judging whether your bends are ‘successful’ or not.
It is this challenge which we will be focusing on here. This will help you to understand what you are trying to achieve when you bend. And this will lay a solid and necessary foundation for implementing this technique in the future.
Targeting pitch
The first and significant point to take away from the video above, is that whenever you bend a note, you are targeting a certain pitch, You are not thinking about string movement. Instead you are trying to move a starting note up to a target note that is higher in pitch.
Part of what makes this challenging is that you need your ear to guide you to the target note. I cover this in the video above, and run through how to work through this challenge in more detail below.
The second and equally significant challenge is that you can target the same pitch in a variety of different ways. In other words, you can execute bends that move the same note across a variety of different pitches. This might sound complicated, but hopefully the explanation in the video above and the following breakdown will make things a little more clear.
Part of what makes bending so effective – but also very difficult to master – is that it is such a broad technique. Every time you bend a string, you break out of the structure out of your fretboard. You access all of the micro tones that exist between the frets, and there are a huge number of these.
As such, I think it is useful to focus on 5 different types of bend that you can execute, each of which represents a particular difference of pitch on your guitar. These are as follows;
Semitone bend
Each fret on your guitar represents a semitone or half step. When you bend up by a semitone on your guitar, you change the pitch by the equivalent of a single fret. For example, if you execute a semitone bend on the 7th fret on the G string, you will push that note up to the 8th fret.
Whole tone bend
A whole tone is made up of two semitones and is represented by 2 frets on your guitar. If you take that same note at the 7th fret on the G string, and you execute a whole tone bend, you will push that note up to the 9th fret.
Tone and a half bend
A tone and a half is represented by 3 frets on your guitar. Executing bends like this requires quite a lot of force and pressure with your fretting hand.
And depending on the gauge of your strings and the strength of your fretting hand, you might find it difficult to execute bends like this in the lower registers of your guitar. It is for this reason that in the video, I play these examples at the 15th fret on the B string.
If you execute a tone and a half bend on this note, you will push that note up to the 18th fret on the same string.
Two tone bend
As noted above, a whole tone is represented by 2 frets on your guitar. And so a two tone bend is represented by 4 frets. As is true of the tone and a half bends, two tone bends are difficult to execute.
You need to apply quite a lot of pressure with your fretting hand, and it is very challenging (if not impossible!) to play these bends in the lower registers of your guitar.
If we stick with our example at the 15th fret on the B string, then executing a two tone bend will push this note up to the equivalent pitch of the 19th fret on the same string.
Quarter tone bend
Last but by no means least, we have a quarter tone bend, or ‘blues curl’. As the name suggests and as I explain in greater detail in the video, this bend creates a distinctly bluesy sound and can work very well in your improvisations.
Unlike the examples above, there is no representation for this pitch on your guitar. Technically speaking, if you play a quarter tone bend, you are pushing the note that you are playing up by half a fret. So unlike the other bends noted above, you can’t test this out on your guitar.
In fact, what you are essentially aiming to do here is play a bend that is smaller than a semitone. You can normally achieve this by a very small movement with your fretting hand. And because of this, you can utilise quarter tone bends very effectively all over your fretboard.

Practicing pitch
As illustrated throughout the video, you can practice the pitch of your bends by testing them against the target note for which you are aiming.
Let’s say for example that you take the note at the 15th fret on your B string. You can test out all of the different bends noted above by checking them against the notes on your fretboard.
If you bend up a semitone, you can check whether you have hit your target pitch by playing the note at the 16th fret. You can do the same with full tone, tone and a half and two tone bends. And as noted above, you can assess the ‘success’ of your quarter tone bend by making sure it doesn’t travel as far as the semitone bend.
To fully get to grips with this idea, I would recommend practicing this idea out all over the neck of your guitar. You won’t be able to execute the big, two tone bends in the lower registers of your guitar. But beyond that you can apply this idea across your whole fretboard.
Start with areas that you target a lot in your playing. Look at the notes you normally bend, and assess whether you have been bending accurately.
If you are unsure, either get a friend or family member to help you out here, or film yourself. This will help you to judge your playing effectively, without having to worry about improvising at the same time.
Once you feel comfortable in the areas of the fretboard that are familiar to you, extend this idea out and try it all over the neck.
As noted in the video, the amount of pressure you need to apply on different strings and in different parts of the neck, varies. Testing this idea out across the fretboard will help you to appreciate these differences. And in turn this will help you to start implementing these ideas practically.
The next and significant step, is understanding which of these bends you should use at any given moment. There are two reasons for this, which are as follows:
Firstly, each bend creates a different feeling and vibe in your playing. And from a stylistic point of view, certain bends might be more or less effective, depending on the feeling you are trying to create in your solos.
More importantly though, each of these bends represents a shift in pitch. And depending on the note on which you start and the bend you choose, this could lead you to bend out of the key in which you are playing.
As an example, you could execute a perfect two tone bend and hit the pitch of the note 4 frets higher than your starting note. Yet if that higher note is not within the key in which you are playing, it could sound dissonant. In other words, you can’t execute bends indiscriminately.
You need to think about how these bends fit into the broader musical context in which you are playing.
I appreciate this sounds complicated. But don’t worry, we are going to dig into this in much more detail now.
Bending in the minor pentatonic scale
Once you feel comfortable executing the different pitches of bends discussed above, we can turn our attention to actually using these bends in your playing.
As noted previously, there are two main considerations we need to make here:
The first of these is stylistic. Each of the bends that we looked at above has a different sound and feel. And as such, certain bends will be more or less effective, depending on the feeling that you are trying to create in your solos.
The second and significant consideration, is the note that you hit when you bend. In the previous lesson we focused predominantly on the journey of the bend.
We looked at what happens when you take an initial note, and move that note across a variety of different pitches. Here though our focus is more on the destination of the bend.
After all, as you have likely experienced when improvising – you can’t just play notes indiscriminately in your solos.
You have to target notes consciously and choose the ‘right’ notes that fit within the key in which you are playing. This is a lengthy topic and one that becomes very broad as you start to become more advanced. As such, it is one that I will return to in future articles.
For now though, we will look at this idea in the context of the minor pentatonic scale. We are going to look at how you can bend to stay within the minor pentatonic scale. This will help you to understand how to utilise different bends in your playing, and which notes you should target with certain bends.
Before we dig into this in more detail, it is worth noting that the ideas outlined in this lesson apply to any scale(s) that you might be using in your playing.
I have focused on the minor pentatonic scale here because of its importance in the blues. But if you are regularly using other scales in your playing, you can apply this idea there too.
Now with that caveat out of the way, let’s get into it! Here is how you can bend within the framework of the minor pentatonic scale:
Thinking laterally
Your guitar functions in both a vertical and a lateral plane. This means that you can play scales from your 6th string to your 1st string and back again. Likewise, on any given string, you can play from the lower frets of your guitar to the upper frets and back again.
When it comes to scales, this simply means that you can play them up and down individual strings; you don’t have to always play them vertically, from the low E string to the high E string.
This is an idea that I cover in much more depth in the my article ‘How To Connect The 5 Pentatonic Shapes‘. So if this concept is new to you, I would recommending heading over there before continuing. However, as a brief recap, the notes in the A minor pentatonic scale are as follows:
A C D E G
We can see this if we look at the first position of the minor pentatonic scale in the key of A:
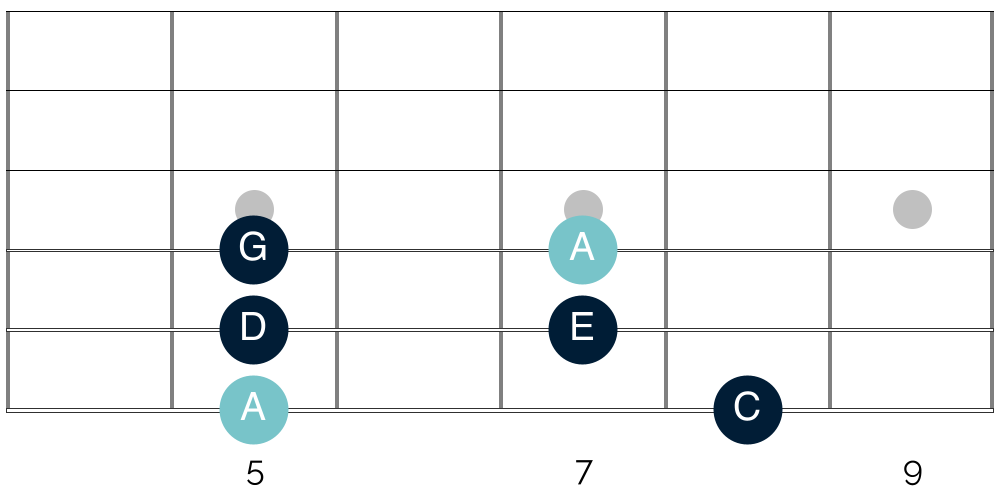
This diagram shows the notes that appear in a single octave of the minor pentatonic scale.
The notes shown in the diagram above are the only notes present in the A minor pentatonic scale. It doesn’t matter which shape of the scale you are playing or on which string – if you are playing the A minor pentatonic scale, you are playing one of the following notes:
A C D E G
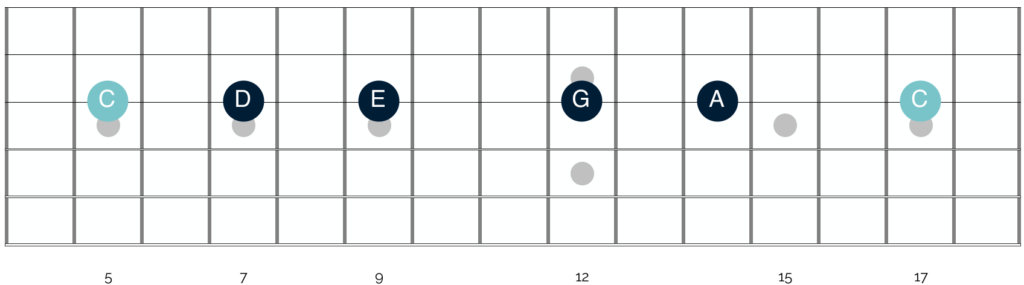
This becomes important to understand as soon as we start to look at the fretboard laterally. Let’s look at how the minor pentatonic scales fit together on the G, B and E strings:
G string
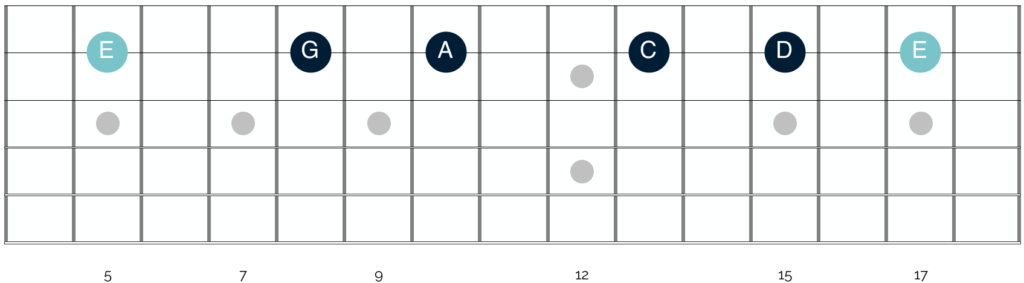
B string
E string
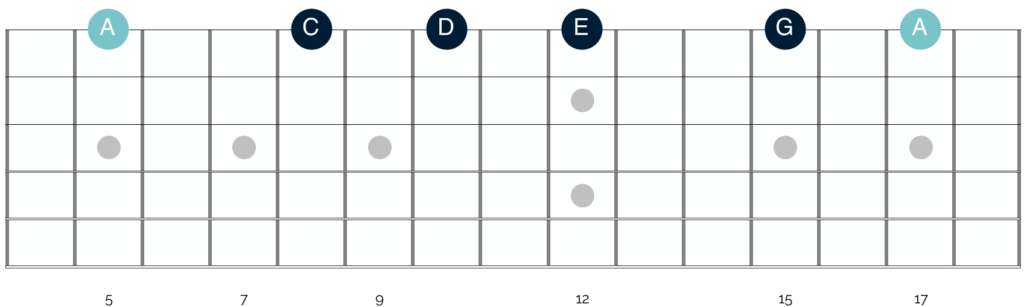
As you can hopefully see, all of the notes on these strings are from the A minor pentatonic scale. It doesn’t matter on which string or fret you find them, all of the notes on the above diagrams are the notes of either – A, C, D, E or G.
If we combine the scales shown above on the G, B and E strings together, we end up with the following notes on those strings:
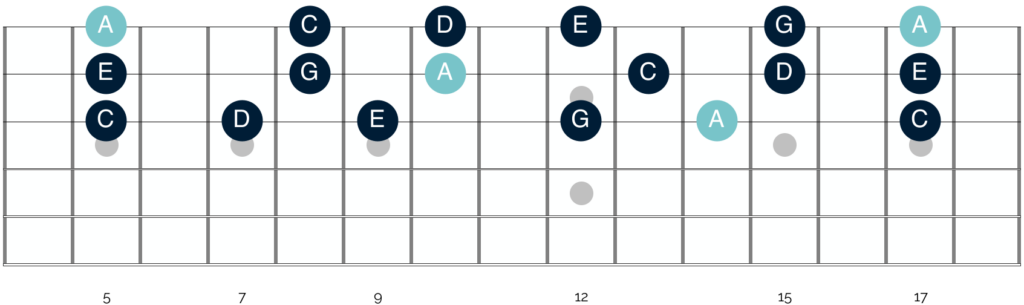
Diagrams laid out in this way often look a little overwhelming. However if you are familiar with the shapes of the minor pentatonic scale, hopefully you can appreciate that this diagram simply shows the notes of the A minor pentatonic scale on the top 3 strings of your guitar.
Now though you can see that these scales function both vertically and laterally.
In other words, you can take any note, and from there you have two options. You can either move off that note vertically and play notes on the adjacent strings, or you can move laterally and play those same notes on the same string.
With this understanding, let’s look at how we can use this information to inform the way we approach bending.
Bending in key
If you are improvising in the key of either A major or minor, playing the A minor pentatonic scale makes a great choice. You can play any of the 5 notes of the scale on any point of the fretboard and you will sound good. This is because you will be playing in key, and that will sound consonant.
When you add bending into the mix, it becomes easy to disrupt this consonance. Depending on the note on which you start and how far you bend, you can end up hitting notes outside of the key in which you are playing. Let’s look at an example of this on the fretboard:
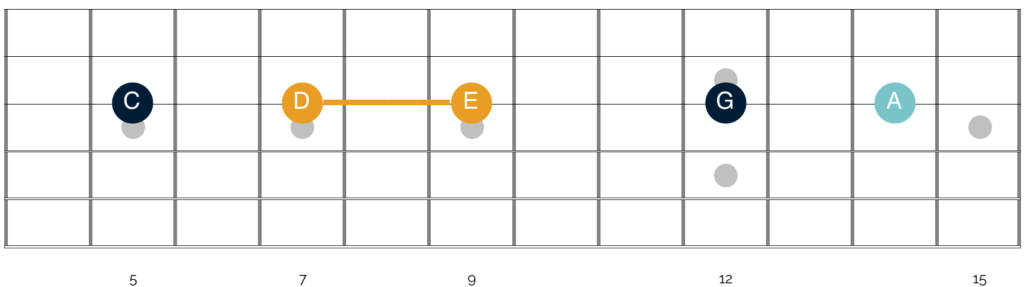
This shows the notes of the A minor pentatonic scale as they appear on the G string. Highlighted in yellow are two notes that you can join up effectively through bending.
If you play the note at the 7th fret (the note of D) and you execute a full tone bend, you will hit the note of E at the 9th fret. This note is also from the A minor pentatonic scale. And so executing this bend will sound very effective.
However, if you try to execute the same bend starting at the 9th fret on the G string, you won’t hit a note from the A minor pentatonic scale. Instead you will hit the note of F# found at the 11th fret. You can see this on the diagram below:
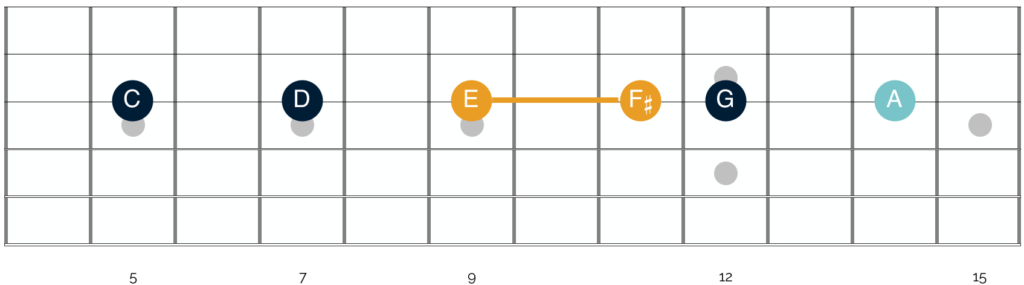
This note is not part of the A minor pentatonic scale. And so hitting the note at this fret will not sound consonant. In fact it is likely to sound a little tense and dissonant. And this is true, even if your bend is executed perfectly.
In other words, you can play a perfect bend that moves up exactly one tone. But if the note that you are targeting is outside of the key in which you are playing, you will still sound like a singer who is not quite in tune.
Taking a practical approach
I appreciate that this all sounds quite complicated. And you might understandably be feeling a little overwhelmed with all of the different elements you have to keep in mind.
This is especially because the example above is just one of many. The same potential for error exists across all of the different notes and strings on your fretboard. In other words, depending on the note that you start on and how far you bend it, you have the potential to end up sounding out of tune.
To begin with, I would recommend taking some time to practice this idea. Let’s return to the notes of the minor pentatonic scale that appear on the top 3 strings:
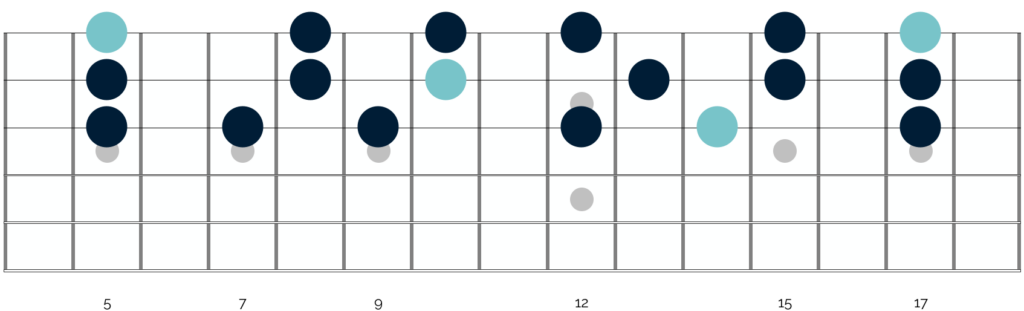
In this way, you can see the specific spaces that exist between the notes on each string. And you can use this to guide your bending choices. On the B string for example, there are 2 frets separating the notes at the 8th and 10th frets.
So if you execute a single tone bend here you will stay within the framework of the minor pentatonic scale. Between the 5th and 8th fret on the same string however, there are 3 frets difference. So if you want to bend that 5th fret and stay within the minor pentatonic framework, you have to bend it by a tone and a half.
As I illustrate in the video around the 4.30 mark, it is not always possible to execute these larger bends in certain parts of the fretboard. For example, I can’t bend from the 5th fret to the 8th fret on the E string. And depending on the gauge of your strings and the strength of your fretting hand you might find the same is true for you.
As such, I would recommend experimenting with bending the various different notes that are show in the diagram above. In each instance focus on bending up to the next note which appears on the same string. As note above, go through the process of.checking and testing your bend against the note that you are trying to reach.
You will then be able to quickly work out which notes work well to bend and how much force you need to execute on any given note to keep it within the minor pentatonic frame work.
Beyond the minor pentatonic scale
As discussed in the video and as you may have worked out from the diagrams above, the majority of the notes in the minor pentatonic scale are separated by either a tone or a tone and a half. Yet in the previous lesson we looked at 5 different kinds of bends.
And so at this stage you might understandably be wondering how you can utilise those 3 additional types of bends. Let’s look at this in a bit more detail:
Quarter tone bends
As noted in the last lesson, the change in pitch that occurs when you bend up by a quarter tone cannot be represented on the fretboard. And so when you execute a quarter tone bend, you move outside of the minor pentatonic framework, if only by a small amount.
Yet whilst this quarter tone shift in pitch might be very small, it creates a significant impact. effective. When you bend any note by a quarter tone, you immediately create quite a tense and dissonant sound. It adds a little tension and ‘spice’ to your playing, but in a pleasing and bluesy way.
There are two key points to keep in mind when executing these bends.
Firstly, you want them to be fleeting, If you hold a quarter tone bend for any length of time, it will shift from sounding tense and bluesy to dissonant and unpleasant. It is the equivalent of adding too much spice to a dish. It becomes overwhelming. So play these bends quickly and don’t hang around on them!
Secondly, you do not want to apply these bends to the tonic notes in the key in which you are playing. The examples in this article are all in the key of A. And so the tonic notes are the notes of A. They are shown on the diagrams above in light blue.
As I noted in much more detail in the first video in this article here, the tonic is the tonal centre of the piece of music that you are playing. If you are playing in the key of A, the note of A is the tonic. If you are playing in the key of B, the note of B is the tonic. And so on.
The tonic is the note around which everything is centred. When you play the tonic note, you are playing a note that is totally lacking in tension. It is perfectly resolved. When you play in any key, your ear draws you back to the tonic. And so when you reach the tonic note, you achieve a moment of musical resolution.
As such, offsetting that tonic note by a quarter tone sounds tense and unresolved. This is in a harsh and dissonant, rather than a bluesy and musical way.
Semitone bend
Semitone bends share many similarities with quarter tone bends. As you can see from the diagram above, there are no notes in the minor pentatonic scale that sit directly next to one another. As such, if you play a semitone bend, you immediately move outside of the minor pentatonic scale.
This introduces an element of chromaticism in your playing. And as with the quarter tone bends, this immediately adds spice and tension into your solos.
The same rules apply to semitone bends as noted above. Avoid using them on the tonic notes, and play them fleetingly. This will ensure that they add a bluesy tension to your playing and not a harsh dissonance.
Two tone bends
Of the various different types of bends discussed throughout this course, two tone bends are arguably the most challenging.
A big part of this challenge is practical. You need to direct a lot of force in the correct way to execute a two tone bend. And if you are fairly new to the world of string bending, this is likely to prove challenging.
It is however also difficult to know when to use these bends. This is partly because they are difficult to fit neatly into a musical context. You need a certain amount of musical space to execute these bends. And this isn’t always possible.
It is also because of the structure of the minor pentatonic scale. Let’s return to our fretboard diagram:
Across these 5 shapes, there are just two sections where you can find notes that are separated by 4 frets, or 2 tones.
The first of these sections is on the G string. You have a note at the 5th fret, and then 4 frets higher, on the 9th fret. However the tension across the neck here makes executing big bends very difficult, if not impossible.
The other section is that which is highlighted in yellow. And here, executing a two tone bend will sound great.
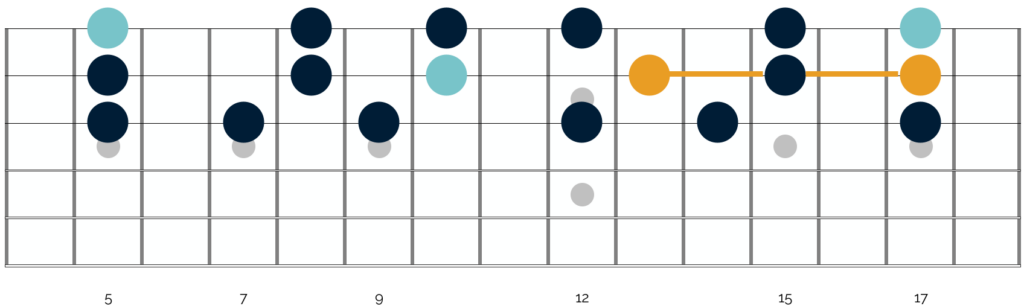
As such, your options within any given key are limited. In fact it is much more common to find notes that are separated by two and a half tones (5 frets). You can see this on both the G and E strings, between the notes at the 12th and 17th frets. The same relationship exists on the B and E strings, between the 10th and 15th frets.
If you have the strength, then you can also target these bigger bends. They will help you to stick in the minor pentatonic framework. But they will sound very different to single tone or tone and a half bends.
Putting it all together
As noted in the video, if you want to stick within the minor pentatonic framework, the bends you are most likely to use are those which shift in pitch by a tone or a tone and a half. These will help you to connect up different notes of the minor pentatonic scale, and to do so in a vocal and expressive way.
Beyond that, quarter tone and semitone bends are also likely to be a key part of your style. Just be cautious not to overuse them. If you do, you will potentially add too much spice and tension into your solos. Rather than create a bluesy feel, this could make your solos sound harsh and dissonant.
Lastly, two tone bends – or bends larger than that – will add a more aggressive and powerful feel to your playing. It is challenging to use these bends effectively. They are not easy to slot into solos or lick. Yet stick with them, as they really make an impact and stand out when you use them effectively.
If you are looking for inspiration, I would strongly recommend listening to the solos of David Gilmour and Albert King.
David Gilmour uses two tone bends in a more melodic way. You can hear this in the solos of songs like ‘Another Brick In The Wall, Pt.2‘ and ‘Shine On You Crazy Diamond, pts 1-5‘.
Albert King is often regarded as one of the all time masters of string bending. And you can hear him use big two tone bends on songs like, ‘Blues Power (Live)‘, ‘The Sky Is Crying‘ and ‘Oh Pretty Woman‘, amongst many others.
Closing thoughts
When you study a topic like this in such granular detail, there is always the risk of paralysis by analysis. You can get so focused on the different bends and how they fit (or don’t fit) within the framework of the minor pentatonic scale, that you end up not knowing where to start.
So if that is the case, break this down into manageable chunks. Look at the fretboard diagram shown above and take a small section on which to focus. This could either be the notes on a single string or the notes in one of the pentatonic box shapes.
Once you have decided on your area of focus, work on practicing your bends – first outside of a musical context and then over a backing track.
Try and join the notes of the minor pentatonic scale up using bends, and practice implementing some of the quarter and semitone bends which will take you outside of the pentatonic framework.
Use your ear to guide your efforts. Check your bends against the notes that you are targeting. And if you can, try to listen at a broader level to how different types of bends fit into your solo.
If you struggle to do this whilst playing, then I would recommend recording your playing. In this way, you can focus on bending and soloing. And after you have finished, you can then assess your playing.
This is not easy. You can’t look at a sheet of scale shapes or chords and tick them off as you memorise them; you have to be as objective as possible and assess your playing at regular intervals. But do this, and over time I promise you – the quality of your bending and guitar solos will totally transform.
Good luck! Let me know how you get on, and if I can help in any way, please do let me know. You can reach me on aidan@happybluesman.com and I am always around and happy to help! 😁


Responses
Nice presentation, but why did you omit the Guage of the strings? If you did, I didn’t see it and I apologize.
Thank you very much for the kind words Rell, and I hope that you found the article helpful 😁 I didn’t include anything on string gauge here as I wanted the focus to be more on playing than gear. However, if you would like some advice on string gauge then I would recommend heading over to this article here.
There I look at the topic of string gauge in much more detail. I discuss the impact that it has on playability, and specifically on bending and vibrato. I hope that helps, but if you do have any more questions, just send them to aidan@happybluesman.com and I am always around and happy to help! 👍
Thank you Aidan. I found this article very interesting and it cleared all the confusion I had about string bending. Thank you