One of the best ways to extract more mileage from your ‘go-to’ licks, is to recreate them in different parts of the fretboard. There are two significant benefits of this, which are as follows:
Firstly, you can play the same lick or phrase in two different sections of your guitar and they will sound very different. This allows you to extract more mileage from the same phrase. And in turn this helps you to solo and improvise for longer, without having to learn more material.
Secondly, targeting the same lick in the higher registers of your guitar can help you to build momentum and move your solo forwards. And again, you can do this without having to craft new licks or ideas.
The challenge in implementing this idea practically is in understanding how you can recreate the same ideas in different parts of the fretboard.
This is largely because the fretboard is so vast. An average guitar has 6 strings, and 21 or 22 frets per string, That gives you between 126 and 132 individual frets and notes for you to try and learn and use in a practical context.
That is already a lot of material. And so if you are also trying to memorise those notes alongside scale shapes, chords and song material, you are likely to struggle.
This is where octave shapes are extremely useful. As I will explain in much more detail throughout this lesson – octave shapes can help you to learn the notes on your guitar, without you having to spend time memorising each individual note.
This in turn will give you a deeper understanding of the logic of your fretboard. And you can use this to navigate across your guitar with fluidity and precision when soloing.
So with that in mind, let’s get into it!
What is an octave?
Before we dive into octave shapes in a bit more depth, I think it is first worth recapping what an octave is in theoretical terms. This is a topic that I cover in more detail in the article ‘An Introduction To Intervals For Guitar Players‘ as well as in The Blues Club course ‘An Introduction To Intervals‘.
So if you are looking to learn more about the theory behind octaves, please do head over to one of those resources before continuing here.
In technical terms, an octave describes the distance between two notes. These notes are the same, but they have a different pitch.
Specifically, one of the notes in an octave is double the frequency of the other. For example, if the first note has a frequency of 440Hz, the same note an octave higher will have a frequency of 880Hz. Likewise, the same note an octave lower will have a frequency of 220Hz.
I appreciate this sounds complicated. But it is much easier to understand when you put it into a real musical context. For example, when you play the open 6th string on your guitar, you are playing the note of E. The 7th fret on your A string is also the note of E. It is the same note, but the pitch is different. It is an octave higher.
This is what the relationship between these two notes sounds like:
The first bar of this audio is the note of E played on the open E string. The second bar is the same note, an octave higher. In the last bar, both notes are played together.
As I hope you can hear, the notes sound the same, but the second note sounds ‘higher’ in pitch. Understanding this point is important, as it underpins the fundamental idea of this lesson.
This is because we are not trying to navigate to just any other part of the fretboard here; we are trying to target the exact same notes but in a different pitch.
Initial fretboard connections
The way to do this, is to build connections that allow us to find the same notes in different areas of the fretboard.
The example above helps to illustrate one of these connections. As noted, the open E string is the note of E. And if you play the 7th fret on the A string, you are also playing the note of E, but an octave higher. This connection exists across all of the frets and strings of your guitar, as you can see on the following diagram:
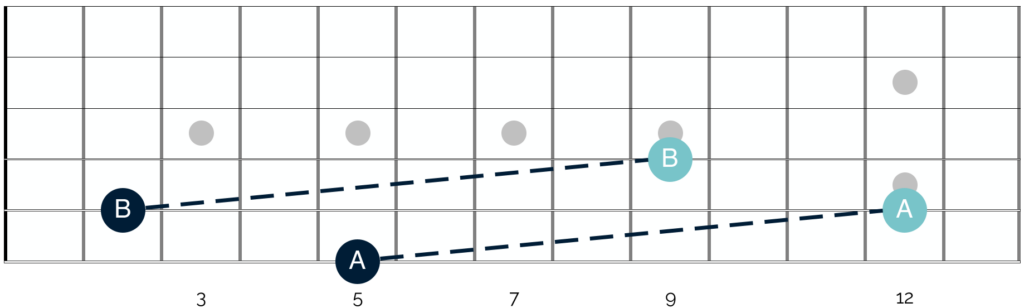
The only exception to this is between the G and B strings. As a result of your guitar’s tuning. the difference here is 8 frets, rather than 7 frets. In other words, you will find the same note on the B string 8 frets higher than on the G string, as follows:
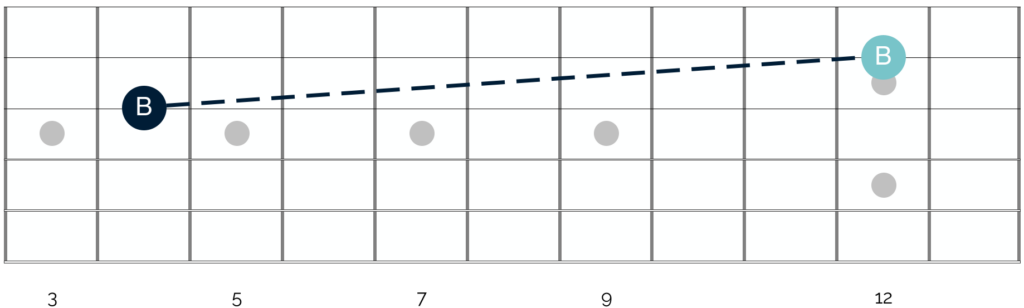
The second connection – which I have not yet mentioned but with which I believe you will be familiar is as follows:
If you take a note on any string, you will find the same note an octave higher, 12 frets higher. You can see this on the following diagram:
Both of these connections are useful, as they help you to start building patterns across the fretboard. However, when soloing and improvising their use is somewhat limited.
As you might imagine, playing an idea and then jumping up 12 frets to replicate the idea has the potential to create quite a disjointed feel in your solo. And this is where octave shapes prove useful.
Octave shapes
Octave shapes help you to build practical connections across your guitar. So instead of having to make big jumps across your fretboard, you can move in a more economical way when soloing.
There are a number of different octave shapes to learn, all of which connect notes that are a single octave apart. And in my experience the easiest way to learn these is to group your strings together into pairs.
Let’s look at this in a bit more detail:
Octave shapes built on the E and A string
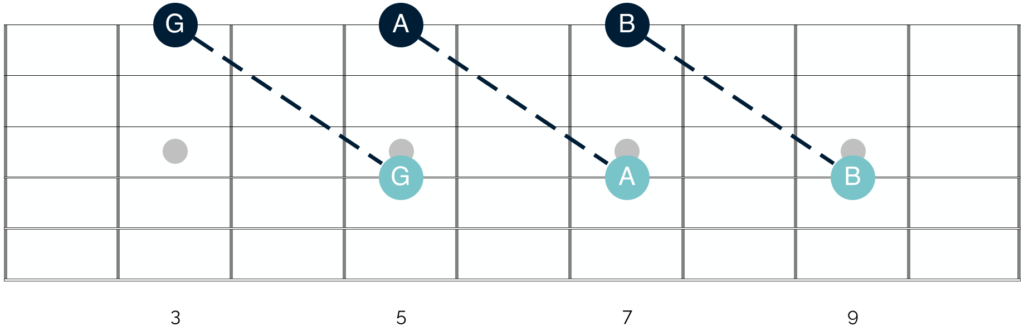
The first octave shape to learn is built from notes on your low E and A strings. If you take a note on one of these strings and move 2 strings up and 2 frets up, you will find the same note, 1 octave higher. This is what this octave shape looks like:
You can apply this shape to any note on your low E and A strings. And when you do, you will find the same note an octave higher on either the D or G string.
Octave shapes built on the D And G strings
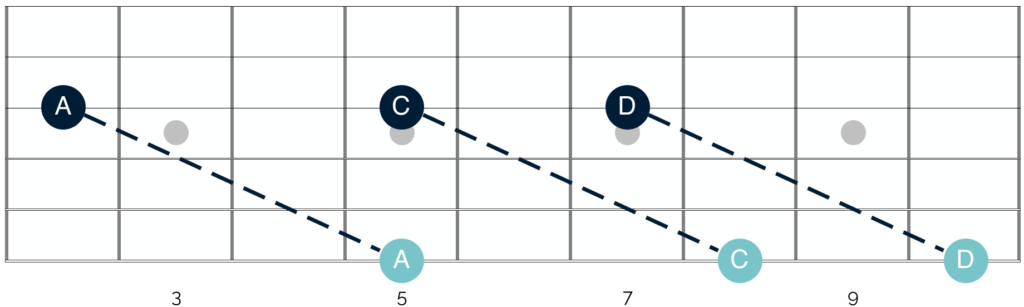
The next octave shape to learn is built from notes on the D and G strings. It is as follows:
Here there is a slightly bigger stretch, as you have to move up 2 strings and 3 frets. Despite the stretch, it is crucial to learn this octave shape.
This is because it allows you to connect the notes on your low E and A strings with the same note in a totally different part of your guitar fretboard. And in this way can you connect notes that are 2 octaves apart.
Octave shapes built on the B and E strings
The final octave shape is built from notes on your B and E Strings. It is as follows:
Again, there is a bigger jump for your fingers here, as you are crossing 3, rather than 2 strings. Yet despite this, it is worth learning this shape. It will allow you to move across large sections of your fretboard elegantly, without having to rely on moving up and down scale shapes.
Octave shapes built on the G string
At this point it is worth noting that this same shape can be applied to the G string. This is as follows:
I prefer to view this as a ‘bonus’ shape, especially when you are getting to grips with this material, I think it is easier to learn the octave shapes by grouping them in pairs.
In this way you can learn the octave shapes that are built from notes on the E and A string, and then the D and G strings etc. There is a neat logic to this which makes them easier to learn.
The second reason, is that this shape is a little more awkward compared with the other shapes listed above.
There is a bigger stretch, which makes it a little less practical in a playing context. Nevertheless, it is an additional shape that you can use to navigate across your guitar fretboard. And so it is still worth learning and committing to memory.
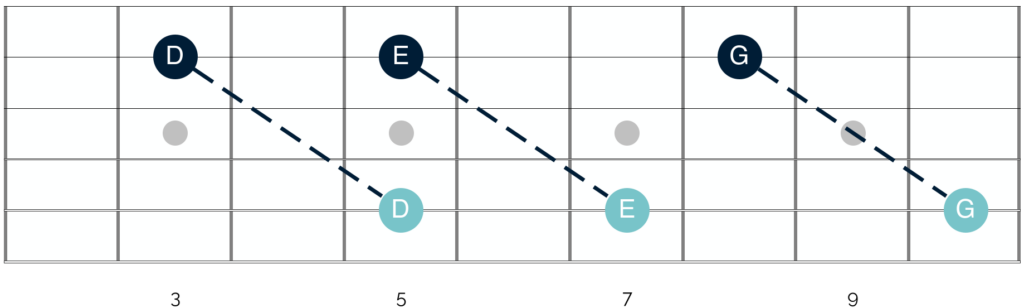
If you put all of these octave shapes together, you can use them to take a note on the low E string, and trace it all over the fretboard, as follows:
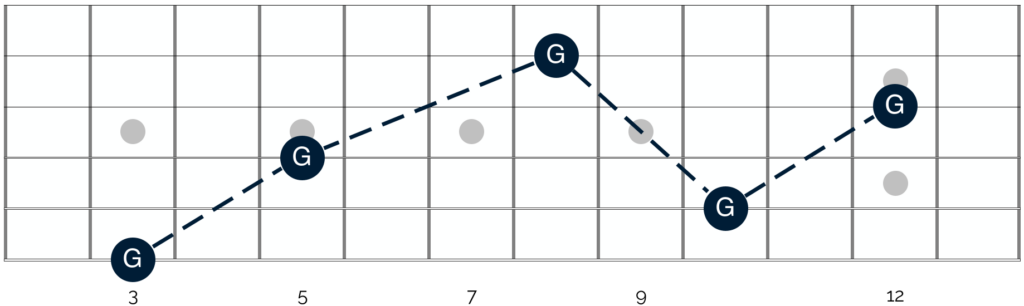
As you can see, understanding these connections helps you to follow a single note across the fretboard. Not only does this help you to better understand what is happening on your guitar – it also has practical uses when soloing, as I will explain in more detail below.
Using octave shapes in your solos
Once you feel comfortable with the shapes illustrated above, and you have practiced playing each of them across your fretboard, you can start to use them in your solos.
The concept here is fairly straightforward. If you have an effective lick that works well in any given section of the fretboard, you can replicate it in a different octave.
You can do so easily, because the relationship between the notes in the phrase is exactly the same in different sections of the fretboard. It is just that the specific frets are different. I illustrate this point between the 10 and 30 second mark in the video above.
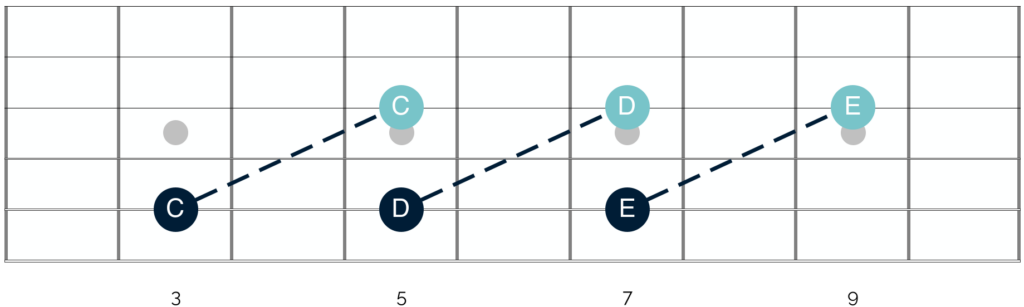
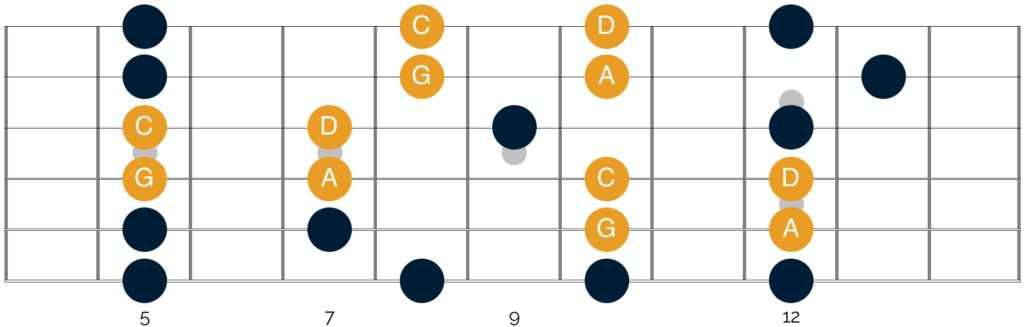
The specific notes that I play are highlighted in yellow on the following diagram:
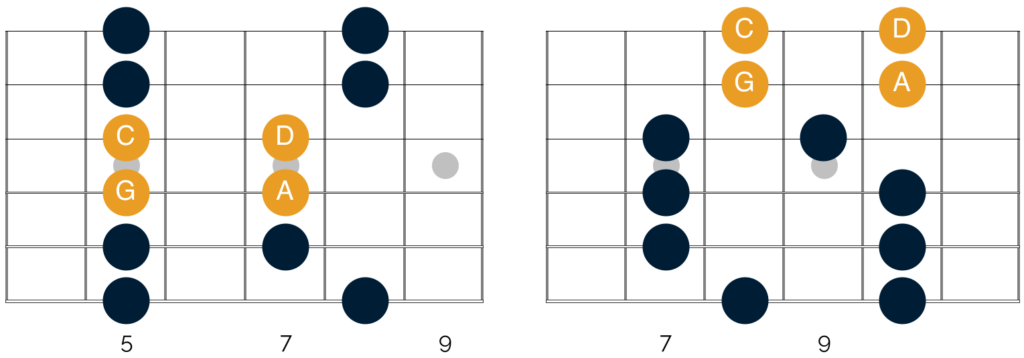
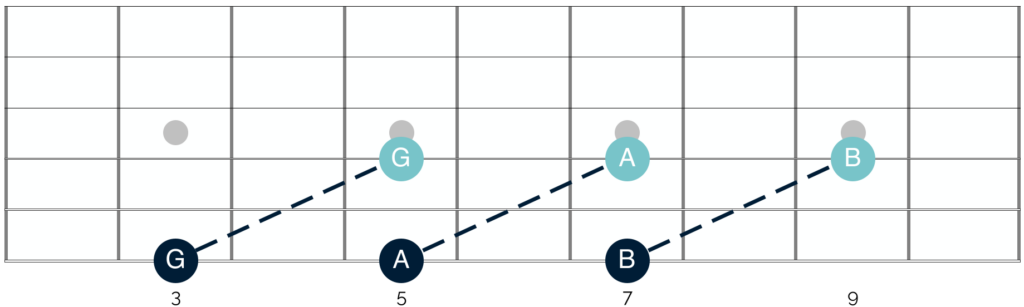
The first lick that I play is based in the first shape of the A minor pentatonic scale. And the notes that I target in that lick are the notes of A, C, D and G.
The second – almost identical lick – is based in the second shape of the A minor pentatonic scale. And again here you can see that the notes that appear in the lick are those of A, C, D and G.
Not only this, but hopefully you can see that in both sections of the fretboard, the relationship between the notes is exactly the same.
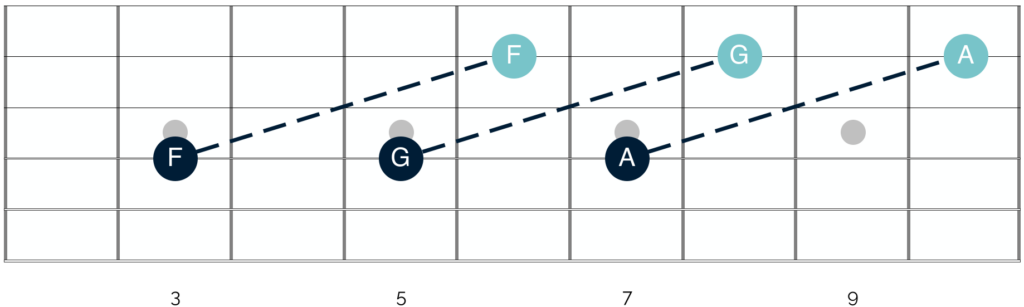
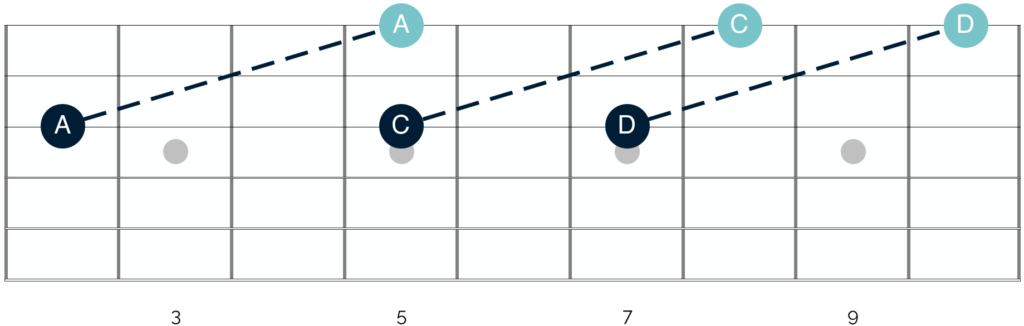
This means that you can take your ‘go-to’ licks and replicate them in a different octave. The example above shows just one way of doing this, however if you wanted to, you could continue to trace these 4 notes across over the fretboard, as follows:
Now, being able to trace these notes across the fretboard to repeat the same idea has its benefits. However, to maximise the effectiveness of these connections, I think it is worth focusing your approach in one of the following 3 ways:
Build motifs
In the article – ‘Motifs: What They Are & How To Use Them‘ I cover motifs in great detail. So if you want to find out more, I would recommend heading over there to study the concept in more detail before continuing here.
In short however, a motif – or motive as it is sometimes called – is a simple musical idea that is repeated through a piece of music. Through its repetition the motif becomes a distinctive and recognisable part of the piece.
I am a big advocate of using this idea in your solos, as it helps you to take a simple idea, and vary and develop it over time. This allows you to solo for longer and to do so in a very effective and musical way.
One way of varying your motif is to play it in a different octave. This will really push your solo forward and give it a totally different feel and energy. I execute a condensed version of this idea at the 35 second mark of the video above, when I play the following:
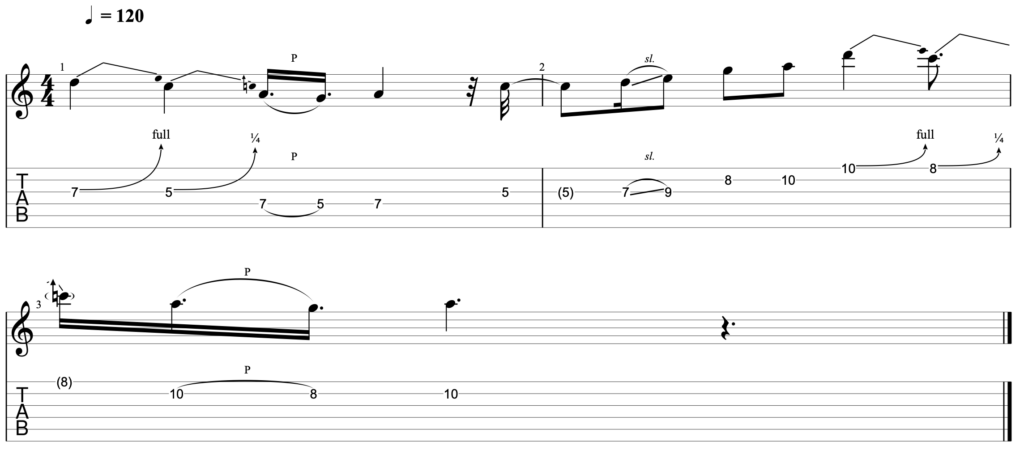
At 120 BPM (beats per minute), this is what this lick sounds like:
As you can hopefully see (and hear), the licks in each octave are the same. However they do not sound identical and in fact they have quite a different quality. And by connecting them with a different lick, I create a phrase that sounds interesting and complete.
If you take the same approach and extend it – you can develop your initial motif in the lower registers of your fretboard, and then create a sense of movement and excitement in your solos by moving it into a different octave.
Connect them with an interesting lick or phrase and you will be amazed at how much mileage you can get from a single idea.
Maximise your position
One of the most effective ways of maximising these connections, is to take the idea of repetition noted above, and create different textures by targeting notes that surround your core phrase.
I appreciate that this sounds a little complicated. But it becomes clearer when we bring it to life on the fretboard. To do so, let’s return to the note groupings that I targeted in the lick around the 35 second mark:
In the lick I move directly from the group of notes on the left of this diagram to those on the right. However, I could develop both areas and get much more mileage from them by targeting notes which surround those of the core phrase.
For example, the notes in the first part of the phrase are found in the first shape of the A minor pentatonic scale. And this is directly above the fifth shape, as follows:
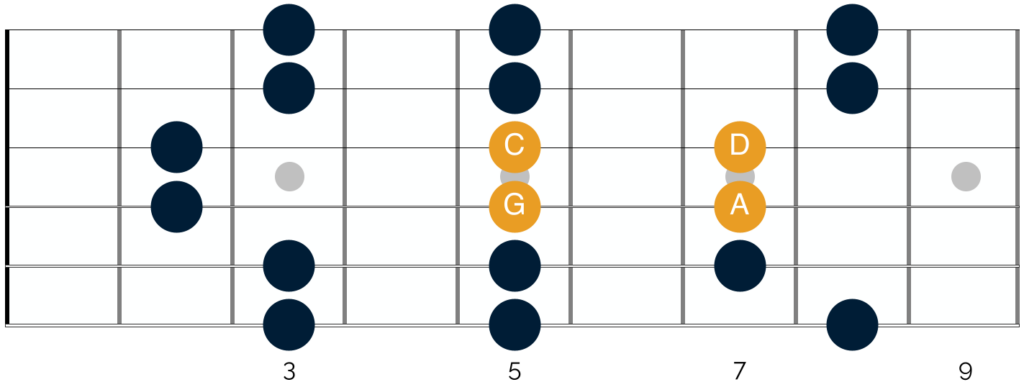
When you appreciate this point, you can take the core notes of your phrase, and combine them with those which appear in the fifth shape of the minor pentatonic scale.
In the second part of the phrase, the notes are found in the second shape of the A minor pentatonic scale. And this is directly below the third shape of the scale, as follows:
Again, you can take the core notes of the phrase here and this time combine them with those which appear in the third shape of the minor pentatonic scale.
In this way, the first half of the phrase is focused all around the lower registers of the guitar. And the second half of the phrase is focused around the higher registers of the guitar. This allows you to really develop the phrase and get a huge amount of mileage from a simple group of notes.
Target intervals
The final and significant benefit of knowing your octave shapes, is that you can use them to target specific intervals in your playing.
Let’s take the tonic note, for example. In many of the courses inside The Blues Club, I talk about how to target the tonic note as a way of resolving your phrases. I also talk about how you can target the tonic note in different ways to keep this idea fresh and interesting.
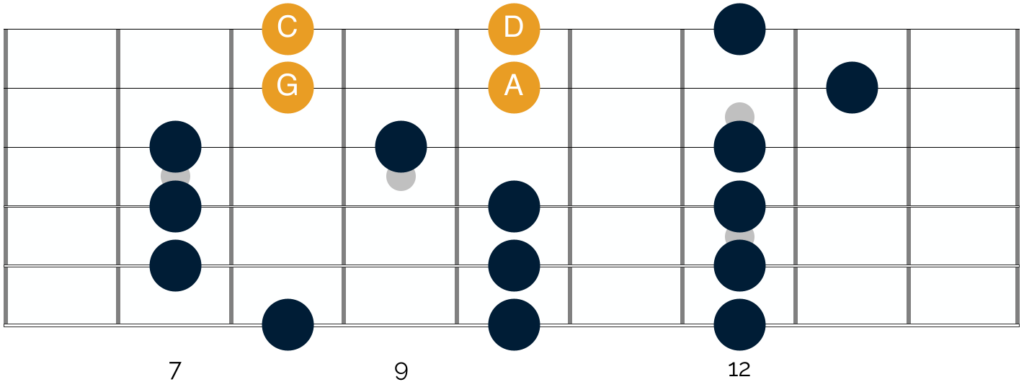
Knowing your octave shapes can really help here. Let’s look at the first and second shapes of the A minor pentatonic scale:
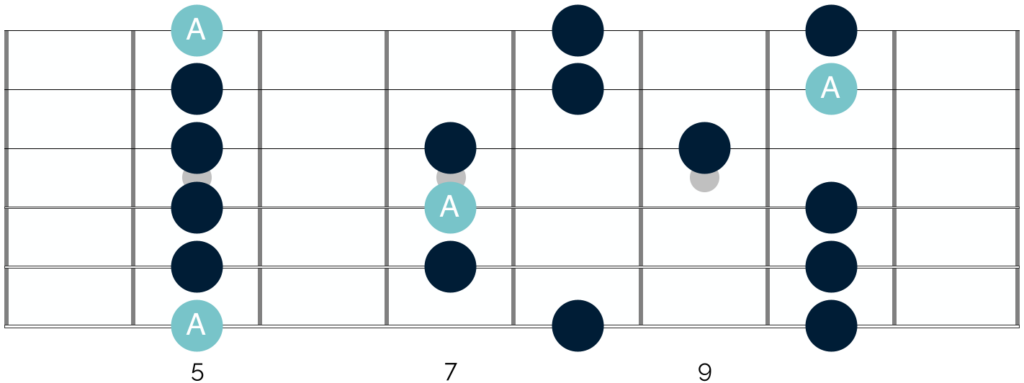
As you can see, within this small section of the fretboard there are 4 different notes of A, which in this musical context is the tonic note. All of these notes are connected by octave shapes.
Understanding this helps you to create licks and phrases which target these tonic notes in different ways. This ensures that your playing stays varied and interesting and it will also help you to create new phrases that you otherwise wouldn’t have targeted in your playing.
You can of course do this with other intervals, too. In the article entitled ‘Targeting The 5th In Your Solos‘ we looked at the value of resolving your phrases on the 5th. And you can apply the same idea here:
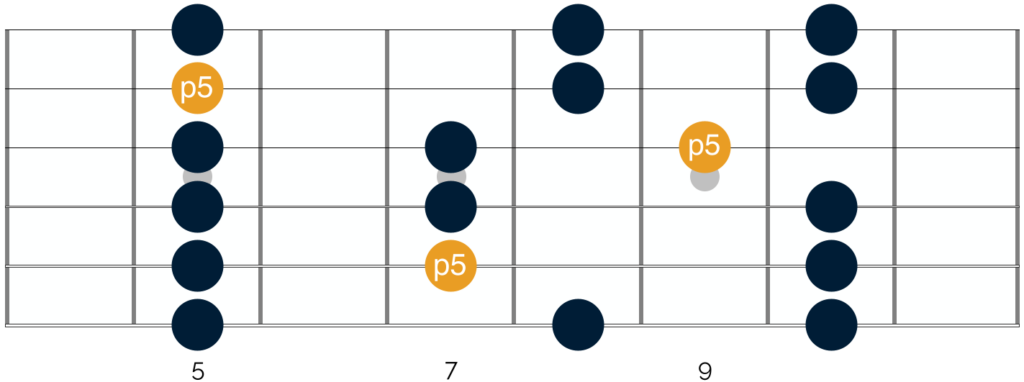
Albert King uses this idea a lot in his playing. He creates phrases that resolve onto the 5th interval at the 7th fret on the A string. He then shifts the same idea up an octave to the ‘Albert King’ box. And here he focuses on resolving his phrases on the 9th fret of the G string.
These of course are just two notable examples. But you can apply this idea to any interval and in any part of the fretboard.
Closing thoughts
Well there we have it – what octave shapes are and how you can use them in your solos. This is one of my favourite ways of not only getting more mileage out of your improvisations, but of developing your knowledge of the fretboard.
And this is significant, as it will help you to navigate across your guitar with fluidity and precision when soloing, as well as to find chords all over the neck of your guitar.
Now as is typically the case with these quick tips, you can get a huge amount of mileage from this concept. So take your time with this material and break it down into the following manageable chunks:
To begin with, learn the octave shapes in string pairs. So get comfortable with the shapes built from the E and A strings, then the D and G strings, and then the B and E strings.
Once you have done that, practice taking a single note and tracing it up and down the fretboard using octave shapes. Start with a note on the low E string in the lower registers of your guitar.
Trace it all the way to the upper registers of your instrument. Then reverse the process and play back down the fretboard to arrive again at the note with which you started.
Finally, start to target this idea in your improvisations in the way I have outlined above. Take a simple idea and play it in different octaves.
Then connect the two bundles of notes with an interesting phrase. Once you feel comfortable doing that, extend the idea out to target intervals and build on this idea in more complex and interesting ways.
As you do so, focus on experimentation and on trying to extract as much mileage as you can from these ideas. Dig deep and you will be amazed at the impact it has on your playing.


Responses