If you want to improve your knowledge of music theory as it applies to the guitar, then learning intervals is one of the best places to start. Intervals are a fundamental part of Western music. And when you learn them, you will develop a much deeper understanding of what you are playing.
This will improve every element of your guitar playing, and make you a better and more skilled musician.
When you learn intervals and how they work, you will understand how scales and chords are formed. You will also appreciate why different notes played either together or separately create different sound and feels.
Finally, you will also understand some of the musical jargon that you might have encountered in YouTube videos, online courses or when you are speaking to other musicians.
In this article then, I will cover everything you need to know about intervals and how they apply to your guitar. This includes:
This information will help you to develop a greater understanding of how music is created. You will appreciate why certain chords and note groupings sound the way they do. And with this knowledge, you will be in a much better position to consciously target particular sounds and feels in your own playing.
So with that in mind, let’s get into it. Here is everything you need to know to get started using intervals on the guitar:
Introducing intervals
An interval is the difference in pitch between two different notes. As such, even if the concept of intervals is not one with which you are familiar, you have in fact played intervals on your guitar from the moment you first picked up the instrument.
Every time you play two or more notes on your guitar – either separately or together – you are playing intervals.
Appreciating this will help you to understand some of the most important points about intervals and how they function. After all, playing different groups of notes on your guitar – either together or in succession – sound quite different, depending on the notes you play together.
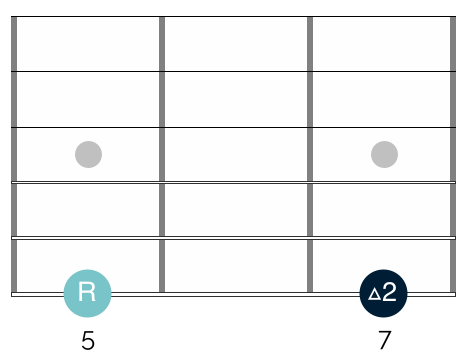
Just listen to the difference between these two intervals on your guitar:
In the opening bar, the first note to be played is the 5th fret on the 6th string, followed by the 7th fret on the 5th string. The 2 notes are then played together. In the second bar, the starting note is the same.
This time though, the second note to be played is the 6th fret on the 5th string. The 2 notes are then played together.
The sound of the notes in the first bar is harmonious. There is no feeling of tension or dissonance. In the second bar, the opposite is true. Here the sound is intensely dissonant.
Understanding this helps to illustrate the power of intervals on your guitar.
As you can see, altering a phrase by just a single note has a profound effect on the sound and feel of your playing. This is because each interval has a different musical quality. They sound different to one another and they function differently in a playing context.
And this is just one reason why they are important for you to learn. They provide you with a system for creating phrases and chords that you can target consciously in your playing.
Different interval types
Part of what makes intervals so useful for guitar players, is that they help to create connections and patterns on the fretboard. One of the biggest challenges for most guitarists is developing the ability to move around the fretboard with freedom.
The average guitar has 6 strings and 22 frets. And so developing connections between the 132 frets on your guitar is key if you want to avoid getting ‘trapped’ in certain areas on your neck.
Now the good news is that there are only a limited number of intervals that you need to learn. And learning these intervals on your guitar will help you to develop connections all over your fretboard.
To look at the different intervals on your guitar, we need to first look at the chromatic scale. If this concept is new for you, then I would recommend reading this article here before you continue. This will help you to understand a variety of concepts which are important to understanding intervals.
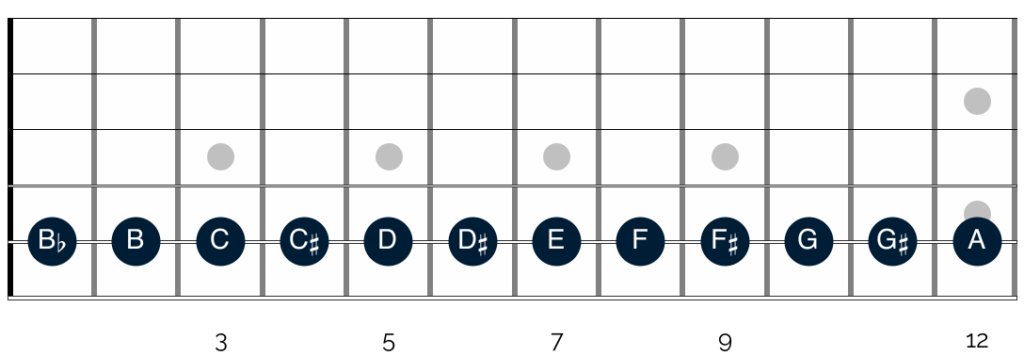
In the chromatic scale, there are 12 different notes. And these are represented by 12 frets on your guitar. Let’s look at this on the fretboard. This is what the chromatic scale looks like when you start on the note of A (which is played here on the open A string):
In this scale (and all other scales for that matter) the differences between the notes are represented by intervals. Let’s look at the same diagram, but this time with the intervals highlighted, rather than the notes:
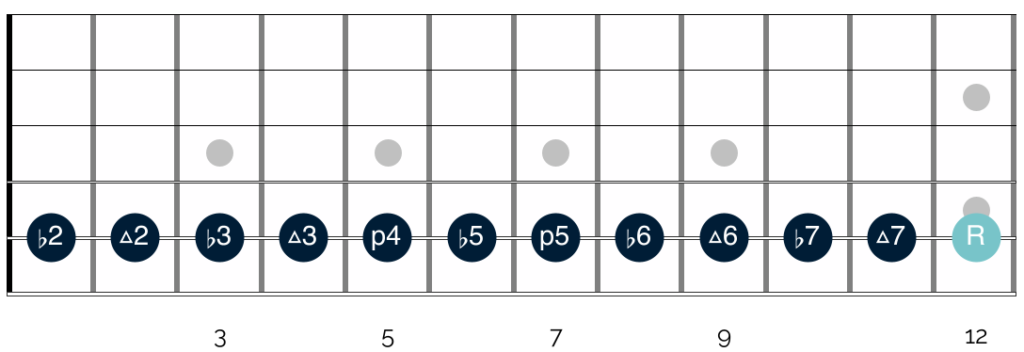
As you can see, there are 12 different intervals – one for each of the 12 notes used in Western music. Each of these intervals is represented by a number, which is paired up with a different symbol. Shown another way, these intervals can be represented in the following format:
| 1 | b2 | 2 | b3 | 3 | 4 | b5 | 5 | b6 | 6 | b7 | 7 | 8 / 1 |
| Root | Flat 2nd | 2nd | Flat 3rd | 3rd | Perfect 4th | Flat 5th | 5th | Flat 6th | 6th | Flat 7th | 7th | Octave / Root |
It is worth noting that these intervals can be described in different terms (which refer to the quality of the interval). I will discuss interval quality in much more detail below. So for now don’t worry about the significance of words like ‘perfect’.
These words are important for helping us to fully understand intervals and how they function. However first we need to look at the distances between different intervals and how you can use these in a practical playing context.
Intervals & the musical alphabet
In my opinion, the best way to do this is to briefly return to the concept of the musical alphabet.
As you might have spotted from the fretboard diagram above – there are 12 notes used in Western music. And yet as you can see from the second diagram and table, the intervals are not numbered between 1 and 12. Instead, there are just 7, rather than 12 numbers that are used to describe intervals.
This is because these 7 numbers correspond to the 7 notes in the musical alphabet. For although there are 12 pitches in Western music, there are just 7 notes. These are represented by the letters A-G, as follows:
| A | B | C | D | E | F | G |
The remaining 5 notes that appear in Western music are accounted for by sharps and flats. These are the notes that exist in between the majority of the notes listed above. For although the letters noted above sit next to each other in the actual alphabet, they do not sit directly next to each other in a musical context.
The exact same thing is true for intervals. There are 7 numbers that are used when talking about intervals. And yet these numbers do not sit directly next to one another on the fretboard. Let’s return to the diagram above:
You can see here that aside from the numbers 3 and 4, the whole numbers are not on adjacent frets on the fretboard. Instead they are separated by additional intervals that match up with the sharps and flats that appear in the chromatic scale. You can see this in the following table:
| Note | A | A# | B | C | C# | D | D# | E | F | F# | G | G# | A |
| Interval | 1 | b2 | 2 | b3 | 3 | 4 | b5 | 5 | b6 | 6 | b7 | 7 | 8 / 1 |
The relationship between the notes of the chromatic scale in the table above and the intervals is the same. In other words, there is a single fret that separates the notes of A and A#. And the same single fret separate the intervals of 1 and b2.
Between the notes of A and B there are 2 frets. The same is true between intervals 1 and 2. And so on.
As a result, if you start on your open A string and play up to your 12th fret – you will play all 12 notes of the chromatic scale, as well as all 12 intervals.
Interval distances
It is important to appreciate this point, because the relationship between the different intervals noted above is the same. And this true regardless of the string or note on which you start.
So if you take any note on your fretboard and treat that note as ‘1’, (the root note) the same pattern exists. We can see this on the following diagram:
This diagram shows all of the intervals present in the D chromatic scale. In contrast to all of the diagrams so far, here we are treating D as the root note, rather than A. And as you can see, the intervals and the relationship between the intervals are the same as they were in the key of A.
This information helps you to establish a number of important points:
Firstly it helps you to understand the different distances between these intervals. So in the example above, you know that if you play the open D string and then the 1st fret on the D string, you are playing the 1 and the b2. If you slide up 1 more fret, you will be playing the 2. And so on.
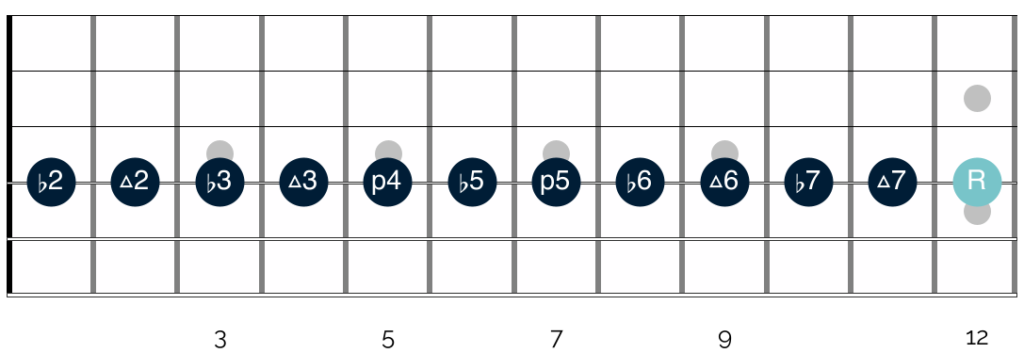
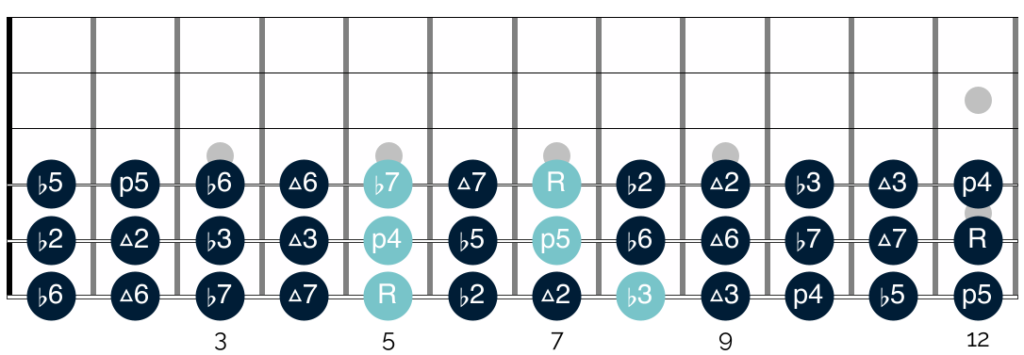
Secondly, because the relationship between different intervals is the same across different strings on your guitar, you can use all of the existing fretboard connections that you might know (which I cover in more detail in this article here) to play intervals all over your fretboard. You can see this on the following diagram:

At first glance, I appreciate that this diagram looks quite overwhelming. But in fact on closer look you will see that it simply illustrates various fretboard connections between different intervals.
As such, you will see that if you take any interval, you will find the same interval:
- One string up and 5 frets back
- One string down and 7 frets back
- Two strings up and 2 frets up
It is worth noting that this relationship changes between the G, B and E strings. If you take a note on the G string, you will find the same note 4, rather than 5 frets back on the B string.
If you take a note on the B string, you will find the same note on the G string, 8, rather than 7 frets back. Lastly, if you take a note on your D or G strings, you will find the same note two strings up, and 3, rather than 2 frets up.
Understanding these points is useful as it helps you to start thinking in vertical, as well as lateral terms. In other words, you don’t have to keep traversing up and down a single string to play any given interval. Instead you can move in more efficient ways on your guitar by moving across the strings too.
How to play intervals on your guitar
Crucially, you can use this knowledge to target different intervals by understanding where they appear on the fretboard.
For whilst it is helpful to appreciate connections between the same interval across different strings, I think it is arguably more important to understand how to find some of the most common intervals on your guitar.
This is because you are most likely to use intervals in this way on the guitar to create chords, scales and melodies.
Let’s have a look at how to find some of the most common intervals on your guitar in a bit more detail:
2nds
If you take any note on your guitar and play a note 2 frets higher on the same string, you will be playing a major 2nd interval.
3rds

If you take a note on your guitar and move 1 string up and 1 fret back, you will be playing a major 3rd interval.
It is worth noting that this relationship is not the same between the G and B strings. If you are playing your root note on the G string, the major 3rd is found on the same fret on the B string.
4ths
If you take a note on your guitar and move 1 string up you will find the 4th on the same fret.
As noted above, it is worth pointing out that this relationship is not the same between the G and B strings. If you are playing your root note on the G string, the 4th is found 1 fret higher on the B string.
5ths
If you take a note on your guitar and move 1 string up and 2 frets up you will be playing a 5th interval.
This relationship also changes between the G and B strings. If you are playing your root note on the G string, the 5th is found 3 frets higher fret on the B string.
6ths
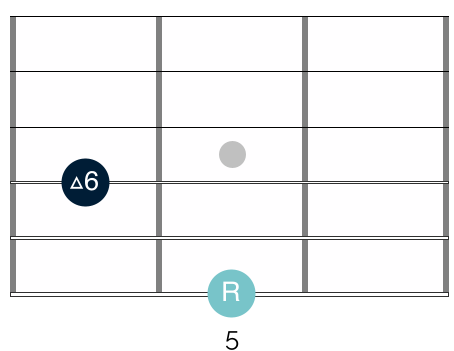
If you take a note on your guitar and move 2 strings up and 1 fret back you will be playing a 6th interval.
This relationship changes if your root note is on either the D or G strings. If your root note is on the D string, you will find the 6th on the B string on the same fret. If your root note is on the G string, you will find the 6th on the E string on the same fret.
As you can see from the earlier examples using the chromatic scale, there is just a single fret that separates each of the intervals on your guitar. So if you take any of the intervals shown above and move them up or down by a single fret, you will reach the next interval.
In other words, if you take the 2nd and move it down 1 fret, you will be playing the b2. If you take the 2nd and move it up 1 fret, you will be playing the b3. The same is true for all of the intervals shown here.
Interval qualities
Now that we have an understanding of interval distance and where intervals appear on your guitar, it is important to look at different interval qualities. This will help you to understand how different intervals sound, and how this dictates the feel of any given chord, scale or melody.
Let’s have another look at the table shown earlier in the article:
| Interval | Interval Quality |
| 1 | Root / Unison |
| b2 | Minor 2nd |
| 2 | Major 2nd |
| b3 | Minor 3rd |
| 3 | Major 3rd |
| 4 | Perfect 4th |
| b5 | Diminished 5th / Augmented 4th |
| 5 | Perfect 5th |
| b6 | Minor 6th |
| 6 | Major 6th |
| b7 | Minor 7th |
| 7 | Major 7 |
| 8/1 | Octave / Root |
The left hand side of this table shows the different intervals that you can see on the various fretboard diagrams. Now though, the right hand side of the table shows the quality of the different intervals.
There are 5 different terms that are typically used to describe interval qualities. These are as follows:
- Perfect
- Major
- Minor
- Augmented
- Diminished
These are the 5 different qualities of interval that you need to know. In the interest of full disclosure, you can also get double diminished and double augmented intervals, but these are not common – especially in the blues and other forms of popular music.
And so for now it is just important to get to grips with and understand these 5 different interval qualities.
As you can see in the table above, the different interval qualities are used to describe a number of different intervals. For example – the b2, b3, b6 and b7 are all minor intervals. The perfect 4th and perfect 5th are both perfect intervals. And the 2, 3, 6 and 7 are all major intervals.
Let’s have a look at these different interval qualities in a bit more detail:
Minor & Major Intervals
If you know how to play major and minor chords on your guitar, then you will have encountered the sound of major and minor intervals.
In simplistic terms, melodies or harmonies that are major have an upbeat and happy sound. Those that are minor have a sad and melancholic sound.
You can hear this if you compare the sound of a major 3rd interval with the sound of a minor 3rd interval:
In the opening bar of this audio, the first note to be played is the 5th fret on the 6th string, followed by the 4th fret on the 5th string. The 2 notes are then played together. This is the sound of a major 3rd interval.
In the second bar, the starting note is the same. This time though, the second note to be played is the 3rd fret on the 5th string. The 2 notes are then played together. This is the sound of a minor 3rd interval.
The major intervals are the 2, 3, 6 and 7. The minor intervals are the b2, b3, b6 and b7.
This means that if you take any major interval and lower it by a single semitone, you will turn it from a major into a minor interval.
Understanding this is important for both your rhythm and lead guitar playing. And we will discuss this in further detail below.
Perfect Intervals
There are 3 intervals that are described as ‘perfect’. These are the perfect 4th, perfect 5th and the octave. The ‘unison’ is also described as a perfect interval. The unison is simply when the root note is played along with another root note of the same pitch.
Perfect intervals are so called because they sound perfectly consonant. When played either together or in succession, they do not create any musical tension. Instead they sound totally resolved.
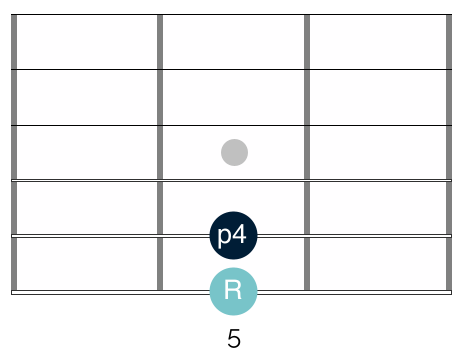
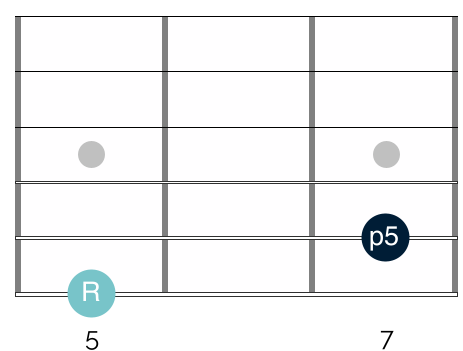
You can hear this in the following example:
In the opening bar of this audio, the first note to be played is the 5th fret on the 6th string, followed by the 5th fret on the 5th string. The 2 notes are then played together. This is the sound of a perfect 4th interval.
In the second bar, the starting note is the same. This time though, the second note to be played is the 7th fret on the 5th string. The 2 notes are then played together. This is the sound of a perfect 5th interval.
Hopefully in both instances you can hear the lack of tension when the intervals are played together. They sound resolved and perfectly consonant.
Augmented & Diminished Intervals
If you take a perfect interval and shift it up a semitone, you create an augmented interval. If you take the same interval and shift it down a semitone, you create a diminished interval.
As noted above, perfect intervals have a completely resolved and consonant sound that is lacking in any tension. Both augmented and diminished intervals offset this consonance by a single semitone. And in both cases this creates a harsh and dissonant sound.
You can hear this in the following audio example:
In the opening bar of this audio, the first note to be played is the 5th fret on the 6th string, followed by the 8th fret on the 5th string. The 2 notes are then played together. This is the sound of an augmented 5th interval.
In the second bar, the starting note is the same. This time though, the second note to be played is the 6th fret on the 5th string. The 2 notes are then played together. This is the sound of a diminished 5th interval.
In both instances, you can hopefully hear the tension that these intervals create. They both sound dissonant and unresolved.
Interval naming conventions
Part of what makes learning intervals on your guitar confusing at first, is that there are a variety of different terms used to described them. I have compiled some of the most common of these in the table below.
| Interval | Interval Name |
| 1 | 1 / Root / Unison / Prime / Tonic |
| b2 | Flat 2nd / Minor 2nd |
| 2 | 2nd / Major 2nd |
| b3 | Flat 3rd / Minor 3rd |
| 3 | 3rd / Major 3rd |
| 4 | 4th / Perfect 4th |
| b5 | Flat 5th / Diminished 5th / Augmented 4th |
| 5 | 5th / Perfect 5th |
| b6 | Flat 6th / Minor 6th |
| 6 | 6th / Major 6th |
| b7 | Flat 7th / Minor 7th |
| 7 | 7th / Major 7th |
| 8 / 1 | 8/ 1 / Octave / Root / Perfect 8 |
Broadly speaking, the interval names are interchangeable. In other words, it doesn’t matter whether you say ‘flat 7th’ or ‘minor 7th’. They are the same, and most people will understand what you mean, regardless of which term you use.
In my experience it is more common for people to refer to the ‘flat 3rd’ and ‘flat 6th’ etc. than to the minor 3rd and minor 6th. It is also common for people to simply refer to the 4th and 5th, rather than the perfect 4th or perfect 5th. But this varies between different musicians.
As such, my advice here is to learn the different terms in the table above. Commit them to memory and practice using them yourself. This will help to ensure that you always know the intervals to which guitar players are referring.
In addition, you may have noticed that there is crossover between different intervals when you alter them. In my augmented and diminished interval example from above, I refer to the augmented 5th and diminished fifth. But the augmented 5th is the same note as the b6.
And the diminished 5th is the same note as the augmented 4th. They are the same notes, named in different ways.
To get into this topic in depth is beyond the scope of this article. This is because the correct way to view and name the intervals depends on the harmonic context in the key. In other words, the way you name the interval will depend on the key and musical context in which you are playing.
This is complex and not something that you need to worry about for now. Instead at this stage it is just important to recognise that this crossover exists.
How to use intervals in practice
Now that we have covered some of the more theoretical elements of intervals, we can turn our attention to how to use them in a practical context.
Intervals provide us with the building blocks of many different elements of music. They are what musicians use to construct scales, chords and melodies. So understanding the information above is crucial if you want to do any of these things proficiently.
As such, before moving on, I would recommend making sure you feel comfortable with the key points covered so far. And these are as follows:
- There are 12 different intervals. These correspond with the 12 notes of the chromatic scale
- Each interval is represented by a semitone. So if you want to move up or down an interval, you just need to move up or down a single fret
- The relationship between the different intervals is the same, regardless of the key in which you are playing. In other words, the distance on the fretboard between the 1 and b2 is the same, regardless of the key in which you are playing
- Each interval has a different quality, which affects its sound and character
Before moving on, I would also recommend committing all of the intervals to memory. And here I would recommend learning not only how to name all 12 intervals, but also learning how to name the quality of the different intervals.
In other words, you should be able to refer to the intervals interchangeably as flat 2nd or minor 2nd etc.
Once you are able to do that, you can then look at the main practical uses of intervals on the guitar. And these are as follows:
Intervals & scale construction
Scales are simply a series of intervals played one after another.
As you might already know, scales typically have a scale formula. And this formula is just a series of intervals played in order.
For example, the formula for the minor pentatonic scale is as follows:
1 b3 4 5 b7
This means that it contains the intervals 1, b3, 4, 5 and b7. Even if you have never played the minor pentatonic scale then, you can use this information – combined with an understanding of the chromatic scale – to work out how to play it.
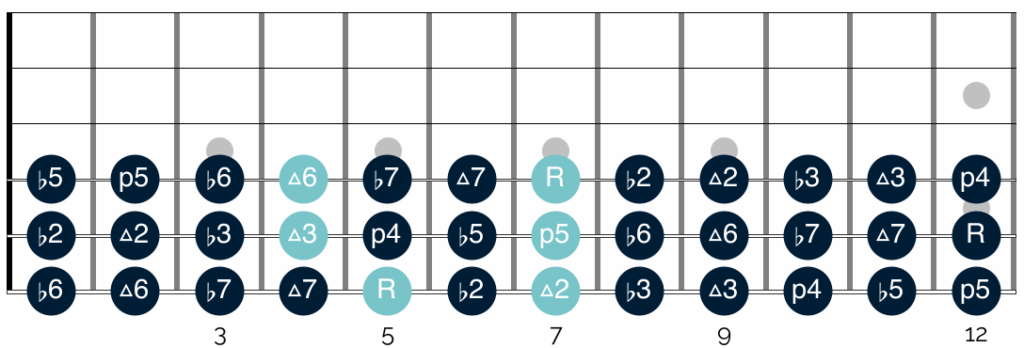
Let’s look at this by returning to one of the early fretboard diagrams:
This shows all of the intervals on the bottom 3 strings in the key of A. Highlighted in light blue are the intervals which appear in the minor pentatonic scale. And as you can see, if you play these vertically across the strings, you are in fact playing the first octave of the minor pentatonic scale.
This process works with any scale. All you need is the scale formula. You can then combine this with your knowledge of intervals and how they are connected on your fretboard, and from there you can construct the scale.
Let’s take the major pentatonic scale as another example. The formula for the major pentatonic scale is as follows:
1 2 3 5 6
If we take the key of A and start in the same position as we did when using the minor pentatonic scale, we can construct a new scale using these intervals:
As above, this shows all of the intervals on the bottom 3 strings in the key of A. Here though, highlighted in light blue are the intervals that appear in the major pentatonic scale. And as you can see, if you play these intervals vertically across the strings, you are in fact playing the first octave of the major pentatonic scale.
I have illustrated this point using pentatonic scales. But it works with any scale. All you need is the information outlined here and the formula of the scale. You will then be in a position to construct the scale in the key of your choice.
Intervals & chord construction
Using the same knowledge, you can create a variety of interesting chords on your guitar.
Like scales, guitar chords are constructed from intervals. And also like scales – chords have a formula which helps you to understand which intervals are present in the chord. Here are the formulae for a number of common chords:
| Chord Type | Major Chord | Minor Chord | Major 7 Chord | Minor 7 Chord | Dominant 7th Chord |
| Chord Formula | 1 3 5 | 1 b3 5 | 1 3 5 7 | 1 b3 5 b7 | 1 3 5 b7 |
As is true of constructing scales, all you need to know here is the formula of any given chord and where the intervals appear in a given key. From there you can then form a wide range of different chords.
Let’s look at this on the fretboard:
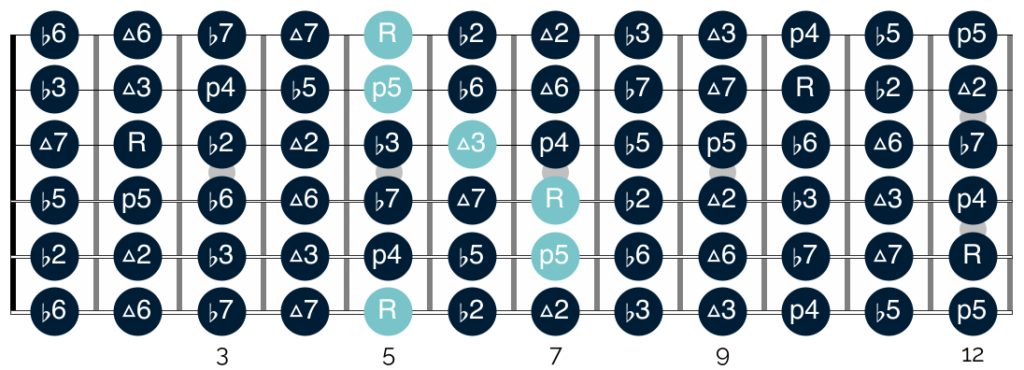
This diagram shows all of the intervals on the fretboard up to the 12th fret in the key of A. The notes highlighted here in light blue are those that appear in a standard A barre chord shape.
I haven’t added in all of the notes that your finger touches during the barre chord. Instead I have added in the actual notes that are heard in the chord. And so as you can see, in the major chord, the only intervals that you play are the root, 3 and 5.
Again, if we stick in the same area of the fretboard and make just small changes to our fingering we can create a range of different chords:
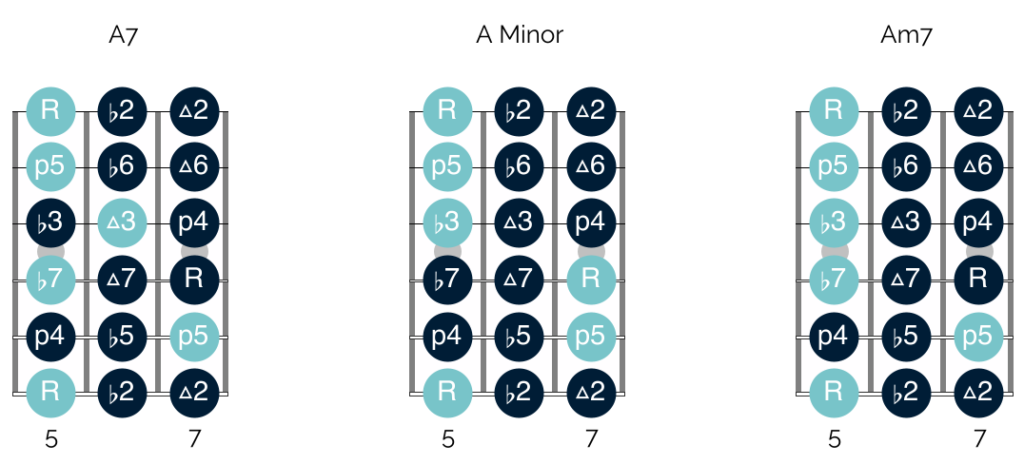
This diagram shows 3 different chords of A, all of which are formed in the same part of the fretboard. As above, I haven’t highlighted all of the notes that your fingers touch when playing the barre chords. Rather, I have highlighted the intervals that appear in the chords. These are as follows:
A7 – 1 3 5 b7
A Minor – 1 b3 5
Am7 – 1 b3 b5 b7
A lot of guitarists try to expand their knowledge of chords by studying chord diagrams and trying to commit as many chords as possible to memory.
Yet the diagrams above show that if you understand intervals and where they appear on the fretboard, you can create a range of chords quickly and easily. And you can do this with only small changes in your fingerings.
Additionally, with this approach you learn through doing, rather than simply imitating. And in my experience this makes the process of learning new chord voicings much easier.
Intervals & melody
In addition to scales and chords, understanding intervals will help you to craft interesting melodies. As I hope I have illustrated so far, each interval has its own unique character. This means that you can create a different feel in your playing by targeting different intervals.
Songwriters will often target particular intervals that work well together when writing riffs and guitar parts. When these intervals are played separately, they are referred to as melodic intervals. When they are played at the same time – as in chords or double stops – they are referred to as harmonic intervals.
Some common intervals that you often hear combined in popular music are 3rds, 4ths, 5ths and 6ths. Here are a number of notable examples:
- The introduction to the song ‘Brown Eyed Girl‘ by Van Morrison features a guitar part played in 3rds
- The opening riffs in the songs ‘Smoke On The Water‘ by Deep Purple and ‘Money For Nothing‘ by Dire Straits, both make use of 4ths
- 5ths are the most common harmonic interval used in music. This is because they form ‘power chords’, As such, they appear in a wide range of rock, punk and heavy metal music. The opening riff in ‘Smells Like Teen Spirit‘ is just one of many notable examples that makes use of 5ths
- The introduction to the song ‘Wanted Dead or Alive‘ by Bon Jovi, is based around 6ths
These are just some of the many examples of common intervals in popular music. I hope they help to give you a sense of the sound of each of these different intervals and the feel and ‘vibe’ they create in the music.
Intervals & improvisation
Lastly – and significantly in a blues guitar context – you can use your understanding of intervals to craft interesting blues guitar solos.
In different types of music, there are different intervals that help to create the feeling of the genre. For example, the b2 interval is often used in Flamenco and Latin styles of music. As such, if you target that interval within the right context, you can create a similar feel in your playing.
The intervals that are best associated with the blues are those which appear in dominant 7th chords. In other words they are:
1 3 5 b7
Blues guitarists can also create bluesy tension by transitioning from the b3 to the 3 using bends, slides, hammer ons and pull offs. They can achieve a similar tension by occasionally targeting the b5 (also known as the ‘blue note‘).
To get into a full blown discussion about ‘chord tones’ is a lengthy subject that goes beyond the scope of this article. However you can target the above intervals when improvising to create impactful guitar solos that have a distinctly bluesy feel to them.
If you want to hear examples of blues guitarists using these intervals in their playing, then I would recommend listening to both B.B. King and Albert King. The former frequently targeted the root note in his playing – playing it on the high E string with his signature vibrato. Conversely the latter often targeted the 5.
He used this note to resolve his phrases (rather than the root note, which is more common) to create a different feel in his solos.
Experiment with the different intervals listed above in your guitar solos, to see the different feels you can create in your improvisations.
Compound Intervals
Up to this point, we have spoken only about intervals within a single octave. And so you might be wondering what happens once we go beyond the octave.
In short, when we do this, we encounter what are known as ‘compound intervals’.
These sound complicated, but in many ways they are in fact quite straightforward. Once you get to the octave (8) – rather than resetting and going back to ‘1’, you continue counting the intervals up from 8. So what was 2 in the lower octave, is now 9 in the second octave. What was 4 is now 11, and what was 6 is now 13.
These intervals perform the exact same function as those in the lower octave. They create the same feel, and they have the same character. The key difference is that they are higher in pitch.
Understanding this allows you to create chords and melodies that target the sounds of the different intervals noted throughout. Here though you can target these intervals in a higher register, which makes a difference to the sound of your playing.
In a blues guitar context, compound intervals are commonly used to create dominant 9th and 13th chords. They are also used all the time during solos and improvisations.
There are 2 key points to keep in mind when it comes to compound intervals. These are as follows:
Firstly, only certain intervals are typically described using numbers beyond 8. These are 2 (9), 4 (11) and 6 (13). It is for this reason that you may well have encountered 9, 11 and 13 chords, but you are unlikely to have encountered 10, 12 or 14 chords.
Once you go beyond the first octave, you don’t continue counting up. In other words, you don’t start having 16, 17 and 18 intervals. Instead after the first octave, you reset back to the initial interval values (also known as simple intervals). So you return to using 1, b2, 2 etc.
To discuss compound intervals and all of their uses in detail is beyond the scope of this article. As such, it is a topic that I will cover in greater depth in the future – particularly in relation to chord creation.
However I hope that the information outlined here helps to give you the basics you need to start experimenting with these compound intervals in your guitar solos and improvisations.
Closing thoughts
Well there we have it, everything you need to get started using intervals in your guitar playing.
I appreciate that there is a lot of quite complex material to take in here. As such, work on the material outlined in this article one step at a time.
It is much better to take a little longer learning intervals – but to properly understand them – than it is to rush in and fail to learn their names and how you use them in practice when playing the guitar.
To do this, I would recommend taking the following steps:
- Learn the intervals on your guitar as they relate to the chromatic scale
- Commit the names of the intervals to memory, and through playing and practicing them, try to develop a sense of their sound and character
- Establish fretboard connections to find and play a variety of different intervals all over your guitar
Once you can do the above and feel confident, you can then start to look at creating chords and scales using intervals, and then actively targeting different intervals in your blues guitar solos.
Good luck! Let me know how you get on, and if you have any questions at all please do get in touch. Drop a note in the comments section, or send me an email on aidan@happybluesman.com. I’d love to help 😁
References & Images
YouTube, Hello Music Theory, YouTube, Live About, Unsplash, Britannica, University of Tennessee, Hello Music Theory, Wikipedia, Britannica, Guitar Theory For Dummies


Responses
Thanks for all the useful information much appreciated.
You’re very welcome and thank you very much for taking the time to comment. If you have any questions about the material here, or if there is any element of your playing that I can help with, please do let me know. You can reach me here, or on aidan@happybluesman.com. I’m always around and happy to help! 😁
Excellent platform
Thanks so much for taking the time to write such a kind comment Kishore, it made my day! If you ever have any questions about your playing – or if there are topics that you would like me to cover, please do let me know. You can reach me on here or aidan@happybluesman.com and I am always around and happy to help! 😁
[…] guitarist, you may have heard other players use terms like "fifth," "third," etc. These terms refer to intervals, which are essentially spaces between the notes on a given scale. In the seven-note C major scale, […]
I do not under stand where the b3 b5and b7 etc. Comes from where I see some land is not b nor sharp could you help please
Hi Ike, I’ve just sent you an email with a bit more detail on this topic. I hope it helps and let me know what you think! 😁
You said you would get a little bit in the future let me know when you do thank you again
I’ve been studying your pages on scales, intervals and chord construction and found them very helpful, thank you
Thank you so much for the kind comment Damian – I really appreciate it and I’m so happy to hear you have found the resources useful 😁 Best of luck with all of your playing my man!