One of the biggest breakthroughs you can have as a blues guitarist is learning how to connect the five shapes of the minor pentatonic scale.
Once you understand how to do this, you will be able to move fluidly across the entire fretboard, create smoother and more musical solos, and unlock a level of freedom that will totally change the way you play.
It will help you to improvise freely, break out of the patterns where you feel stuck, and navigate comfortably across the entire neck of your guitar. It will also bring a new level of vocality and expression to your solos, as you connect ideas fluidly, rather than jump around the fretboard.
In this lesson, I am going to show you exactly how to do that. We are going to break the whole process down into four clear steps. By the end — with a little bit of practice — you will be moving laterally across the neck in a way that sounds confident and fluid.
So, let’s get into it!
Why most guitarists get trapped in box shapes
When we first learn the minor pentatonic scale, we learn it as a series of individual box shapes. You learn shape one, then shape two, and so on. And while this is a great way to get started, it creates a problem when you actually come to solo.
You end up trapped in vertical patterns — moving up and down within one shape, then jumping to the next, without any real sense of connection between them.
There is nothing wrong with soloing in this way. It sounds great, and plenty of brilliant blues guitarists do exactly that.
However, viewing the guitar in this way doesn’t fully capture the way the guitar actually works.
Vertical vs. Lateral movement
Your guitar functions in two planes of movement. The first is vertical — playing from the low E string to the high E string and back again. Most guitarists are very comfortable with this, and it is how we typically think about playing scales.
For example, if you were to play the G minor pentatonic scale, you’d most likely think about this scale shape:
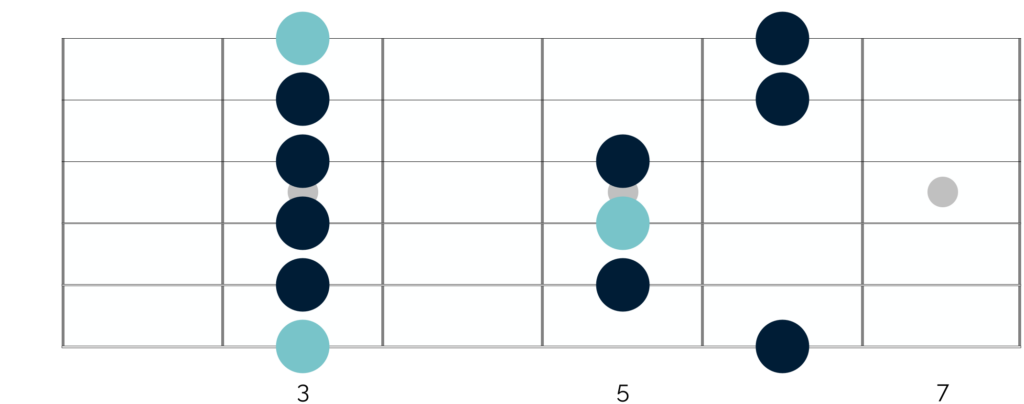
This is a scale shape played in the vertical plane of movement, from the low E string to the high E string.
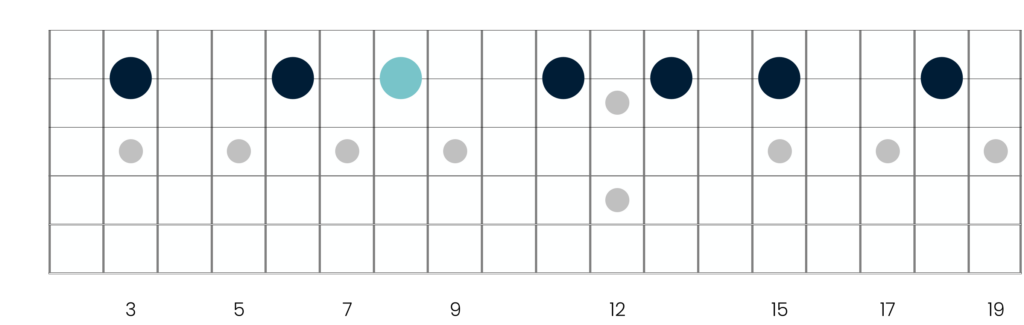
However you can take the notes of that scale and play them up and down horizontally along any string, not just vertically across all six strings.
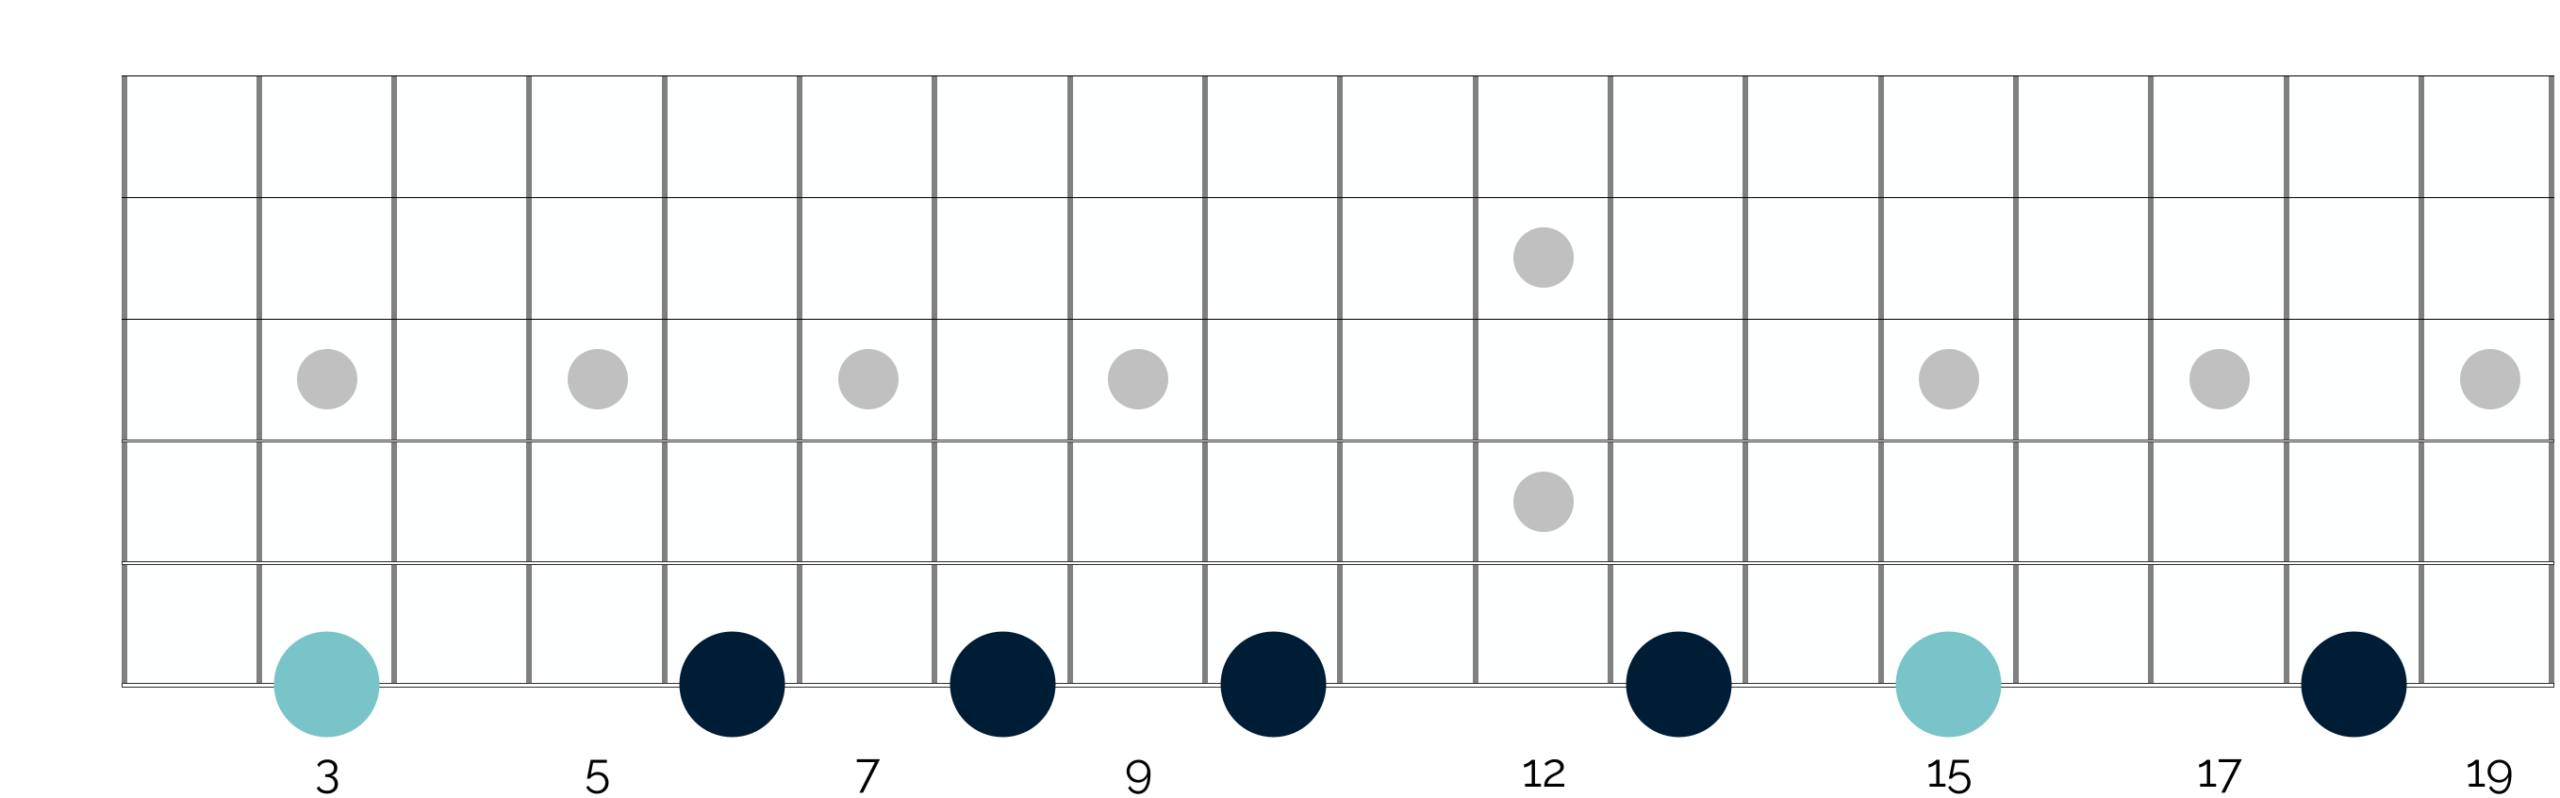
The above diagram shows where the notes of the G minor pentatonic scale – G Bb C D F – appear on the low E string.
And the same is true across all 6 strings.
So you have notes from the G minor pentatonic scale running up and down the A, D, G, B and E strings.
Once you appreciate this, everything changes. You are no longer limited to moving up and down within box shapes, and instead can start to think about connecting pentatonic shapes laterally up and down the fretboard.
Step II: Follow the thread
Now that you understand how your scales run up and down the fretboard laterally, we can think about targeting this concept in our playing.
The first step here is to focus on just a single string.
Typically I like to start with the G string, as you can navigate up and down the guitar on this string and then move off it to play notes on the B and E strings.
In doing so you also streamline your approach to look at the top 3 strings (which are the ones you are most likely to play when improvising).
The notes of the G minor pentatonic scale on the G string appear as follows:
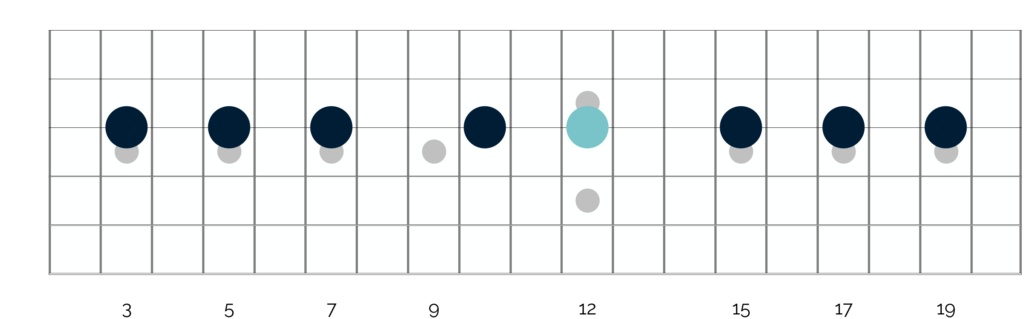
The first step here is to just get comfortable playing those notes up and down the G string. Play the scale in this way moving both up and down, and only move on to the next step when you feel confident and you don’t have to think too much about where the notes appear.
Step II: Add the blues boxes
Once you are comfortable following the notes on the G string, the next step is to add what I call the blues boxes. These are simply the notes that appear in each pentatonic shape on the top strings — specifically the G, B, and E strings — in each position as you move up the neck.
So in any given position, you move along the G string thread and then reach out to the notes on the B and E strings that belong to that shape.
There are 5 of these mini box shapes to get to grips with – one for each of the five shapes of the minor pentatonic scale.
Here is what each of these boxes looks like in G minor:
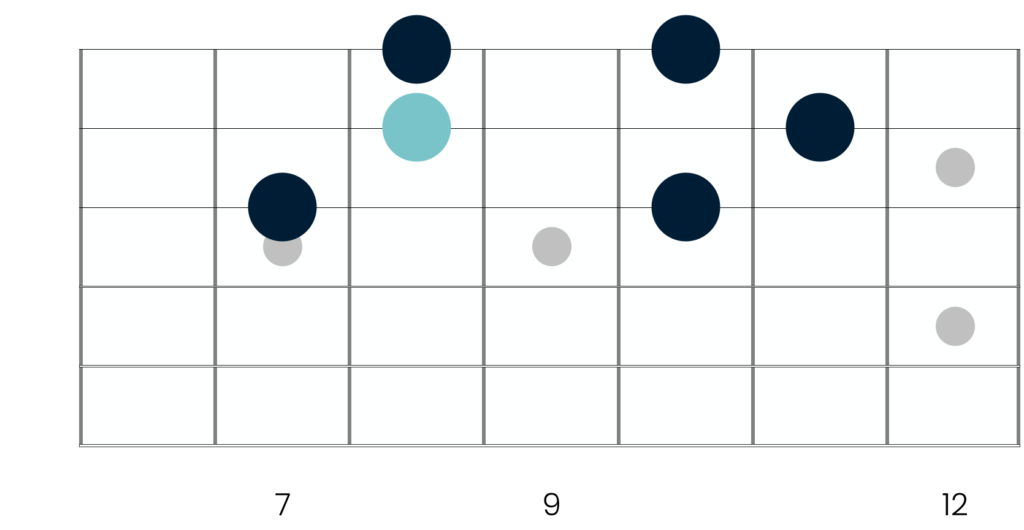
Blues Box I
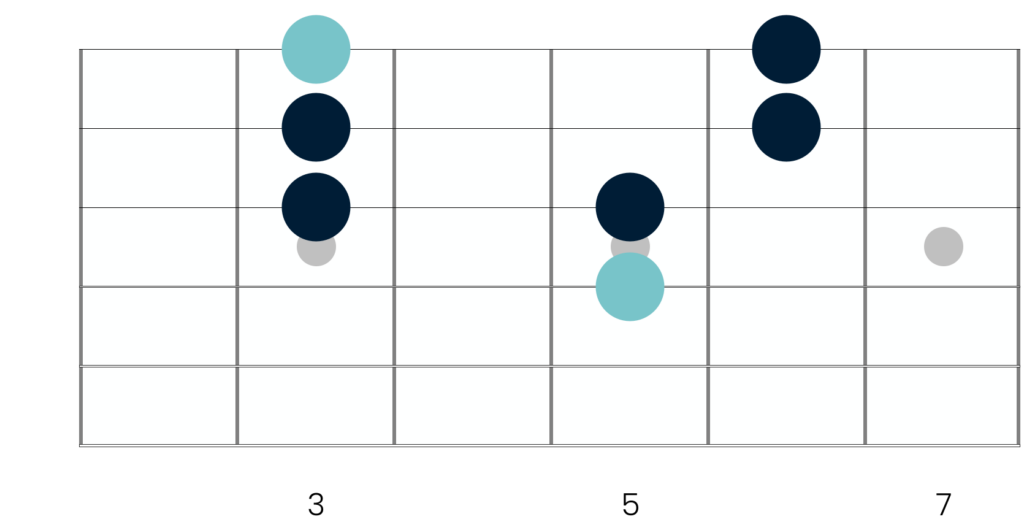
Our first blues box is nothing more than the a collection of notes on the G, B and E strings in the first pentatonic shape. Unlike the other boxes outlined here, there is also an extra note on the D string.
This is the tonic note of G, and it makes for a nice addition, as you can target the note at the end of your phrases to create a strong sense of resolution.
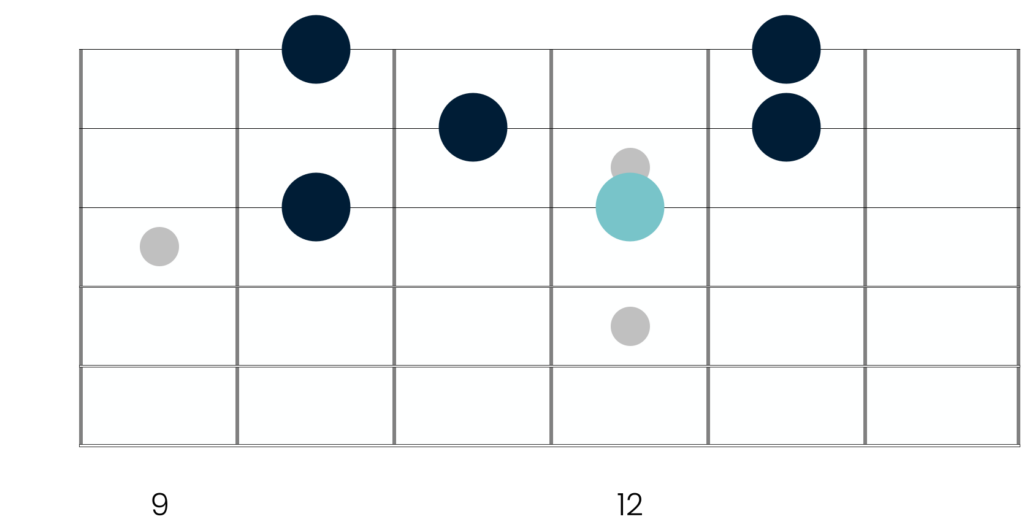
Blues Box II (The Albert King Box)

Our next blues box is the Albert King Box – a versatile and very useful box shape that will help you to bring the blues power and recreate the vibe of King, but also Stevie Ray Vaughan.
If you’d like to dig deeper into this box and how to use it in your playing, then you can find a full deep dive on the box shape here – An Ultimate Guide To The Albert King Box.
And if you want to understand how Stevie Ray Vaughan used the box in songs like “Texas Flood”, then check out this lesson here.
The shape is compact, it lends itself beautifully to string bending on the B and E strings, and once you have it under your fingers, it will help you to get a huge amount of mileage from just a handful of notes.
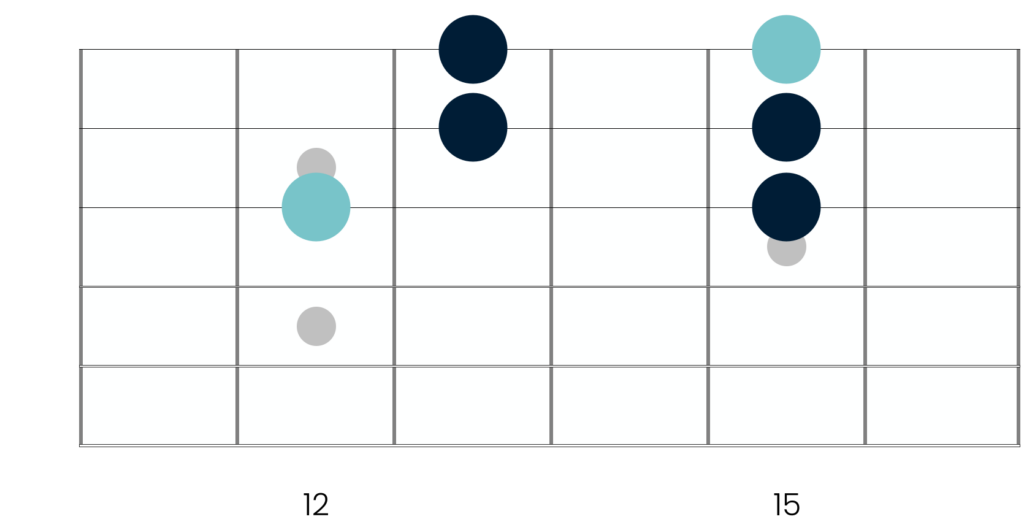
Blues Box III
This third shape is one that is often underused by guitarists.
At first, it’s easy to see why. Unlike the first two box shapes, this third one is not symmetrical and so requires you to shift back and forth with your fretting hand.
However, once you feel comfortable with the shape, you can create some beautiful ideas here. The shape also lends itself particularly well to heavier techniques like unison bends, so it makes a great choice if you want to bring a more aggressive edge to your playing.
Blues Box IV
Like the previous box shape, this is also asymmetrical and so can be harder to implement at first.
Stick with it though, as it is an essential piece of the puzzle that will allow you to connect up the entire fretboard.
With a little bit of patience and experimentation, you’ll also discover some beautiful licks that have a different flavour to those in the more comfortable and symmetrical shapes.
Blues Box V
As we move into the fifth shape we encounter another symmetrical pattern that feels comfortable under the fingers and is nice and easy to commit to memory.
It’s also a brilliant shape for connecting alongside the first and very familiar pentatonic shape, which is the next shape that appears as you continue to move up the fretboard.
This is how these blues boxes look laid out across the fretboard:
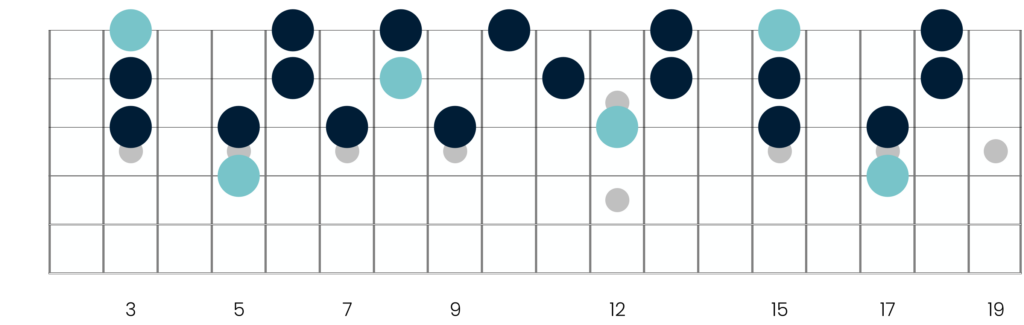
At this stage, don’t worry about moving between these boxes smoothly.
Just play through them individually, both up the neck and back down again. Get them under your fingers and commit them to memory.
Then when you’re ready, head over to the next step!
Step III – Join the dots
This is where things start to get really exciting. Now that you have your thread and your blues boxes, it is time to start joining them together.
Start nice and slow here and be patient in your approach.
Focus on soloing in the first box shape, and then move up into the second. Explore that connection in both directions — moving up the neck and coming back down — and start creating new licks and ideas with the movement.
Just getting two adjacent shapes talking to each other will immediately give you more mileage out of those positions than you have had before.
Once you feel comfortable there, rinse and repeat the process. Bring shape 3 in and try stacking shapes 1, 2, and 3 together. From there, add shape 4, and then shape 5.
You can also break this down further if you need to — working on shapes 2 and 3, then 3 and 4, before joining them all up.
This took me the best part of a month to feel genuinely comfortable with when I first worked through it.
But once it clicked, I never had to revisit the material or practice it again. My solos went from sounding choppy and abrupt to smooth and flowing.
So be patient and take your time trust the process, and only add a new shape when you feel comfortable with each of the individual connections.
Step IV: Advanced movements
Once you can move up and down the whole fretboard and confidently incorporate the ideas outlined above into your solos, there are two more advanced concepts you can explore.
Making bigger jumps
The first way to increase the challenge is to start making bigger jumps between shapes. Rather than always moving through adjacent shapes, you leap from shape 1 to shape 3, or from shape 2 to shape 4.
This adds real energy and dynamism to your playing, and it will deepen your understanding of exactly where notes sit across the fretboard.
It is not always appropriate, as in a slow and more mellow blues context, those big leaps can feel a bit choppy and abrupt – but used well, it sounds brilliant.
Moving across strings
The second concept — and this is where the real magic happens — is to extend everything you have built on the G string across to the B string and then the E string.
All of the same connections exist on those strings too, and the process for learning them is exactly the same. Here are the notes of the G minor pentatonic scale as they appear on the B string:
And here are the notes of the G minor pentatonic scale as they appear on the E string:

Helpfully, the positions of the notes on the B and E strings are the same, so once you feel confident on one string, you should be able to transfer over to the other string relatively easily.
Here are all of the notes from the G minor on the top three strings (with that extra note added on the D string – our tonic note from the first pentatonic shape):
Once you have the notes on those strings individually under your fingers — you can start to mix your approach across strings:
Move up on the G string and come back down on the B string. Start a phrase on the E string and weave back down on the B string.
This is the approach you hear in the playing of guitarists like Joe Bonamassa and Eric Johnson, who fly up and down the fretboard with fast pentatonic runs that seem to flow effortlessly.
When you combine all five shapes across three strings, the number of options available to you increases exponentially. My confidence at jam sessions increased tenfold when this clicked for me, because I was no longer locked into small, familiar patterns.
If this material is new for you, I’m sure that it will have the same impact on the quality of your improvisations.
Closing thoughts
Learning to connect the five shapes of the minor pentatonic scale is one of the most impactful things you can do for your lead guitar playing. It is not a quick fix, and it will take some patience and a methodical approach — but it is absolutely worth it.
So, work through the four steps in order and get comfortable with each one before moving on.
Resist the urge to rush, and remember that it is far better to execute one or two connections really well than to have a vague familiarity with all five shapes that never quite makes it into your playing.
The minor pentatonic scale is the foundation of blues lead guitar. It is the primary scale that Clapton, Stevie Ray Vaughan, Albert King, Peter Green, and so many others built their entire styles around.
Getting to grips with how it connects across the full neck will not just make you a better technician — it will make you a more expressive, more confident, and more musical blues guitarist.
Good luck!
Let me know how you get on, and if you have any questions at all just drop a note in the comments section, I’d love to help.


Responses
The licks do not play.
Thanks very much for letting me know Jim – I’ve just made a few changes and the licks should now be working again 😁 However if you do have any problems, or if I can help with anything else at all, please do let me know. You can leave a comment here or send me a message on aidan@happybluesman.com. Thanks again!
Absolutely Fantastic. That makes it a fair bit clearer for me .Thank you
Thanks so much for the kind words and for taking the time to comment David, I really appreciate it. Best of luck on getting to grips with moving between the different shapes. And if you ever have any questions – either about this topic or anything else I can help with – please do let me know. You can reach me on aidan@happybluesman.com and I am always around and happy to help 😁
I can’t believe you are providing this for free!! Absolutely brilliant approach and tips!
Wow – thank you so much for taking the time to write such a kind comment Diego, it made my day 😁 I am very glad to hear that you have found the articles helpful, and I hope you’re getting on well connecting the pentatonic shapes. If you do ever have any questions that I can help with though, just send them over to aidan@happybluesman.com. I am always around and happy to help!
Outstanding! Just what I was looking for. Thanks for this!
Thank you so much for taking the time to write such a kind comment Dennis. I really appreciate it and I am glad to hear you found the article helpful! 😁
Great stuff thank you so much Love it
My pleasure Mike and thank you for taking the time to write such a kind comment, I really appreciate it 😁
Great article for the intermediate player. For new players instead of learning five patterns, I find a good point of entry to be taking the box every 13-year-old player knows, moving it down to lower strings and playing octaves. You only need to remember the bend in the road at the B. So If your root is on the A string, you must shift two notes on the B. If You start on the D or G, you shift both the B and E positions. If you start on the B there is no change. By switching to the index finger at each octave, the most inexperienced player can play with confidence through three octaves. You will also see how those other patterns are derived.