Learning to navigate around your guitar fretboard is difficult. In fact, the challenge that it presents is so great, that most guitarists don’t even attempt it. And for some guitarists, just thinking about how and where to start with learning the logic of the guitar fretboard causes them to feel overwhelmed.
This is largely because it is so vast. An average guitar has 6 strings, and 21 or 22 frets per string. And that gives you between 126 and 132 individual frets and notes for you to try and learn and use in a practical context.
That is already a lot of material. And so if you are also trying to memorise those notes alongside scale shapes, chords and song material, you are likely to struggle.
This is where octave shapes are extremely useful. As I will explain in much more detail throughout this article – octave shapes can help you to learn the notes on your guitar, without you having to spend time memorising each individual note. This in turn has a number of benefits.
It will give you a deeper understanding of the logic of your fretboard. And you can use this to navigate across your guitar with fluidity and precision when soloing, as well as to find chords all over the neck of your guitar.
In this article then, I will cover everything you need to know about octave shapes. This includes:
- What octave shapes are, and where they appear on your fretboard
- How you can use octave shapes to learn the notes all over your guitar
- The easiest ways to memorise octave shapes
- Practical examples of how you can use octave shapes to craft better guitar solos
In short, learning octave shapes will do a lot to improve your ability and confidence when it comes to moving around your guitar freely. And this will benefit all areas of your guitar playing.
So with that in mind, let’s get into it! Here is everything you need to know about octave shapes, and how you can use them in your playing:
What is an octave?
Before we dive into octave shapes in a bit more depth, I think it is first worth covering a little bit of theory. Don’t worry, I won’t be going into too much technical detail here.
I will just run through what octaves actually are, which will help to give you a better understanding of what you are playing when you use these octave shapes. And this is important.
In technical terms, an octave describes the distance between two notes. These notes are the same, but they have a different pitch.
Specifically, one of the notes in an octave is double the frequency of the other. For example, if the first note has a frequency of 440Hz, the same note an octave higher will have a frequency of 880Hz. Likewise, the same note an octave lower will have a frequency of 220Hz.
I appreciate this sounds complicated. But it is much easier to understand when you put it into context. For example, when you play the open 6th string on your guitar, you are playing the note of E.
When you play the 7th fret on your A string, you are also playing the note of E. It is the same note, but the pitch is different. It is an octave higher.
This is what the relationship between these two notes sounds like:
The first bar of this audio is the note of E played on the open E string. The second bar is the same note, an octave higher. In the last bar, both notes are played together. As I hope you can hear, the notes sound the same, but the second note sounds ‘higher’ in pitch.
Understanding this relationship and using it in your playing will help you to move around your fretboard and improvise more freely.
You can find the same notes in these different pitches, all over the neck of your guitar. There are multiple notes of E, A, F, D etc. These notes appear all over your fretboard, and they are connected by octave shapes, in addition to a couple of additional fretboard connections.
The chromatic scale
I will review these fretboard connections and octave shapes in full detail below. First though, it is worth pointing out that even when you use these shapes, you do still need to learn some of the notes on your guitar.
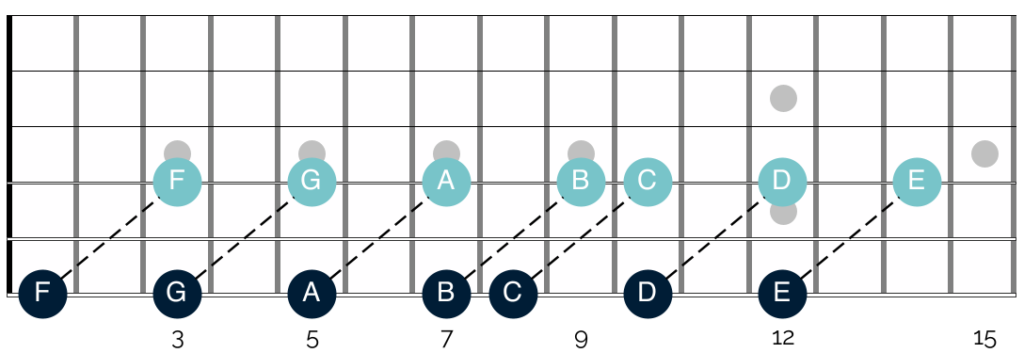
Specifically, you need to learn the notes on your E and A strings. Octave shapes work so effectively, because they help you to connect notes from these strings, to other strings on your guitar. In this way, you can gain an understanding of where a range of notes are all over the fretboard.
And you can do this, without having to learn them all individually. The notes that you need to learn on your E and A strings are as follows:
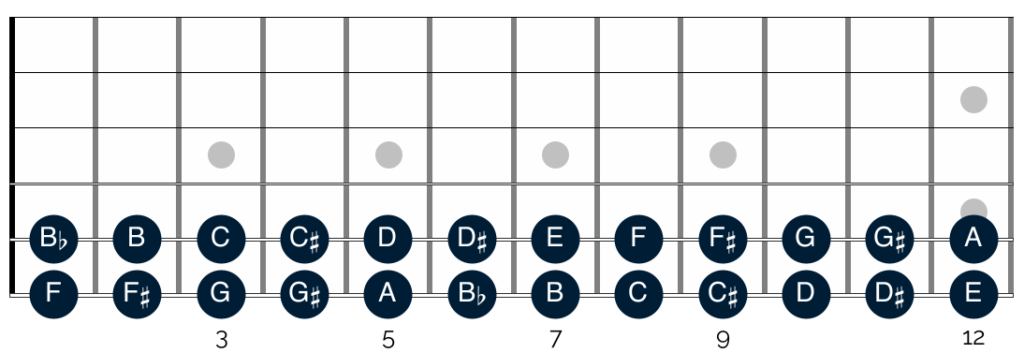
Looking just at this diagram in isolation, you might be wondering why I have only included the notes on each string up to the 12th fret. This is because, in Western music, there are only 12 different notes available.
When you put these notes together, they form the chromatic scale. So when you play all of the notes on your low E string (starting with the open E string) you are playing the E chromatic scale. When you do the same on the A string, you are playing the A chromatic scale.
When you reach the 12 fret, you are back at the beginning of the scale. This means that the scale starts again and the notes of the scale repeat. In other words, the order of the notes after the 12th fret is exactly the same as those before the 12th fret.
This is what the notes above the 12th fret look like when laid out on your low E and A strings:
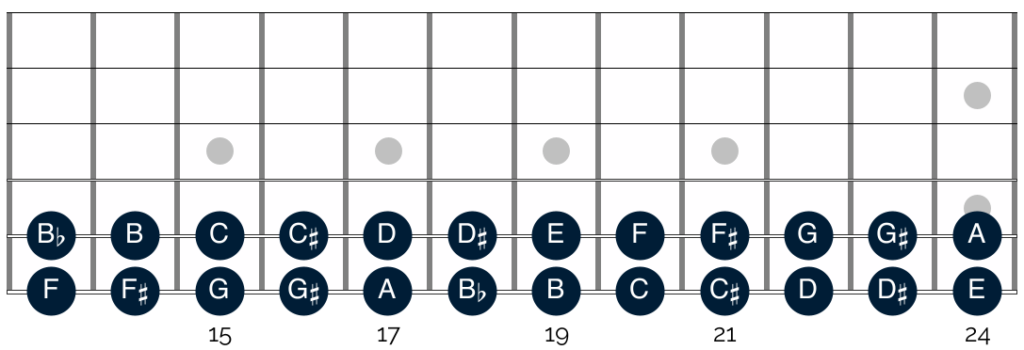
As you can see, the notes that appear above the 12th fret are exactly the same as those below the 12th fret. To best illustrate this point, the diagram above shows a guitar with 24 frets. If you play a guitar with 24 frets, you can play 2 octaves of the chromatic scale, on each string.
But even if your guitar has 21 or 22 frets, you can still think of your fretboard as being split into two parts. It is for this reason that there are two fret inlays on most guitar fretboards at the 12th fret.
Learning the chromatic scale
I appreciate this might still look complicated at first. After all, there is still quite a lot of information here, even if it is much less compared with trying to learn all of the notes on your fretboard. As such, I would recommend breaking this challenge up into small chunks.
Dedicate a portion of your practice routine to learning the notes on these strings. Start with the E string first. Take your time to really get to grips with the notes, before moving onto the A string.
Additionally, try and incorporate learning these notes into your playing. For example, if you are playing a riff that starts on the low E string, pause and try to recall which note you are playing. If you do this regularly, you will be surprised at how easy it is to learn these notes.
Whichever approach you take, try to be patient. The rest of the information in this article relies on you having an understanding of the notes on these strings. So take your time and get to grips with them before moving onto the octave shapes listed below.
Initial fretboard connections
The final step we need to take before looking at octave shapes, is to understand some initial fretboard connections. There are two of these, which are not strictly octave shapes – even though they do connect the same notes in different octaves.
The first of these connections is evident when we look at the chromatic scale.
As noted above, on the low E and A strings, the notes repeat themselves after the 12th fret. This is the same on all of your guitar strings. If you take any note on one of your strings, you will find the same note on the same string, 12 frets higher.
The note that is 12 frets above is a whole octave higher than the original note. You can see this by looking at two examples on the E and A strings:
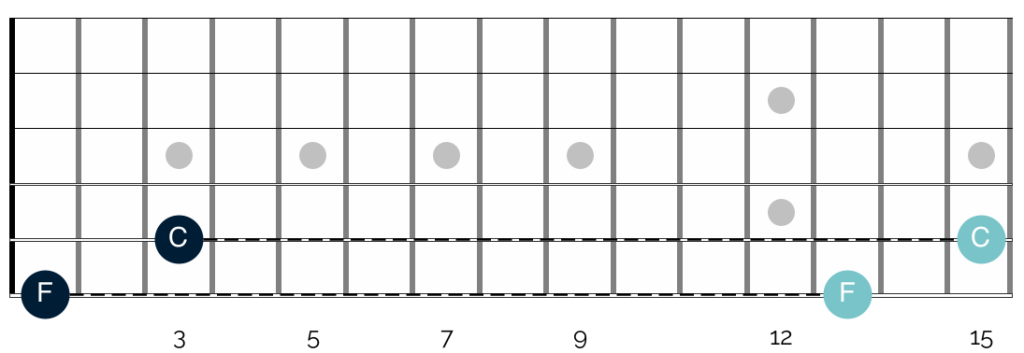
This connection also exists when using open strings. For example, if you play any open string, you will find the same note at the 12th fret of that same string. Again, it is for this reason that most guitars have two fret inlays on the 12th fret.
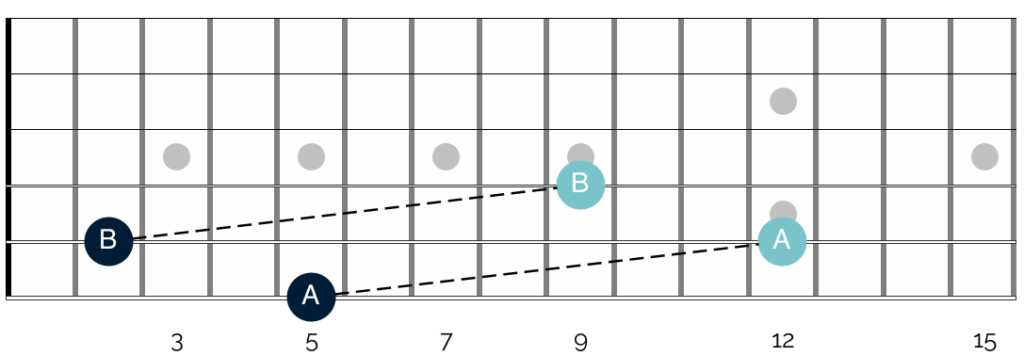
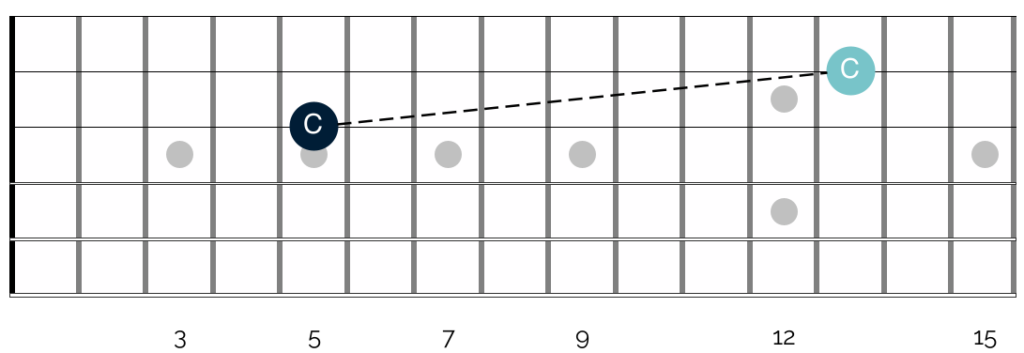
You can also find the same note in a different octave, by moving 1 string up, and 7 frets up.
For example, if you play the open E string and the 7th fret on your A string, you are playing two notes of E, both separated by an octave.
The relationship between the two strings remains the same as you move up the fretboard. So if you take any note on your low E string, you will find the same note on your A string, 7 frets higher. This is the same note, played a whole octave higher. You can see this on the following diagram:
This connection exists between all of your strings, apart from your G and B strings (as I explain in more on this below). So if you play a note on your A, D or B strings, you will find the same note, an octave higher, 7 frets up on your next string.
The G And B strings
This same connection does not exist between your G and B strings. This is because your B string is tuned one semitone lower than your other guitar strings.
And you need to account for this when you try to make connections from the G string to the B string. So instead of moving up 7 frets, you now need to move up 8 frets:
This difference only exists between the G and B strings. On all of the other strings of your guitar, when you move up 1 string and 7 frets, you will find the same note, an octave higher.
This is also true of the B and E strings. If you take any note on the B string, you will find the same note, an octave higher, 7 frets up on the high E string.
Octave shapes
Slightly confusingly, these initial fretboard connections are not typically referred to as octave shapes. This is because, whilst useful, they are not particularly compact. And although you can jump 7 or even 12 frets up your fretboard when you are soloing or playing chords, this can make your playing sound disjointed.
This is where octave shapes can make a huge difference. As you will see, octave shapes help you to build more practical connections across your guitar. So instead of having to make big jumps across your fretboard, you can move in a more economical way between chords or when soloing.
There are a number of different octave shapes to learn, all of which connect notes 1 single octave apart. And in my experience the easiest way to learn these is to group your strings together into pairs.
Let’s look at this in a bit more detail:
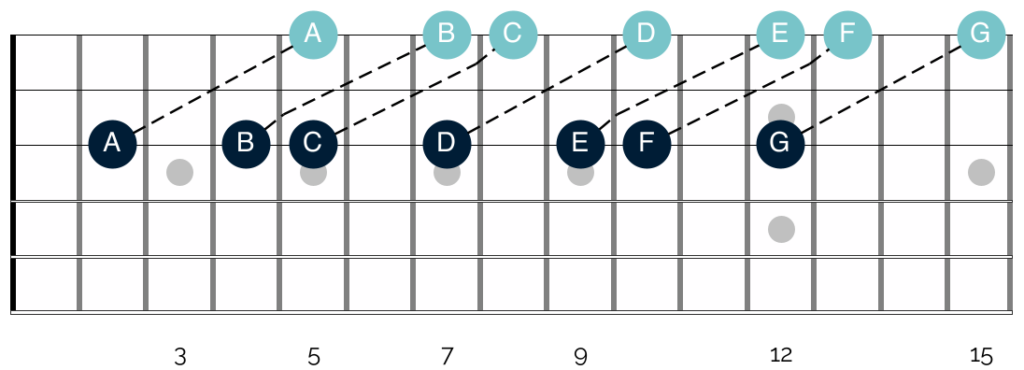
Octave shapes built on the E and A string
The first octave shape to learn is built from notes on your low E and A strings. If you take a note on one of these strings and move 2 strings up and 2 frets up, you will find the same note, 1 octave higher. This is what this octave shape looks like:
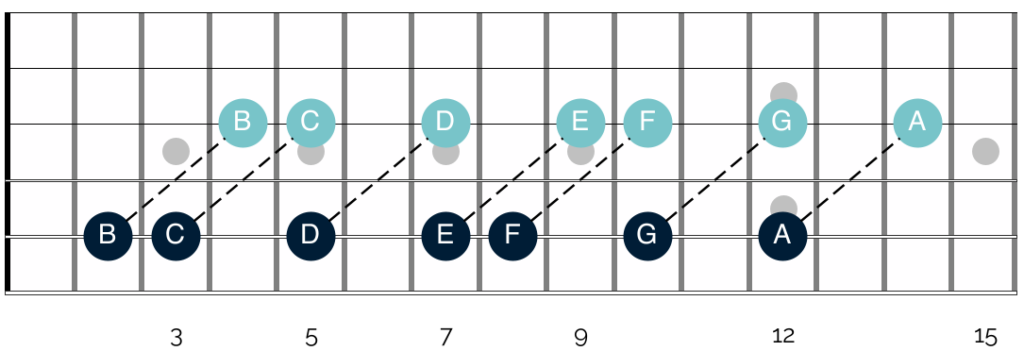
You can apply this shape to any note on your low E and A strings. And when you do, you will find the same note an octave higher on either the D or G string.
This is an immensely useful octave shape. In fact it is one which, when combined with the additional shapes shown below, will really help you to unlock your guitar fretboard.
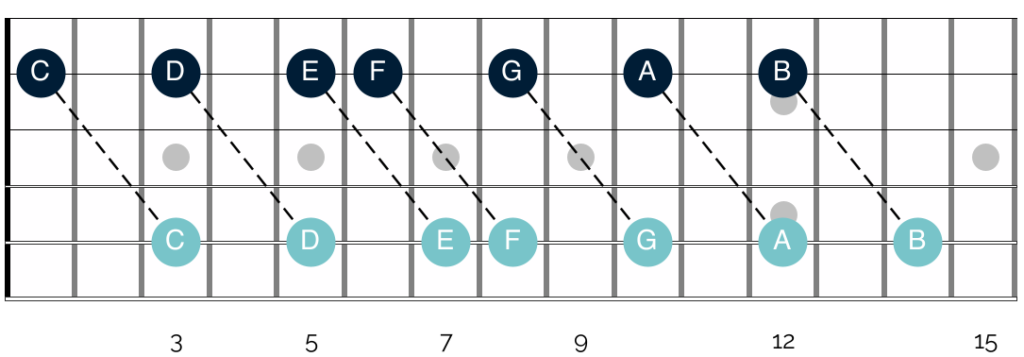
Octave shapes built on the D And G strings
The next octave shape to learn is built from notes on the D and G strings. It is as follows:
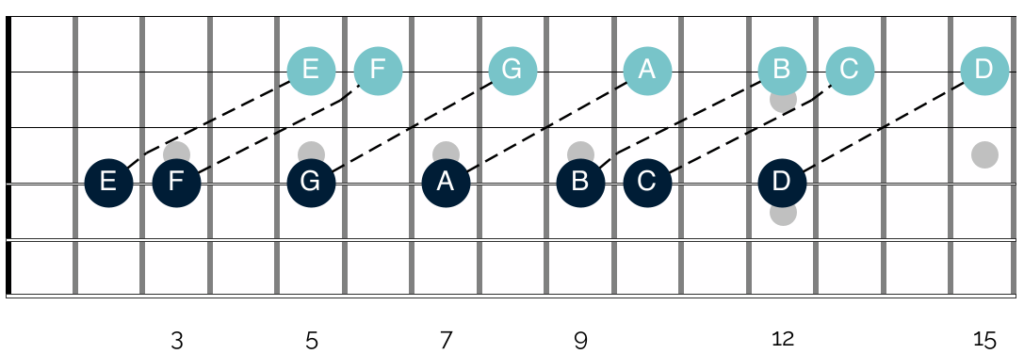
Here there is a slightly bigger stretch, as you have to move up 2 strings and 3 frets. Despite the stretch, it is crucial to learn this octave shape.
This is because it allows you to connect the notes on your low E and A strings with the same note in a totally different part of your guitar fretboard. In this way can you connect notes that are 2 octaves apart.
Octave shapes built on the B and E strings
The final octave shape is built from notes on your B and E Strings. It is as follows:
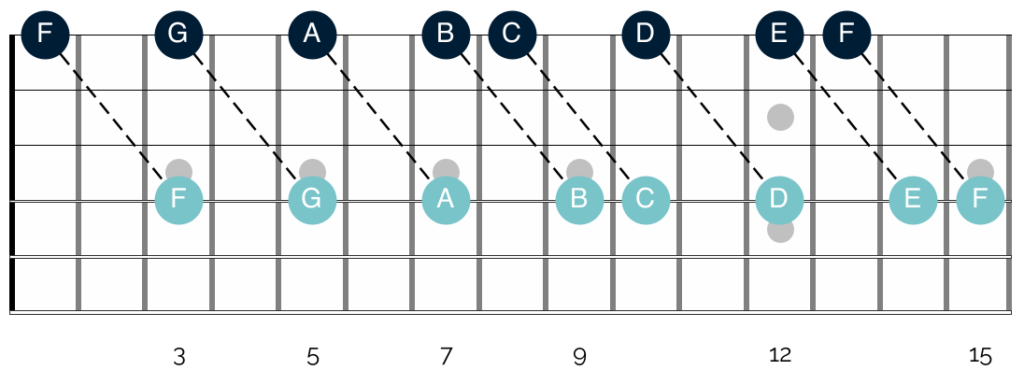
Again, there is a bigger jump for your fingers here, as you are crossing 3, rather than 4 strings. Yet despite this, it is worth learning this shape. It will allow you to move across large sections of your fretboard elegantly, without having to rely on moving up and down scale shapes.
Octave shapes built on the G string
At this point it is worth noting that this same shape can be applied to the G string. This is as follows:
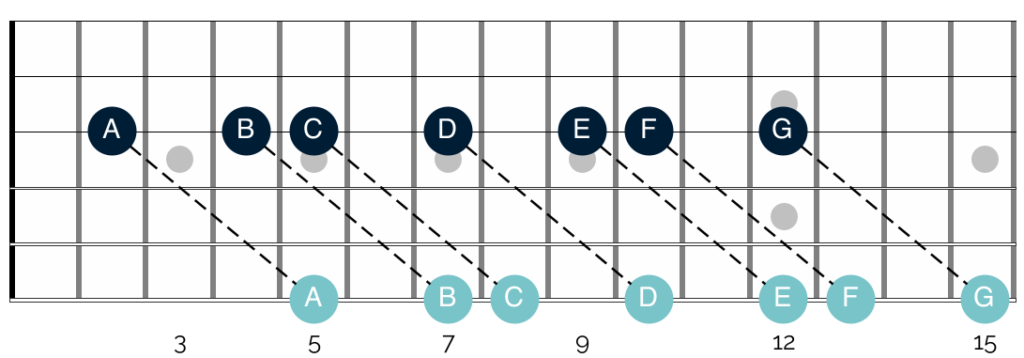
I prefer to view this as a ‘bonus’ shape. Especially when you are getting to grips with this material, I think it is easier to learn the octave shapes by grouping them in pairs.
In this way you can learn the octave shapes that are built from notes on the E and A string, and then the D and G strings etc. There is a neat logic to this which makes them easier to learn.
The second reason, is that this shape is a little more awkward compared with the other shapes listed above.
There is a bigger stretch, which makes it a little less practical in a playing context. Nevertheless, it is an additional shape that you can use to navigate across your guitar fretboard. And so it is still worth learning and committing to memory.
How to learn your octave shapes
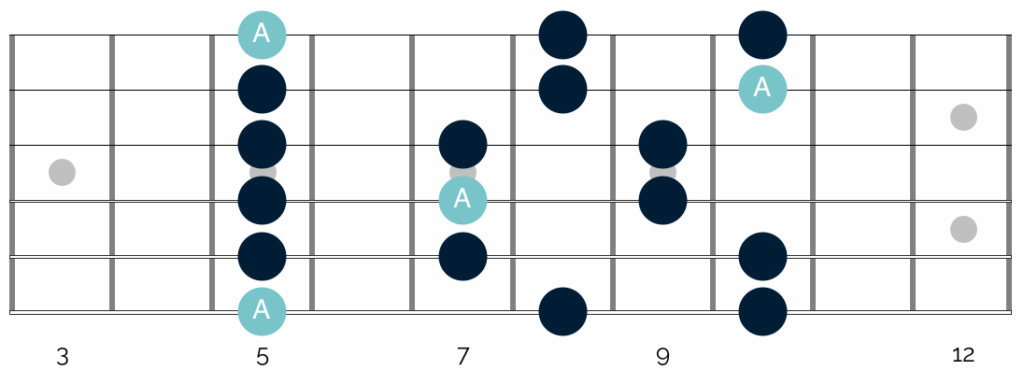
When you look at the octave shapes as they are laid out above, it is difficult to appreciate just how important they are in helping you to navigate across your guitar. But this changes when you visualise them on your fretboard:
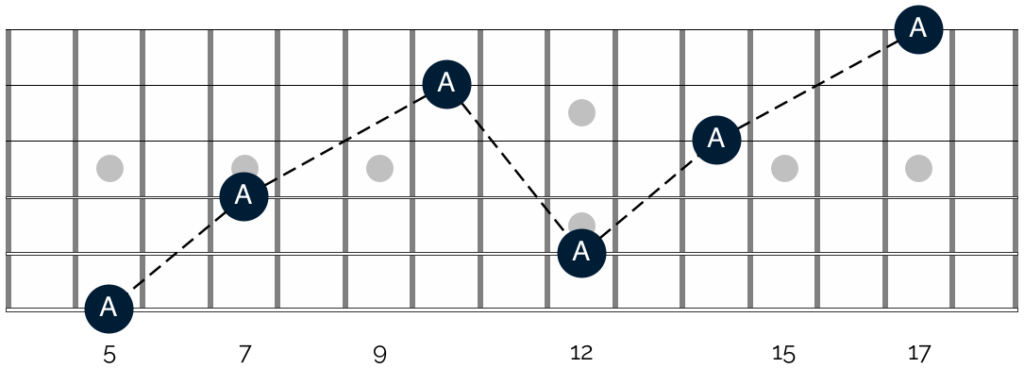
As you can see, with octave shapes, you can quickly find 5 different notes of A. And this is just in the first half of your fretboard.
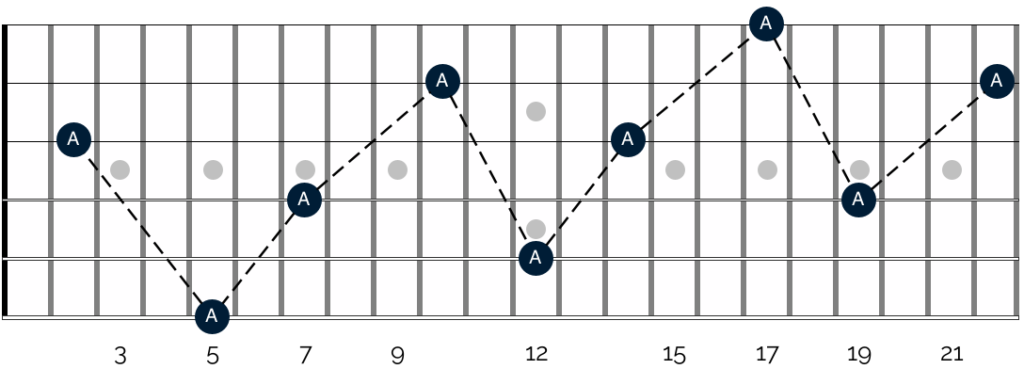
We can take this one step further, by looking at these shapes across the entirety of the fretboard:
Learning all of these notes from memory would be very challenging. But by combining your knowledge of the notes on your low E string with your knowledge of the octave shapes, you can quickly connect all of them together.
There are just two further things to keep in mind here:
The first of these is that the open strings can be included in these octave shapes. So although it is not shown on the diagram above, you can think of there being an additional connection here between the 2nd fret on the G string and the open A string.
The second, is that there are certain points on the guitar fretboard where 3 of the same notes converge in the same area. This is what the fretboard looks like with all of the notes of A applied:
As you can see, around the 5th and 17th frets, there are 3 notes of A in a small area. This is because the notes on both the high and low E strings are the same. So if you follow an octave shape onto either of the E strings, that exact same note will appear on the other side of the guitar fretboard. These 2 notes are separated by 2 octaves.
The same is true no matter which note you pick. The only difference is the position on the fretboard where these notes appear.
Practice exercises
The best way to get to grips with these shapes is to practice moving between them. And I recommend doing this across the entirety of your guitar fretboard. To start, pick a note on one of the first frets on either the low E or A strings.
Then follow that note all the way to the top of your neck using octave shapes. Try this with a variety of different notes.
At first, just work up your guitar fretboard. Don’t worry too much about working your way back down to the beginning.
Once you have done that with a range of different notes on your low E and A strings, you can make the exercise more challenging in a number of ways:
Firstly, you can work your way down from the top of your guitar fretboard, back to your starting note. For example, if you start on the note of G on your low E string, you can work all the way up to the note of G on either the 22nd fret of your A string, or the 24th fret of your G string.
You can then pause, before working your way back down the guitar fretboard to the note of G at the 3rd fret on your low E string. This is much more difficult than just travelling up your fretboard.
Secondly, you can choose a note in the middle of your fretboard, or even a little higher up. So instead of starting low down on the neck, this time you are picking a note higher up on the fretboard.
This allows you to trace your octave shapes one way on the fretboard before pausing and returning to the starting note. You can then go the other way. This will help you to practice using octave shapes in a way that is more reflective of a real playing situation.
Finally, and only if you feel comfortable with both your octave shapes and the notes on your low E and A strings, you can try starting this exercise with notes on different strings. Initially you may need to take a moment to work out which note you are starting on.
But if you go through this process enough, you will quickly start to develop awareness of the notes on other strings.
Using octave shapes in your guitar solos
Once you feel comfortable with the various octave shapes and practice exercise listed above, you can start to apply this knowledge practically.
Specifically, you can start to use octave shapes when you are playing lead guitar.
One of the biggest obstacles to improvising and soloing effectively is being able to move around your fretboard with fluidity and precision.
It is easy to get stuck playing the same shapes and patterns on your guitar. It is also challenging to move to different areas in a way that is smooth and musical, rather than mechanical and disjointed.
Getting really comfortable with the shapes of the minor pentatonic scale, blues scale and major pentatonic scale will help. Understanding some of the ways that you can connect these shapes will also help. However, as blues guitarists, it is easy to become overly reliant on scale shapes.
And using octave shapes can really help here. These shapes will give you additional ways to move across your fretboard. This will give you a greater sense of freedom when soloing, and help you to create more interesting improvisations.
Let’s look at this in a bit more detail:
Targeting the root note
When you are playing in any given key, the note of that key is described as the root note. For example, the root note in the key of A, is A. If you are playing in the key of C, then the root note in that key is C. And so on.
Targeting the root note in your improvisations works very well. When you hit the root note, it creates a moment of musical consonance. It is a harmonious sound, and when you play the note at the end of a phrase or lick, it helps to create a sense of resolution. It is the musical equivalent of a full stop.
You can hear this by comparing two similar and simple licks which resolve on different notes:
At 100 beats per minute (BPM), this is what these two licks sound like:
The lick in the first two bars resolves on the note of A. And it does so in conjunction with the chord of A7 being played (this isn’t shown on the tab but you can hear it on the audio track).
The lick in the second two bars resolves on the note of G. Again this is over an A7 chord, which is going to be one of the most common chords you will play over in a 12 bar blues progression.
At least to my ears, neither lick sounds bad. The second lick isn’t displeasing to the ear, nor does it create any dissonance. But when compared with the first lick, it lacks a sense of completion.
When you end on the G, rather than the A, the lick sounds unfinished. It makes it sound as if you have more to say or somewhere else to go.
Using octave shapes to target the tonic note
Provided that you agree, then you can use this information – in conjunction with your knowledge of octave shapes – to target these tonic notes in different parts of your fretboard during your improvisations.
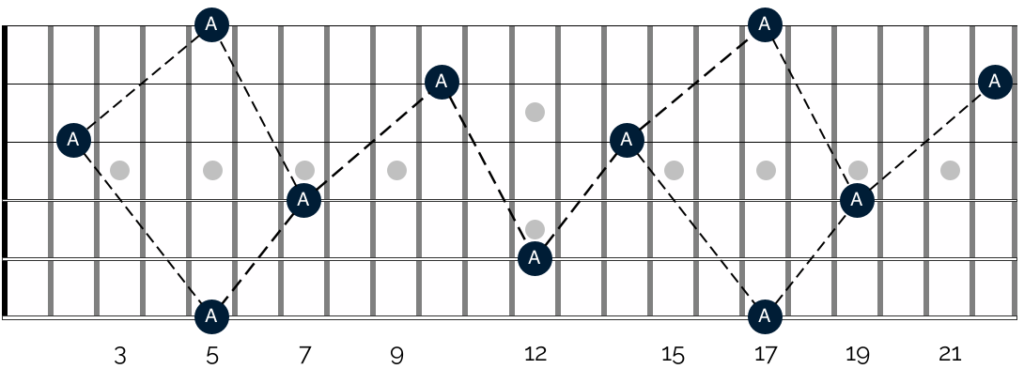
We can see this in greater detail when we look at the notes of A that appear on the fretboard alongside shapes 1 and 2 of the minor pentatonic scale:
As you can see, within this small section of the fretboard, there are 4 different notes of A that you can target when using the A minor pentatonic. 3 of these notes are in different octaves.
If you are used to playing and improvising with these shapes, then I suspect that many of your licks and phrases already hit on these root notes. And this is likely to be true, even if you are not targeting them consciously.
However by focusing on them, and connecting them using octave shapes, you can create different and interesting lead lines. Let’s look at a number of examples:
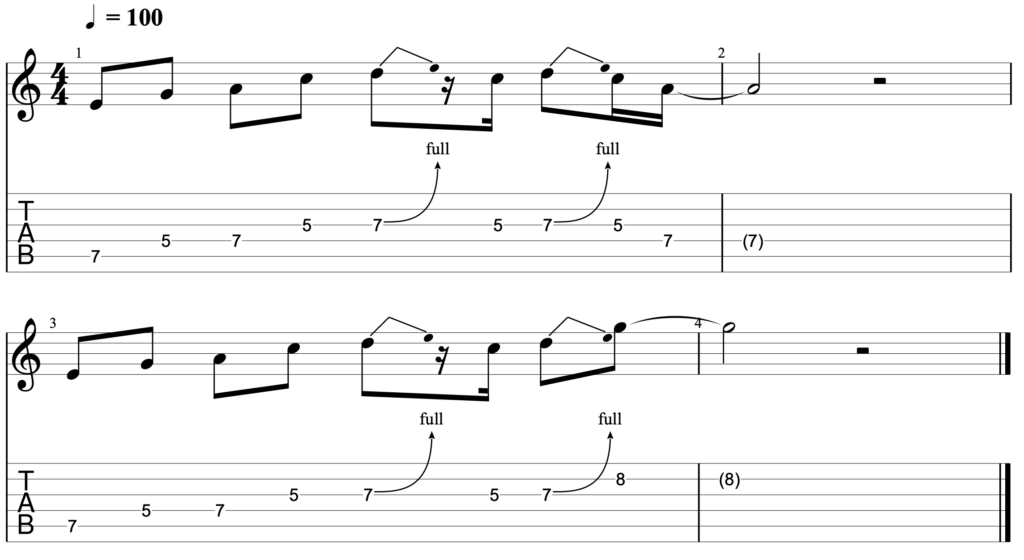
Lick 1
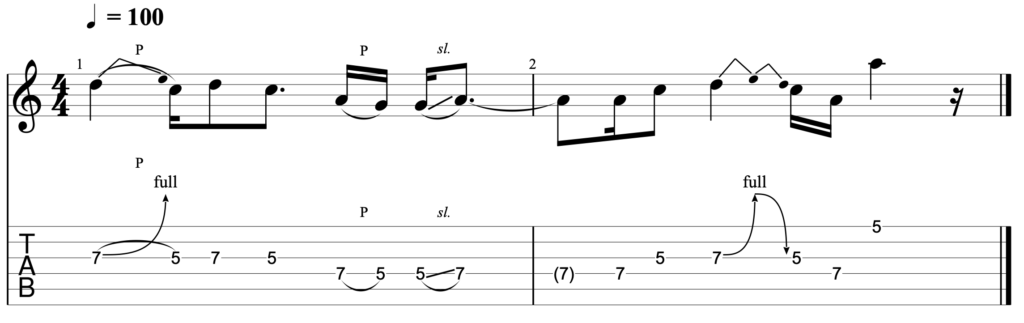
At 100 BPM, this is what this lick sounds like:
In this first lick, the root note is targeted at the end of each bar. This happens first at the 7th fret of the D string. It then happens again one octave higher, at the 5th fret of the E string. Resolving on the root note of the E string in this way is very effective.
It is a technique that B.B. King uses a lot in his playing. So if you want to recreate a similar vibe in your playing, try taking this approach in your solos.
Lick 2
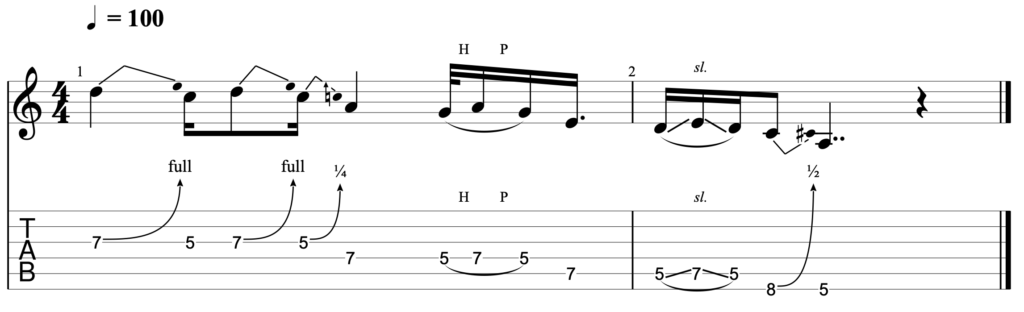
At 100 BPM, this is what this lick sounds like:
This second idea works well if you want to target a root note on your lower strings. Arguably it is less likely that you will spend a lot of time on your lower strings. However, it is important to know how to resolve your phrases effectively when you do use these strings.
Although it is not illustrated in this lick, the 5th fret on the low E string also works very well as a note to join the 1st and 5th shapes of the minor pentatonic scale together.
Lick 3
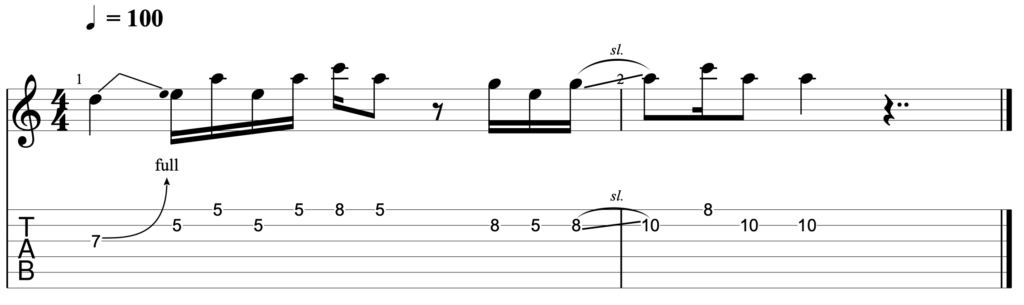
At 100 BPM, this is what this lick sounds like:
This final lick is slightly different. This is because it does not illustrate movement between the same notes in different octaves. It does however illustrate the types of licks you can create when you learn your octave shapes, and as a result – appreciate where the root notes of A are on your fretboard.
This particular lick demonstrates – in my opinion – one of the smoothest and most musical ways of transitioning between the first and second shapes of the minor pentatonic scale.
It is also a phrase that you will encounter a lot when learning blues songs. Stevie Ray Vaughan in particular is one guitarist who uses this phrase a lot in his solos.
Closing thoughts
It is worth pointing out that there are octave shapes are embedded in all of the scale shapes with which you might be familiar. The examples above show how you can use octave shapes alongside shapes 1 and 2 of the minor pentatonic scale. But the same applies all over your fretboard.
In this way, you can create different licks, and move across your guitar, without sounding like you are just playing scale shapes up and down your neck.
It is also worth pointing out that there are further ways in which you can use octave shapes. One of the most significant of these is to form different chord shapes across your fretboard. In this way, you can play the same chord, but use different ‘voicings’.
This gives you a greater variety of options when playing rhythm, and also helps you to navigate the fretboard more easily.
This is a lengthy topic, and one which is beyond the scope of this article. To understand and utilise it properly requires you to have knowledge of chord construction and barre chord shapes, as well as your octave shapes. As such, I will cover it in much more detail separately in a future article.
Until then, I hope that the information laid out here helps you to get started using octave shapes. In my experience they are one of the best ways to break down the challenge of moving around your fretboard. And the benefits of this are significant.
Good luck! Let me know how you get on, and if you have any questions at all please do get in touch. Drop a note in the comments section, or send me an email on aidan@happybluesman.com. I’d love to help!


Responses
Thanks so much for this tutorial, really helpful!
Thank you so much for taking the time to comment Aran. I’m very glad to hear you found the article helpful! Best of luck getting to grips with the octave shapes, and if you do ever have any questions about them – or any other element of your playing – just send me an email on aidan@happybluesman.com. I am always around and happy to help!
Great article and very valuable info. I knew of one octave shape. I didn’t know there were so many. Looks like I have a lot of work to do. I think this will help unlock my ability to become more of a improvised player. Because in my opinion if your going to “jam” with other musicians, then you have to improvise.
Jack
Thanks so much for the comment and for the kind words Jack, I really appreciate it. And you’re absolutely right! Although these octave shapes and patterns are a little challenging to get to grips with at first – once you do feel comfortable with them, they will help you to ‘unlock’ the fretboard. This is useful for a variety of reasons, but is particularly helpful for improvising. So once you have these shapes and also the shapes of the minor pentatonic or minor blues scale under your fingers, you’ll be very well set-up for your first blues jam 😁
Having said that, if you do have any questions at all about the material here – or if there is anything else that I can help with, please do get in touch. You can reach me here or directly on aidan@happybluesman.com. I am always around and happy to help!