In this first clip, I am playing in a laid back style over a smooth blues track in A minor. Before we look at what is going on here in a bit more detail, here are the key downloads you need when working through this lesson:
Smooth Blues In A Minor Backing Track
Smooth Blues In A Minor Backing Track Tab
A Minor Pentatonic Scale Shapes
The first of these downloads is the backing track for you to play over and create your own ideas.
The second is the tab for the backing track, illustrating the chords and how to play them, along with the tablature for the single note lead line.
Finally, the last download shows the 5 shapes of the A minor pentatonic scale.
These show my suggested fingerings and the tonic notes of A are highlighted in each position. So if you don’t yet feel totally comfortable with these scale shapes, you can refer to them when creating your own ideas.
The tab for this first mini solo is as follows:
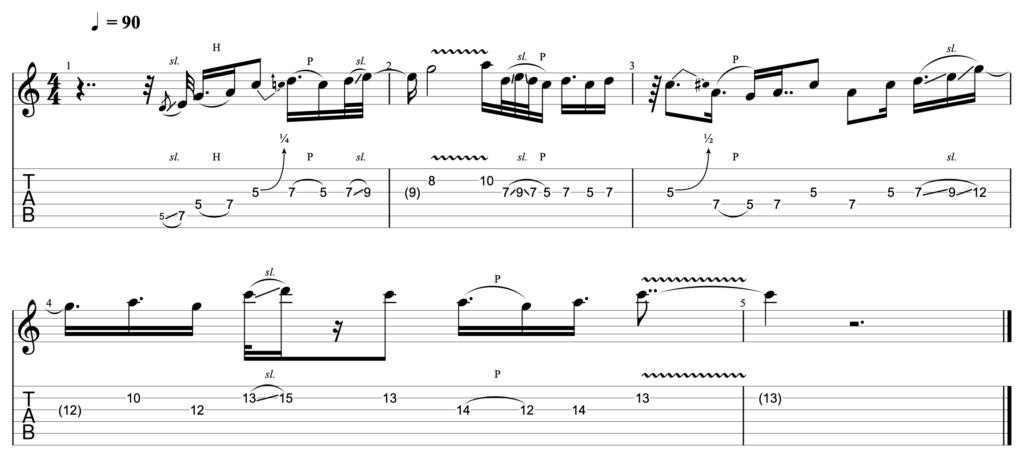
At the 90 beats per minute (BPM) at which the track is played, the isolated audio for the guitar part is as follows:
Musical context
The backing track that we are playing over here is in the key of A minor. It is not a standard 12 bar blues in any form. It is not based around dominant 7th chords, and there are more chords and chord changes involved in the track than you would find in a typical 12 bar blues.
The specific chords in the verse of this track run as follows:
F | Em7 | Am7 | D9
As that chord progressions continues, a single note lead line enters over the top of the chords, before the progression alters and the following chords are played:
Em7 | Dm7 | Am7 | Gsus4
This is not a full theory course and so to prevent overwhelm, I’m not going to run through how this chord progression is formed and the way it differs from a classic 12 bar blues. If you would like to dive into that content then I would recommend working through the course entitled ‘Understanding Chords & Chord Progressions‘.
There are however a couple of key points that are worth noting and which are as follows:
The chord progression is based around the chords that are formed when you harmonise the notes of the A minor scale. These chords are as follows:
Am | Bdim | C | Dm | Em | F | G
In this particular track, most of the chords are turned into 7th chords. This takes away some of the heavy minor feel of the chords and serves to brighten up the sound of the progression.
As a result, the track has a minor feel, but it does not feel overly melancholic; it feels more ambiguous and a little jazzy.
Not only this, but the chord progression moves quickly. Each chord is only held for a single bar and so there is a real sense of movement in the progression.
If you are at a more advanced stage in your playing, this offers a lot of opportunity for ‘playing the changes’ and trying to target notes of the specific chord that you are playing over in any given moment.
If you are at an earlier stage then not to worry! The good news here is that the rapid movement through the chords means that the musical landscape over which you are playing is changing.
In this way, you can play the exact same licks and they will take on a slightly different flavour at different points in the backing track, as you will be playing them over different chords.
The final point to consider with this backing track, is the repeated single note line that is played alongside the chords. This does a lot to create the groove and vibe of the track, and it gives it almost a slightly funky feel.
Locking into this groove and really connecting with the feel of the track is essential to improvising effectively in this musical context.
So before you launch into your playing, lock into the rhythm of the track by tapping establishing the beat. Tap your foot, start nodding your head and try to feel the groove in your body.
Taking a few seconds to do this before you dive into your improvisation will pay dividends, so don’t overlook this point. It will help you both to learn and recreate the specific licks I play, as well as improvise effectively.
Key learning points
When playing over any backing track, there are two key steps you need to take.
The first is to establish the key you are playing in, and which scale(s) work over that key. As noted above, this backing track is in the key of A minor, and so your approach needs to be based around A minor scales.
Once you have that piece of the puzzle in place, it is important to assess the feel of the track over which you are playing. This is essential and will fundamentally determine the quality of your improvisations.
The track here has a smooth and laid back blues pop feel. This fundamentally altered how I approached soloing over the track, and the techniques and ideas that I targeted in my playing.
Here are the key ideas that I thought about and targeted when crafting this lick, and the key takeaway points that you can apply in your own playing.
Scale choice
This track is in the key of A minor. This means that when soloing over the track, you need to use an A minor scale. There are a number of different options here, but the most obvious choices are as follows:
- A minor pentatonic scale
- A minor blues scale
- A natural minor scale (also known as the A Aeolian mode)
I opted to solo using the A minor pentatonic scale. This is because the minor pentatonic scale naturally has a very smooth and musical feel. In fact, once you have some experience using the scale, it is actually difficult to create a dissonant or jarring sound with it in your playing.
Opting for the scale also ensured that my playing retained a bluesy feeling, even though the track over which I am playing is not a classic 12 bar blues.
Now, there are many further options you could use over this track. However, instead of targeting complexity with scale choice, I would recommend targeting more complexity in your phrasing. The track has a strong groove that you want to lock into, and this is where I would recommend placing your emphasis.
Key Takeaway
The A minor pentatonic scale will work very well over this track, and provide you with a comfortable foundation. You can then focus on phrasing, technique and the groove of your playing.
The A minor blues scale would also make a great choice, as you can add a little bluesy dissonance with the use of the blue note.
Technique
My technique in this small section of playing is heavily focused on legato ideas. I am sliding, bending, using grace notes, and combining these ideas to create phrasing that has an almost liquid quality.
This is evident throughout, but particularly so in the final section where I work my way up the fretboard using a series of slides.
This approach works particularly well when playing in a smooth and more laid back context like this one. However it is one that you can apply in almost any musical context with great results.
This is simply because it gives your playing a more vocal and expressive feeling. If you are not careful, relying on your picking hand too much can make your phrasing sound a little clunky. It is like overly enunciating every word when you are speaking.
Not only this, but when you do this and play up and down scale shapes, it can sound as if you are just practicing your scales, rather than making music.
By contrast, when you pick less and place more emphasis on fretting hand technique and the combination of ideas, you can move between notes of the scale in a very smooth and vocal style.
Key Takeaway
If you want to create a smooth and vocal feel in your playing, try to reduce how often you pick the strings.
Instead, focus on targeting legato techniques with the fretting hand which allow you to fret multiple notes without so much picking.
Lateral movement
If you opt for legato techniques in your playing, you will naturally begin to focus on lateral movement across the fretboard.
In other words, rather than thinking about playing across scale shapes from the low E to the high E strings, you will instead be thinking about playing up and down the fretboard, across one or two strings.
Getting comfortable with this idea is one of the first steps I take with players who want to improve their soloing style. There are 5 key of reasons for this, which are as follows:
- It allows you to connect pentatonic scale shapes in an elegant and musical way
- Movements across a scale laterally sound much more musical than when you simply play across a scale shape
- You can create the feel of a slide player in your playing
- Looking at the guitar in a different way will lead you to craft a whole range of new and interesting licks
- Your knowledge of the fretboard will dramatically improve
For these reasons I focused a lot on lateral movement in my short solo. I think it does a lot to help me lock into the track and create the smooth feel required for the track.
Key Takeaway
The guitar offers you so much potential because it functions in both a vertical and lateral plane.
Players typically focus on the vertical plane, but you can get much more mileage and create a whole range of amazing ideas by thinking about moving laterally across the fretboard.
Phrasing
This final point is a little more complicated and nuanced, however it will do a lot to improve the quality of your solos – especially if you have a bit more experience improvising.
When blues guitarists first start improvising, they target the tonic notes in the key in which they are playing as a way of resolving their phrases.
I have covered this idea in depth in various lessons inside The Blues Club, including this one. As such, I won’t repeat all of that material here. In short however, the tonic note creates a very strong sense of resolution and is a great note for you to target as a way of finishing your phrases.
The drawback of this approach over time is two-fold:
Firstly, it can become a little repetitive and boring. If all of your phrases bring you back to the tonic note every time, your playing can start to sound a little predictable.
Additionally, it can actually break up the flow of your playing a little bit. It has such a strong sense of resolution that it can almost bring your ideas to a halt. You create a real sense of finality and then have to almost start the engines again to get the next phrase going.
This is potentially a little more problematic in this specific musical context, where the track has a funky groove and a strong sense of movement.
As such, throughout my playing in the clip above I didn’t opt to resolve on the tonic notes. Instead I opt for intervals which have a more tense and unresolved sound. In this way I elongate the length of my phrases with the use of musical commas, rather than full stops.
To discuss this in depth involves in more complete discussion around intervals and their qualities. The good news however, is that you can target this idea in your playing just by using your ear:
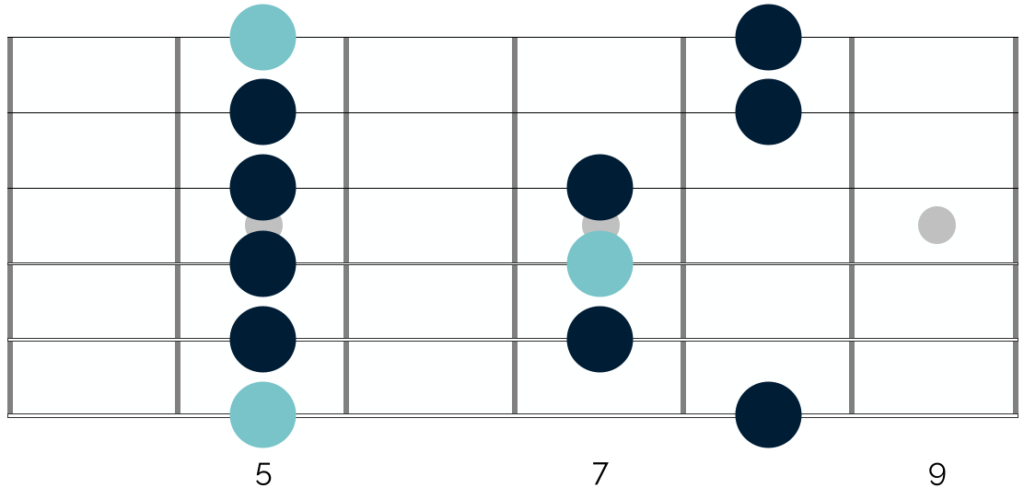
This diagram shows the first shape of the A minor pentatonic scale, with the tonic notes of A highlighted in light blue.
To start to move beyond always resolving on the tonic note in your playing, all you need to do is target different notes at the end of your phrases.
You can then either seek to actually resolve on these other notes, or to use them as pausing points to increase the length of your phrases before then resolving on the tonic (or another note of your choosing).
In the interest of full disclosure, this will not always work or sound good. You will try to resolve on notes that sound tense and you are likely to get tangled up as you seek to to construct more complex ideas.
Despite these challenges however, this approach will alter your playing over time. You will improve your musical ear and start to play with more variety.
Key Takeaway
The tonic note always works well as a point of resolution. However, rather than crafting always heading to the tonic and resolving your phrases there, you can explore pausing on other notes before finishing your phrase on a strong point of resolution.
In this way, you can craft longer phrases and more interesting and varied ideas.
Over to you 😁
The ideas outlined above are just suggestions for what I think works well in this specific musical context. However, I would always encourage you to use your ear and try to craft new and different ideas that resonate with you.
You don’t need to produce the perfect solo on the first go. Instead, explore, work to create new ideas and allow yourself to make mistakes. Once you have done that, you can then begin to tighten things up and zone in on the specific ideas you think work best.
If you do learn the mini solo that I have tabbed out above, brilliant! I hope that you enjoy playing it, and that it helps to build your technique and playing style.
More than anything, I hope that it provides you with inspiration for ideas you can use in your own solos. Don’t just learn the notes and then move on. Instead, look at how you can take the ideas I play, and then adapt them and make them your own.
In this way, you have the potential to get huge amounts of benefit from learning this single mini solo.
On that note, good luck!
Keep me posted with how you get on, and if you want feedback on how you are playing through the mini solo – or on a longer improvisation over the track – just send me a video.
You can reach me on aidan@happybluesman.com and I can provide personalised feedback on your playing and soloing ideas 😁
I’m really looking forward to seeing them!