In this fourth mini solo, I’m playing over a relaxed blues track in the key of A minor. Before we look at what is going on here in a bit more detail, here are the key downloads you need when working through this lesson:
Chilled Blues In A Minor Backing Track
Chilled Blues In A Minor Backing Track Tab
A Minor Pentatonic Scale Shapes
The first of these is the backing track that I am soloing over, which you can use to play over and create your own ideas, as well as practice the mini solo tabbed out below.
The second is the tab for the backing track, which illustrates the chords in the backing track and how to play them.
Finally, the last download shows the 5 shapes of the A minor pentatonic scale.
These scale diagrams show my suggested fingerings for the scale, and the tonic notes of A are highlighted in each position.
So if you don’t yet feel totally comfortable with these scale shapes, you can refer to them when creating your own ideas.
The tab for this fourth mini solo is as follows:
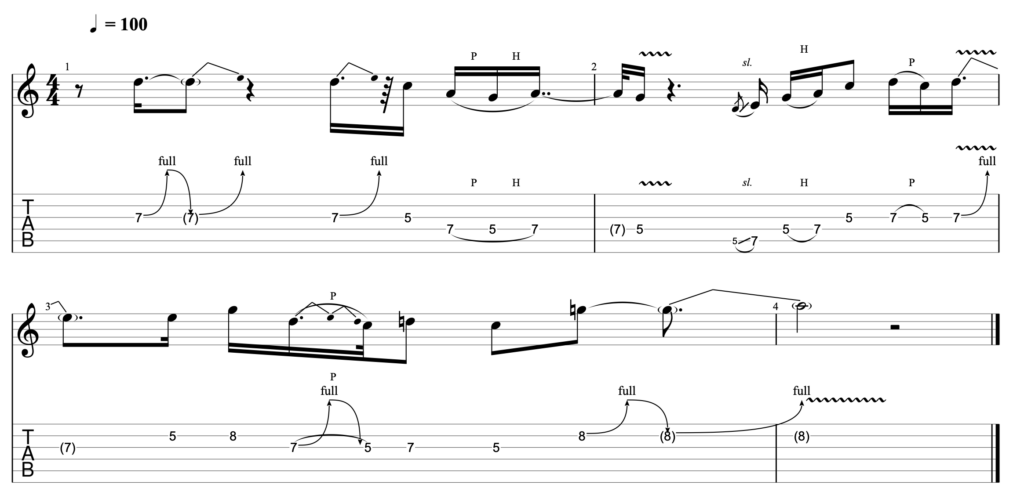
At the 100 beats per minute (BPM) at which the track is played, the isolated audio for the guitar part is as follows:
Musical context
In a number of the previous mini solos in this course, the chord progressions in the backing track have born some resemblance to the 12 bar blues.
That is not true here.
The chords that appear in this backing track are as follows:
C | Am7 | G
Am7 | Fmaj7 | G
Am7 | Fmaj7 | E7#9
Although it is not immediately obvious, the track is in the key of A minor.
This backing track is built around what is known as a diatonic chord progression. It uses the chords that are formed when you harmonise the notes of a scale, and it does not play them in a standard I, IV, V progression.
So, even though we are playing in the key of A minor, we start on a C chord, which in this case is the III chord in the progression.
We then encounter a range of different chords, including the VII, vi and a v chord which should be minor, but instead is turned here into a dominant 7th chord with an added #9.
To cover this theory in depth moves beyond the scope of this lesson. In short though, the key points to keep in mind are as follows:
- This progression differs from a standard 12 bar blues in almost every way. It features more chords, a greater variety of chord types and there is more movement throughout the progression
- Even though the first chord played here is the chord of C, we are actually playing in the key of A minor. The note of A feels like our tonal home base, and the chord of Am7 is the most commonly occurring chord in the progression.
In addition to these two ideas, there is however one additional point that is worth mentioning. This is only obvious when you download the tab for the track, so hit the link above before reading on.
This is as follows:
Triad shapes
The chord progression for this backing track is based around triads. I cover what these are in much more detail in the course entitled ‘Understanding Chords & Chord Progressions‘.
In short though, a triad is a 3 note chord in which each note is separated by the interval of a third. This sounds complicated. However, most of the chords with which you are likely to be familiar – including C, A, Gm and Em etc, are all triads.
This is because each of those chords only contains 3 unique notes, even though you might be playing them across all 6 strings.
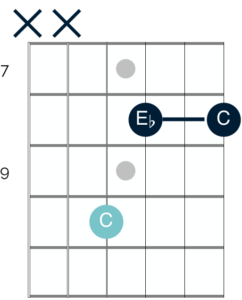
If you take a C major barre chord for example (which is played over all 6 strings) you will see that there are only 3 unique notes in the chord – C, E and G:
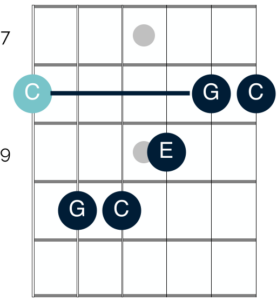
The root of the chord (the C on the low E string) is highlighted in light blue. Beyond that, you can see that all of the other notes are either C, E or G.
So, even though you are playing the chord across 6 strings, you are actually only playing 3 individual notes.
This is the case for all regular major and minor chord shapes, regardless of whether you play them in the open position or as barre chords.
As you can see from the diagram above however, there is actually a ‘mini’ chord shape hiding within the broader barre chord shape. This is as follows:
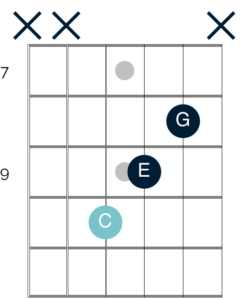
This is a C major triad. It contains just one instance of each note, and as such has a more delicate sound than the barre chord above.
It is also easier to play than a regular barre chord, yet it is still a moveable shape that you can trace all over the fretboard.
Not only this, but because this triad shape only requires you to use three fingers, you can use your little finger to add notes onto the triad base – creating a range of beautiful sounding chords in the process.
It is for this reason that guitarists like Jimi Hendrix, Stevie Ray Vaughan and John Mayer (amongst others) all use these triad shapes in their playing.
To discuss these shapes in depth is the subject of an entire course.
However, if you would like to start experimenting with a couple of them, here are two triad shapes built on the D string that you can begin to target in your playing:
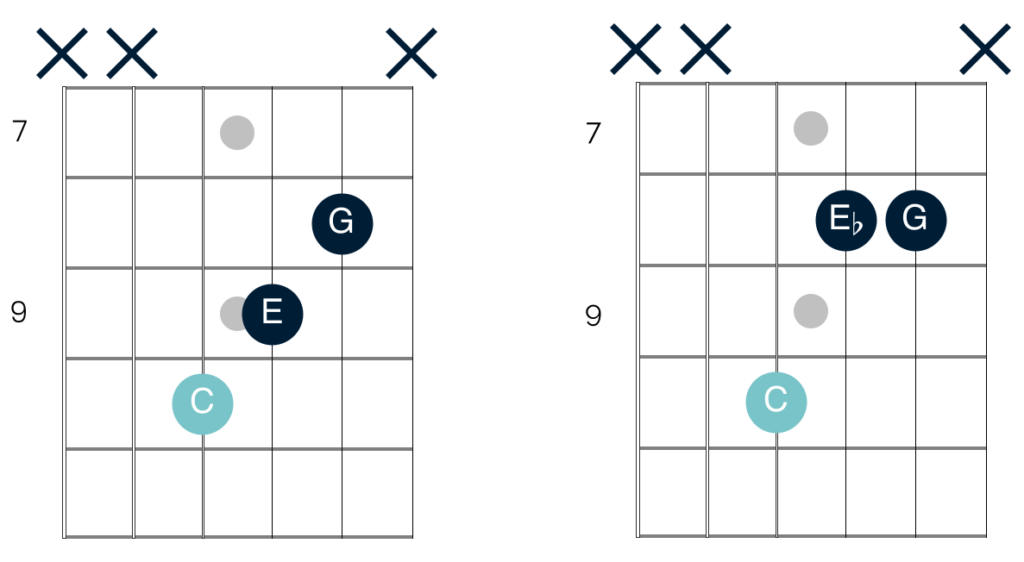
You can move these all over the fretboard to also form the chords of D major and minor, E major and minor and so on.
As a final point, it is worth noting that each of these images shows the ‘true’ triad shape, with just 3 notes. In a real practical playing situation however, it is quite likely that you would play the minor triad like this:
It is a more comfortable barre shape and also requires you to play with a little less accuracy in the picking hand.
Key learning points
In the last mini solo covered in this course, I looked at how to move beyond the minor pentatonic scale, and target the Aeolian mode in your solos.
As I discussed in that lesson, this is an important and useful step to take as you become more advanced as a musician. You can start to broaden your vocabulary and target new and different textures in your solos.
In my experience, most players want to rush towards this point. They want to ‘break out’ of the pentatonic boxes as soon as possible, and move onto more complicated material.
Doing so is a mistake for two key reasons:
The first of these is that the minor pentatonic scale is of fundamental importance in the blues. It appears in the lead playing of every famous blues guitarist of all time, and quite literally defines the sound of the genre.
If you use the minor pentatonic scale and combine it with blues technique and phrasing – in almost any musical context – you will create a solo that sounds ‘bluesy’.
You can see this in my mini solo. I am not playing over a bluesy backing track here. Yet by using the minor pentatonic scale and combining it with bluesy techniques like bending and slides, I create a distinctly bluesy sound in the solo.
Put another way, if you want to sound like a blues guitarist, you need to have a deep understanding of the minor pentatonic scale and how to use it.
Additionally, if you try to move beyond the minor pentatonic scale too quickly, you are leaving a lot on the table.
The minor pentatonic scale provides you with almost endless soloing possibilities.
I explore this point in depth below, so will keep this point brief for now. In short though, you could spend a lifetime of practice working just within the pentatonic scale, and still find yourself discovering new material.
I can attest to this personally. At this point in my blues guitar career, I have spent thousands and thousands of hours playing and coaching guitarists on the minor pentatonic scale. Yet I still find myself unearthing new ideas and patterns of movement.
With these two points in mind then, throughout the rest of this lesson I will look at how you can maximise the sound of the minor pentatonic scale, and create beautiful bluesy ideas with simple scale shapes.
Scale choice
As noted above, in this mini solo I use the A minor pentatonic scale. More specifically, I actually stick within the first shape of the scale:
I craft all of my ideas in this single position and don’t move anywhere else on the fretboard.
In my experience, guitarists of all levels have difficulty soloing in this way.
Players early in their journey want to show that they have the ability to move beyond that first shape. More advanced guitarists might share the same insecurity, and on top of this, it is likely that they have forgotten the potential of the scale since moving onto more complex material.
Just to really hammer home the potential of the first pentatonic shape though, here are a range of blues and blues rock solos which are constructed almost entirely from just the first shape of the minor pentatonic scale:
- The Thrill Is Gone – B.B. King (key of B minor)
- Hey Joe – Jimi Hendrix (key of E)
- Comfortably Numb – Pink Floyd (key of B minor)
- Mary Had A Little Lamb – Stevie Ray Vaughan (key of Eb)
- Cocaine – Eric Clapton (key of E)
I could add in literally hundreds of examples here. Hopefully however, these help to illustrate the point.
Regardless of where you are in your playing journey, taking this focused approach and limiting your fretboard movement can be very useful.
This is simply because it gets you focusing on technique, and all of the tools you need to use to bring simple note groupings to life.
If you are new to blues soloing, this will improve your execution of techniques like bending and vibrato, as well as your phrasing.
Conversely, if you have been playing for a long time, limiting yourself in this way will remind you of just how much mileage you can get from a single position when you start to focus on technique.
With this in mind then, let’s look at some of the ideas I target above to make my improvisation interesting.
Double bends
Guitarists often talk about string bending as if it is a single technique. Yet this is not really the case.
Bending is a highly nuanced set of techniques that you can use to create a wide range of different feels in your solos.
The problem when you treat bending like a single idea is that you typically develop a fairly limited bending style, and fail to explore all of the possible ways you can alter your bends.
Just some of the ways you can do this are as follows:
- Pitch. You can bend across a wide range of different pitches, all of which will create a different sound
- The journey of the bend. You can cut the bend off once you reach your target pitch, or you can allow it to return to its starting point
- Speed. You can alter the speed of any of the different sections of a bend
You can then apply these variations to different kinds of bends, like pre-bends, unison bends and multiple pitch bends. In this way, you can create an exponential number of different sounds by focusing on a single technique.
You can then combine that technique with slides, hammer ons and pull offs etc to create even more variation in your lead playing.
My chosen bend variation in the solo above is to play two bends with a single pick. This creates a smooth and vocal sound, as there is a lot of movement in the note, but not a lot of picking to make that movement happen.
I execute this idea twice in the mini solo, and in both instances I think it does a lot to add interest and life to the solo.
Key Takeaway
Bending is the most important technique in lead blues guitar. It should be present in all of your blues guitar solos and you should work to explore it at a deep level.
Don’t just lock into a single kind of bend. Push outside of your comfort zone and experiment with altering some of the parameters above, as well as the kind of bends you include in your solos.
If you feel lost on where to start here, I would recommend looking at the following two courses inside The Blues Club:
I dive deep into bending at deep level and look at everything from the fundamentals, through to more advanced bending variations.
Phrase capping
When you focus on a more limited section of the fretboard, you also have the opportunity to create more interesting and varied phrases.
Specifically, you can think about being more nuanced with the way you finish your phrases.
In my experience, when blues guitarists first start improvising, they target the tonic notes in the key in which they are playing as a way of resolving their phrases.
This works very well for a variety of reasons, which I outline in more detail here.
As you might expect though, continually targeting the same note at the end of every phrase has the potential to sound repetitive and boring over time.
The tonic note also creates such a strong sense of resolution that it can actually break up the flow of your playing. Each phrase feels very complete and final, which means you then have to almost start the engines again to get the next phrase going.
To avoid this repetition in my mini solo, I end most of my phrases in a less predictable manner. We can see if this if we look at the tab:
I resolve my opening idea with a bend at the 7th fret on the G string and my second phrase resolves at the 5th fret on the D string.
Neither of these are the tonic note of A.
As such, it is only at the end of the mini solo, where I bend the 8th fret on the B string up to the 10th fret where I resolve to the tonic.
Opting for this approach makes the solo less predictable and gives it a sense of flow. Rather than each phrase feeling complete and final, each phrase sounds like it wants to lead on to the next.
In this way, there is a thread which connects the different phrases and creates a strong sense of movement throughout the mini solo.
To implement this idea in your solo, all you need to do is target notes which are not the tonic.
Now, to discuss this in depth involves a more complete discussion around intervals and their qualities. The good news however, is that you can target this idea easily by simply avoiding the tonic notes.
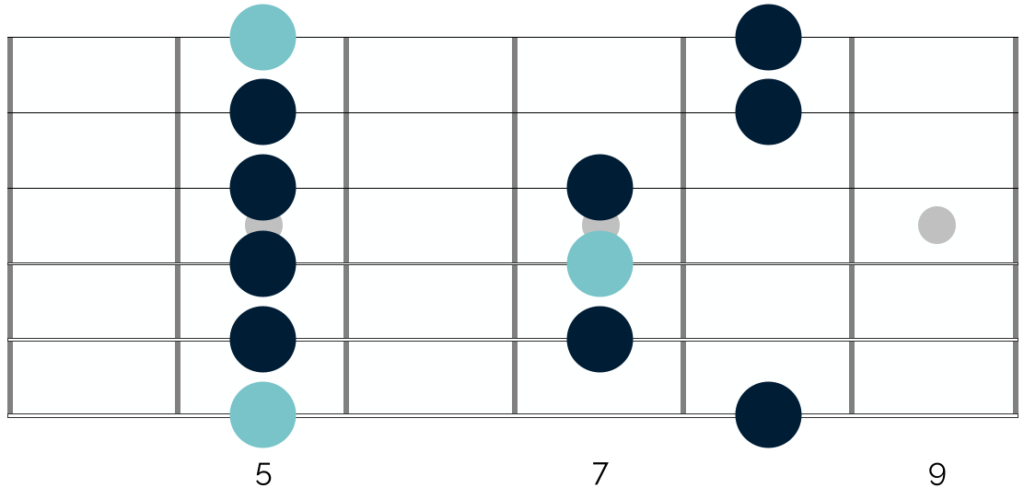
This diagram shows the first shape of the A minor pentatonic scale, with the tonic notes of A highlighted in light blue.
Rather than trying to resolve your phrases on those tonic notes, try finishing your phrases on different notes.
You can then either seek to actually resolve on these other notes, or to use them as pausing points to increase the length of your phrases before then resolving on the tonic (or another note of your choosing).
As you try this, my one piece of advice would be to avoid holding these notes for a long period of time.
If you listen to my mini solo above, you will see that every time I opt to finish an idea on a note other than the tonic, I don’t hold onto that note.
Instead, I play the note briefly, before cutting it off and pausing before the next phrase. In this way, I create a little burst of tension, that then resolves.
The alternative – of hanging on a note that is not the tonic for a long time – can sound overly tense and dissonant. So keep that in mind when you are trying to implement this idea in your improvisations.
Key Takeaway
The tonic note always works well as a point of resolution.
However, rather than always heading to the tonic and resolving your phrases there, you can explore pausing on other notes before finishing your phrase on a strong point of resolution.
In this way, you can craft longer phrases and more interesting and varied ideas.
Over to you 😁
The ideas outlined above are just suggestions for what I think works well in this specific musical context. As always, I would encourage you to use your ear and try to craft new and different ideas that resonate with you.
Having said that, over this particular track, I do think there is a benefit of taking a focused approach.
Regardless of your playing level, it is so easy to fall into the trap of thinking that the answer to better solos is found in more speed, more complex scales and more complicated concepts like ‘playing the changes’.
Yet as I have hopefully illustrated here, you can get a huge amount of mileage from small sections of the fretboard.
Not only this, but focusing your approach in this way will actually help you become a more interesting player, who creates less obvious ideas.
So, as you are working through this mini solo and trying to craft your own ideas, do so with an experimental mindset. Dig deep and think about how you can vary your technique and phrasing, and the ways you can combine different ideas to create even more variation.
This will make you a much more skilled guitarist and will improve every element of your playing.
On that note, good luck!
Keep me posted with how you get on, and if you want feedback on how you are playing through the mini solo – or on a longer improvisation over the track – just send me a video.
You can reach me on aidan@happybluesman.com and I can provide personalised feedback on your playing and soloing ideas 😁
I’m really looking forward to seeing them!