In this second mini solo, I’m playing over a fast and funky jazz blues track in the key of E. Before we look at what is going on here in a bit more detail, here are the key downloads you need when working through this lesson:
Funky Jazz Blues In E Backing Track
Funky Jazz Blues In E Backing Track Tab
E Minor Pentatonic Scale Shapes
The first of these is the backing track that I am soloing over, which you can use to play over and create your own ideas, as well as practice the mini solo tabbed out below.
The second is the tab for the backing track, which illustrates the chords in the backing track and how to play them.
Finally, the last download shows the 5 shapes of the E minor pentatonic scale.
These scale diagrams show my suggested fingerings for the scale, and the tonic notes of E are highlighted in each position. So if you don’t yet feel totally comfortable with these scale shapes, you can refer to them when creating your own ideas.
The tab for this first mini solo is as follows:
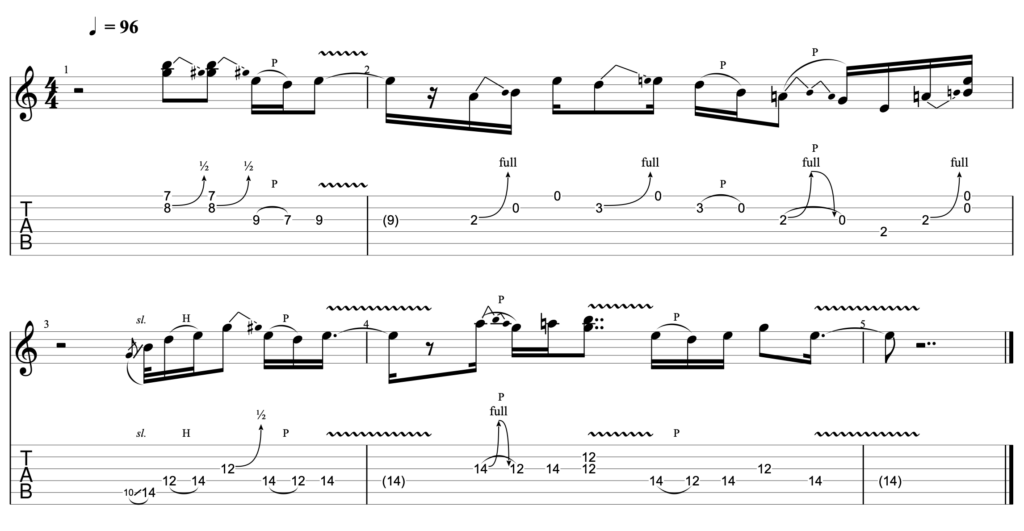
At the 96 beats per minute (BPM) at which the track is played, the isolated audio for the guitar part is as follows:
Musical context
The backing track that we are playing over here is in the key of E.
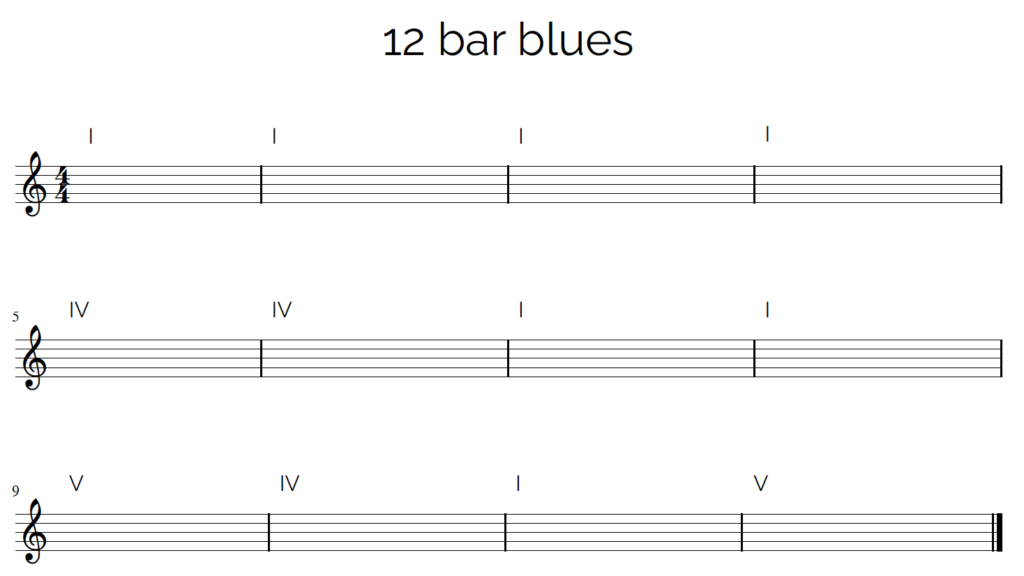
The track actually loosely follows a 12 bar blues structure, however there are three elements in the chord progression which make it sound quite different to a typical 12 bar blues.
I cover these in more detail below. First though, it is worth doing a quick recap on what you would find in a typical 12 bar blues in the key of E.
The notes in the key of E are as follows:
E F# G# A B C# D#
If you harmonise the notes of this scale and turn them into chords, you end up with the following:
E | F#m | G#m | A | B | C#m | D#dim
In a typical 12 bar blues, you would take the I, IV and V chords from this progression. So you would take the chords of E, A and B and play them in the following order across 12 bars:
You would also expect to play these chords as dominant 7th chords.
These are chords which contain a mix of both major and minor tonalities, and they create a tense and unsettled sound which we now associate with the blues.
So if you were playing a standard 12 bar blues in the key of E, you would expect to play:
E7 | A7 | B7
As you can see from the tab above however, this is not the case in this backing track. The chord progression here runs as follows:
E7#9 | A13 | E7#9 | B13
C13 | B13 | E7#9 | B7(b13)
Compared with the typical 12 bar blues, this looks a lot busier and more complex. There are however just three changes which alter the feel of the track. These are as follows:
Chord extensions
The track uses a variety of what are known as extended chords.
Without getting too deep into the theory here, these are chords which contain intervals beyond the 7th. Put another way, a chord that contains numbers 9, 11 or 13 is an extended chord.
This is because they contain the 9th, 11th and 13th intervals, respectively.
Compared with regular major, minor or 7th chords, extended chords have a more ‘colourful’ and arguably dissonant sound.
The more extensions you add into a chord (i.e. the higher the number which appears in the chord) the more colourful and dissonant the sound of the chord.
So 13 chords have a more colourful and dissonant sound than 9 chords.
As you can see from the chord progression above, this song is largely based around 13 chords.
When you play these chords by themselves (and you can try this out by following the attached tab), you will hear that they create quite an unsettled sound.
This gives the track a jazzy feel which is quite different to that of a typical 12 bar blues.
The I chord
The jazzy and unsettled feel of the track is enhanced by the fact that the I chord is an E7#9. Also known as ‘the Hendrix chord’, this chord has a highly unsettled and dissonant sound.
It is fairly unusual for the I chord of a progression to have this tense and unsettled quality.
A more common approach is for the I chord to be a dominant 7th chord, and then for either the IV or V chord (or both) to be turned into extended chords like this one.
In this way, musicians benefit from the relative stability of the I chord, and then add a little tension and spice to their playing by extending the IV and/or V chords.
That is not the case here, and it does a lot to define the sound of the track and give it that jazzy feel.
The turnaround
The final way that the track differs from a standard 12 bar blues is in the turnaround. As you can see from above, a typical 12 bar blues progression contains just 3 chords – the I, IV and V.
That is not the case here, where the VI chord is also introduced into the turnaround (the C13). This creates more variety and movement in the turnaround section and also means that the progression moves through the chords more quickly.
Not only this, but the V chord (the chord based off the note of B) is altered. First it is played as a B13, and then at the end of the turnaround it is changed to a B7b13 chord.
This again creates more variation in the progression and enhances the tension in these final bars, before it loops back to the beginning.
Keeping things simple
In the interest of full disclosure, I have purposefully not done a deep dive into all of the nuances of this chord progression.
To do so would lead into a deep discussion of theory which I think is likely to be distracting to the aim of this lesson.
If you do want to learn more about some of these topics then I would recommend working through some of the following courses and resources:
- An introduction to the 12 Bar Blues
- Understanding the basics of guitar chord theory
- Understanding chords and chord progressions
Finally, if you have questions about this material, please do send me a message on your dashboard. You can also book a 1-2-1 coaching session if you would like to dig into this in much more detail.
Key learning points
If you don’t yet feel ready to tackle the theory of this chord progression, then I have good news!
For the purpose of learning this mini solo and jamming over this backing track however, there are really just a couple of points you need to keep in mind.
These are as follows:
1.) The song is in the key of E. This means that to lock into the track and create harmonious sounding lead lines, you need to be focusing on scales based around the key of E (I cover this in more detail below)
2.) As a result of the extended chords, the song has a jazzy and unsettled feel, which you need to keep in mind when improvising to create the right feel in your solo
3.) There is a lot of muting in the chord progression and also a number of single notes added in between the chords – both of which create a funky feel in the track.
Keeping these points in mind, here are the ideas that I thought about and targeted when crafting this mini solo, and the key takeaway points that you can apply in your own playing:
Scale choice
This track is an E blues, which actually gives you a number of different scale options when soloing. This is because you are playing over dominant style chords which blend major and minor tonalities.
As a result, you can opt for either minor or major scales, or you can target a mix of the scales in your playing. Some of the different scales you can use here are as follows:
- E minor pentatonic scale or E minor blues scale
- E natural minor scale (also known as the E Aeolian mode)
- E major pentatonic scale or E major blues scale
- E Mixolydian mode
All of these options are valid and will sound great over the track, however it is worth noting that there is a key difference between the sound of minor and major scales.
The former sound more aggressive and melancholic, whilst the latter have a warmer and more upbeat quality. Mixing minor and major scales together obviously allows you to mix these elements in a very dynamic way.
In my solo, I actually opted to just use the minor pentatonic scale for two reasons.
The first of these was a practical choice for this lesson.
Far fewer players feel comfortable with the major pentatonic and Mixolydian mode than with the minor pentatonic or minor blues scales.
So by focusing on the minor pentatonic, I hope that this material is more accessible to more people.
The second choice was stylistic.
As noted above, the chord progression here contains some jazzier elements. The result of this is that you can absolutely go for some bolder melodic choices in your playing to reflect the movements in the chords and enhance the jazz sound in your solo.
When I came to improvise however, I was not struck so much by the quality of the chords in the progression but rather by the heavy drumbeat and highly percussive nature of the track.
Both of these create a funk feel in the track, which in a way presents a challenge when improvising. This is simply because you can washed away by the track and end up soloing in a way that doesn’t sound at all bluesy.
Opting fore the minor pentatonic scale helps to guard against this potential pitfall. Not only does the scale itself has a distinctly bluesy sound; it will also lead you to phrase in a way that is more typical of the blues.
In this way, you can craft a killer blues solo, even if you are playing over quite a different musical context.
Key Takeaway
You have a lot of options when improvising here.
If you are earlier in your playing journey, I would recommend focusing on the E minor pentatonic or E minor blues scales. This will ensure your playing sounds bluesy, and it will help you to focus on some of the other technical and stylistic elements outlined below.
Conversely, if you feel comfortable to do so, try experimenting with either the full natural minor scale, or with mixing major and minor scales together.
Whichever approach you take, focus on blues phrasing and note choice so that your solo retains a bluesy feel, even though you are playing over a funky and jazzy chord progression.
Playing in the open position
The key of E is one of my favourites because of the possibility it offers for creating killer blues licks in the open position. These licks are easy to craft and to play, and they can give your playing a distinct SRV vibe – as he often uses them in his solos.
Now, technically speaking – you can target ideas in the open position in any key. In the key of E however it is easier, because the it is the first shape of the minor pentatonic scale (everyone’s favourite!) which appears here.
Not only this, but the same shape appears an octave higher, at the 12th fret. You can see this on the following diagram:
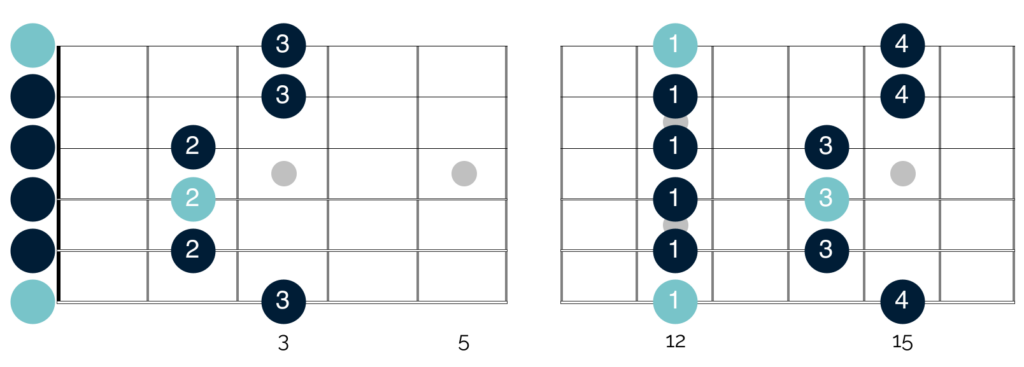
The first diagram here shows the first shape of the minor pentatonic scale in the open position. Here all of the notes on the left side of the scale are played by the open strings and the remaining notes are played by the third and fourth fingers.
The second diagram shows the same scale shape an octave higher, with the full and suggested fingerings for the scale. In both diagrams, the tonic notes of E are highlighted in blue.
The benefit of understanding this connection is that you can play the same licks in two different sections of the fretboard, yet create a very different feel when doing so.
You can also create classic sounding blues licks in the open position with the use of mostly open strings. This greatly reduces the technical burden on your fretting hand and makes it easier to play fast licks in the style of guitarists like SRV.
Although I typically advocate moving across the fretboard in a stepwise fashion to give your playing a sense of coherence and connectedness, this connection in E also lends itself well to dramatic jumps between the two positions.
I target one of these jumps in my mini solo, when I move from the open position to the same shape an octave higher in the 3rd bar. This creates a huge amount of energy and momentum in my playing and fits with the heavy percussive vibe of the backing track,
Key Takeaway
In the key of E, you can take all of the ‘go-to’ licks you use in the first shape of the minor pentatonic scale, and shift them down to the open position.
Here you can recreate all of the same ideas but using open strings. This will allow you to play faster, and add a SRV vibe to your improvisations.
Spacing
The final idea I would recommend focusing on when you are improvising here, is that of leaving a little space between your phrases.
Leaving space in your solos is a key concept that you should think about whenever you are soloing.
In short, this is because it brings with it a whole range of benefits and puts you into a position where you are likely to succeed when improvising. Leaving spacing will:
- Ensure that the quality of each of your ideas shines through more clearly
- Prevent your playing from sounding too busy or crowded
- Give you more time to think and plan your next move, which in turn will help you to relax and craft better quality phrases
- Allow you to better lock into the track and create more rhytmic variation in your phrases
I hopefully help to illustrate these benefits in the mini solo I play above. Although the track is quite fast, I leave space between each phrase, which I feel helps each one to stand out as an effective piece of playing.
It also allows me to identify the precise moments in the track where I want to enter with a lick, which gives the feeling of my solo being ‘locked in’ with the track.
Leaving this space often causes guitarists a lot of discomfort. Players often feel like they need to be provide new ideas all of the time, and it can feel awkward to sit back and let the backing track play.
This is particularly the case here, as the track is upbeat and has a relatively fast tempo. This can make it feel like you have to play more to ‘keep up’ with the track.
This is not true in any musical context – whether fast paced or laid back. You are the improviser and the one in control, and so you can set the pace of your playing whenever you are soloing.
This is not easy, so keep focused and resist the urge to play lick after lick without any pause. Instead, let the backing track play and be tactical with when you play, and how many notes you put into each phrase.
This is is a difficult skill to develop, but one that will make you a much better blues guitarist.
Key Takeaway
Space is an essential part of effective blues soloing – even when you are playing fast.
Letting your phrases breathe will enhance the sound of everything that you play and make improvising a less stressful and more enjoyable experience.
Finally, it will help you to solo for longer without burning through all of your licks and ideas!
Over to you 😁
The ideas outlined above are just suggestions for what I think works well in this specific musical context. However, I would always encourage you to use your ear and try to craft new and different ideas that resonate with you.
You don’t need to produce the perfect solo on the first go. Instead, explore, work to create new ideas and allow yourself to make mistakes.
Once you have done that, you can then begin to tighten things up and zone in on the specific ideas you think work best.
If you do learn the mini solo that I have tabbed out above, brilliant! I hope that you enjoy playing it, and that it helps to build your technique and playing style.
More than anything, I hope that it provides you with inspiration for ideas you can use in your own solos. Don’t just learn the notes and then move on. Instead, look at how you can take the ideas I play, and then adapt them and make them your own.
In this way, you have the potential to get huge amounts of benefit from learning this single mini solo.
On that note, good luck!
Keep me posted with how you get on, and if you want feedback on how you are playing through the lick – or on a longer improvisation over the track – just send me a video.
You can reach me on aidan@happybluesman.com and I can provide personalised feedback on your playing and soloing ideas 😁
I’m really looking forward to seeing them!