In my experience, the major scale is not one of the most popular scales amongst guitar players. Most guitarists focus on the minor pentatonic scale, the blues scale and the major pentatonic scale in their playing.
And yet whilst these scales are brilliant and have a wide variety of applications – both in the blues and other genres – if you want to further develop as a guitarist and a musician, I would strongly recommend learning the major scale.
And so in this article, I will be covering everything you need to get started using the major scale in your guitar playing. This includes:
From a theoretical point of view, getting to grips with the major scale will help you to develop a stronger understanding of music theory as it applies to the guitar. You will understand how chords are formed, how modes are constructed, and how musicians write and use chord progressions.
From a practical point of view, learning the major scale will give you further access to a wide range of modal scales. Each of these has a very different sound and feel. And you can use them to great effect when playing lead guitar.
So if you have heard people talking about the ‘Dorian’ or ‘Mixolydian’ mode, and you would like to incorporate these scales in your own playing; or if you feel ‘trapped’ within the shapes of the minor pentatonic scale – then learning the major scale will have a profound impact on your guitar playing.
In short, it is little exaggeration to say that learning the major scale will change how you approach guitar playing. It will help you to better understand almost every element of the guitar. This includes chord progressions, soloing approaches and the formation of other scales.
Opening thoughts
In my experience, self-taught guitar players typically encounter the major scale after they have learnt the minor pentatonic scale.
Once guitarists have played the minor pentatonic scale for some time, they start to feel limited when soloing. So they start looking for other material that they can use in their improvisations and solos.
If you feel that you are in this position, then I would first recommend trying to extract as much out of the pentatonic shapes as possible before you try to expand your musical vocabulary.
You can get a huge amount out of the pentatonic and blues scales. And even when you do learn additional scales, the minor and major blues scales should always be a core part of your blues guitar solos.
Having said that, learning the major scale on the guitar does give you more options when soloing. And so knowing the major scale shapes – and how to effectively use them when you play the blues – will do a lot to push your playing onto the next level.
If you know how to play the minor pentatonic scale but you haven’t yet covered some areas of theory, then I would strongly recommend reading the following articles before continuing here:
The material in the first two articles will help you to move beyond the minor pentatonic sound, whilst sticking with familiar scale shapes and patterns. This will improve your repertoire. And it will do so without some of the added complexity you have to deal with when learning the major scale.
The second two articles are more theoretical. They will give you background on how scales are created. And this will give you a solid foundation on which you can build and add these new ideas.
I appreciate that working through theory can be both challenging and a little unexciting. I also appreciate that you want results quickly. You want new scales and material that you can start using in your solos today.
Yet whilst this may be the case, please don’t jump in here and just learn the scale shapes. The major scale is very different to the minor pentatonic.
It doesn’t form comfortable shapes and phrases under your fingers, and playing it over backing tracks is also more complex. There are more notes to consider, and more areas where you can potentially make mistakes.
In short, it is more difficult to effectively play the major scale on your guitar. And so If you want to have success using it, then I would strongly recommend learning some of the theory first.
This will do a lot to help you understand the material outlined here. It will also make it much easier to learn and understand modal scales. And this is important, as these are the scales that you will most likely be using in your playing.
So with those caveats out of the way, let’s get into it! Here is some background on the major scale, and the major scale shapes you need to learn on your guitar:

What is the major scale?
The major scale provides the foundation for Western music.
Although guitar players don’t typically use the major scale in solos and improvisations, the scale plays a hugely an important role for guitar players (as well as all musicians that play Western music).
As I will explain in further detail below – this is because the major scale is a ‘parent’ scale, from which a variety of modal scales are formed.
In this way, once you learn how to play the shapes of the major scale on your guitar, you will also be able to play a range of additional scales. And you will be able to do this without having to learn any additional scale shapes.
The major scale is a heptatonic scale. This is because it is comprised of 7 notes per octave, (‘hepta’ meaning 7 in Latin). The scale ‘formula’ for the major scale is as follows:
1 2 3 4 5 6 7
Each of the numbers above represents an interval that appears in the scale. And in the major scale, all of the intervals are either major or perfect. In the key of A, the notes of the major scale are as follows:
A B C♯ D E F♯ G♯
Each of the numbers 1-7 corresponds to one of the notes above. A is 1, B is 2 and so on. This is what the A major scale looks like when played horizontally across the 6th string on your guitar:
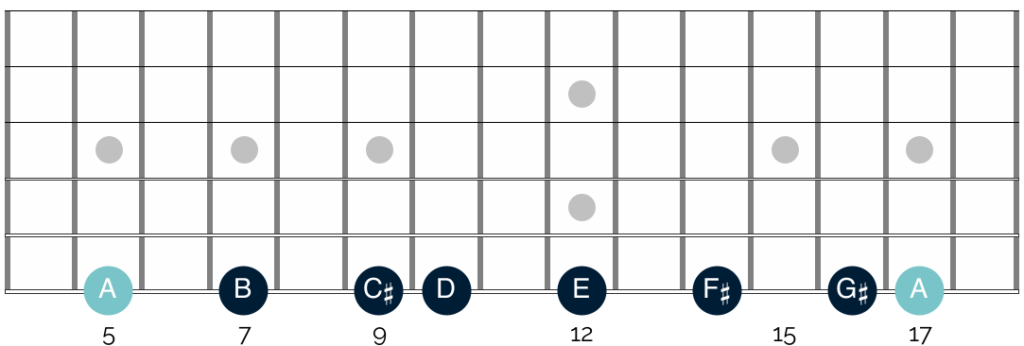
When laid out visually in this way, you can see that the major scale is constructed in a series of alternating tones and semitones (or half steps and whole steps). Specifically, the spacings on the fretboard are as follows:
Whole step | Whole step | Half step | Whole step | Whole step | Whole step | Half step
A lot of guitarists find it helpful to repeat this series of spaces when they first learn the scale. And it certainly can be a useful mechanism for remembering the pattern of notes, which has a different sound and feel to many of the scales with which you might be familiar.
The shapes of the major scale
Whilst at first it is useful to look at the major scale laterally in this way, there are a variety of more compact scale shapes that are more economical and easier to use in a real playing context.
In contrast to the minor and major pentatonic/blues scales, which have just 5 fixed shapes – there are a number of different ways that you can play the shapes of the major scale on the guitar. There are two ways to play the scale that are most common, both of which I will cover here. They are as follows:
Closed position fingerings
The first and perhaps most common way of playing the major scale makes use of what are known as closed position fingerings.
When you play closed position fingerings, you play each scale shape using a one finger per fret principle.
In other words, you ‘assign’ fingers to each fret in any given scale position. You then always use the same fingers to play the notes on those frets.
For example, if you have a scale shape that starts on the 5th fret and that scale also covers the 6th, 7th, 8th and 9th frets – in this system you always play the 5th fret with your first finger, the 6th fret with your middle finger, the 7th fret with your third finger, and so on.
I appreciate this might sound complex. But it becomes a lot clearer when you look at the scale diagrams below.
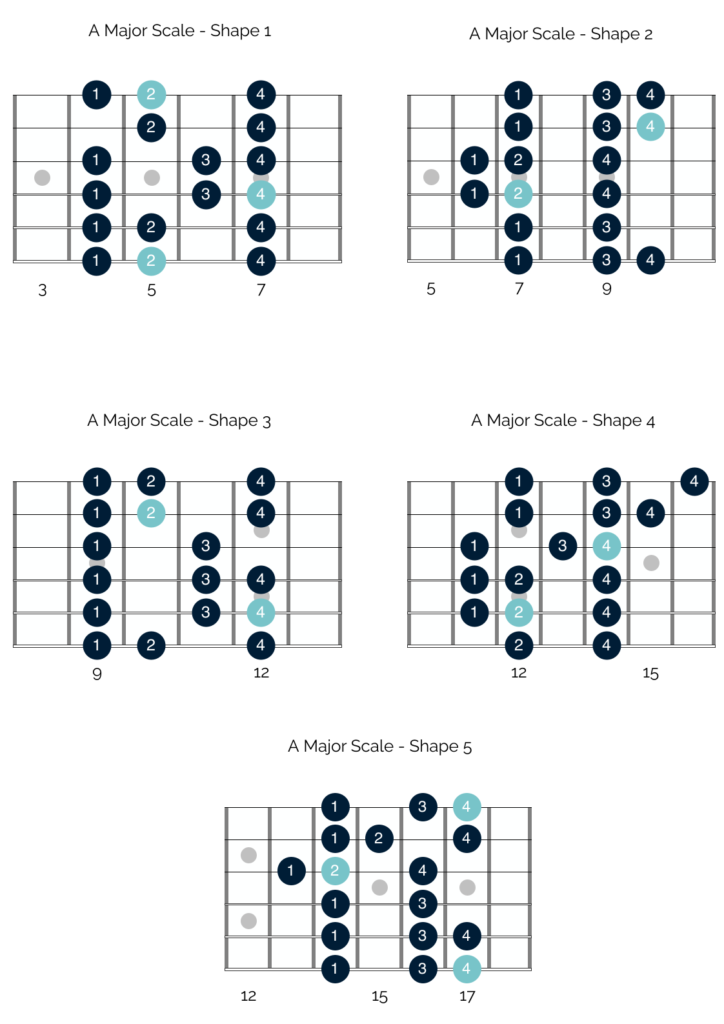
There are 5 shapes of the major scale which use closed position fingerings. These are shown below in the key of A. The notes in light blue are the root notes of A:
When you are playing these shapes, there is still some movement in your fretting hand. The shapes are not so compact that you can simply lock into one set of frets and move from the 6th string to the 1st string and back again.
As such, when you are playing through them – I would recommend thinking about ‘playing in position’. In shape 3 for example, you don’t need to move your fretting hand at all. The scale shape starts on the 9th fret and spans up to the 12th fret. So you can assign a finger to each of those 4 frets.
In shape 5 by comparison, the scale shape spans 5, rather than 4 frets. Here then, the important thing to remember is to play in position. The scale shape starts on the 14th fret and spans up to the 17th fret. So you can assign a finger to each of those 4 frets.
On the G string, the scale shifts. As such, you need to shift your hand back into a new position. Now you are playing between frets 13 and 16. Again then, you can assign a finger to each of those 4 frets. Now though, you are playing in a new position.
This shift also appears in shapes 2 and 4 of the scale. So when you are playing these scale shapes, you will need to adopt the same approach.
Pros of closed position fingerings
There are a number of benefits of closed position fingerings. In my opinion one of the most significant of these is that the fingerings help you to become accustomed to playing in position.
This in turn gets you using all of your fretting fingers. This is an economical and efficient way to play and it is a great habit to establish in all of your playing.
Additionally, closed position fingerings put your fretting hand into a very compact and strong playing position. This allows you to strike notes with force, and execute techniques like hammer ons and pull offs with ease.
It also allows to you bend with force, and combine those bends with additional intensity techniques. Rory Gallagher is one example of a blues guitarist who plays fiery lead lines in this way, using closed position fingerings.
The final benefit of this approach, is that there are only 5 scale shapes you need to memorise when you adopt this fingering. Like the shapes of the pentatonic scales, these shapes are nice and compact, which I think makes them easier to learn initially.
In fact – and as I will cover in more detail in a future article – the shapes of the major pentatonic scale are ‘hidden’ within the shapes of the major scale.
So if you play through the major scale shapes above, you will notice that you are playing all of the notes of the major pentatonic scale, as well as 2 additional notes in each octave. Understanding this can make these major scale shapes feel more familiar on your guitar. And that can make them easier to learn.
Cons of closed position fingerings
The downside of closed fingerings is that they can be challenging to play at speed. The number of notes that you play on each string, and the position of your hand on each string is often changing. And this can make it difficult to play them quickly.
This isn’t such a problem for most blues guitarists. But it is something to keep in mind if you are looking to build speed – or if you want to play fast blues and blues rock in the style of Stevie Ray Vaughan, Joe Bonamassa or Eric Johnson.
The lack of symmetry in the scale shapes can also make them difficult for some guitarists to learn. Part of what makes the minor pentatonic scales easy to memorise is that they are balanced and quite symmetrical.
You play 2 notes on each string for all 6 strings. The same is not true here. And you might find this challenging at first.
Finally, whilst the separation between the scale shapes is useful in many ways, it also means that you have to look for areas on the fretboard where you can join the different shapes of the scale on your guitar.
There is not the same level of crossover between the scale shapes, and so you need to find those areas of crossover yourself.
3 note per string scale shapes
The alternative to closed fingerings, is to play these scales using 3 notes per string. These scale shapes are probably not quite so popular, but there are a number of benefits to this approach. As such, I would strongly recommend learning them as well.
In contrast to the closed fingering scale shapes illustrated above, there are 7 of these shapes, rather than 5. These are shown below in the key of A. As above, the notes in light blue are the root notes of A:
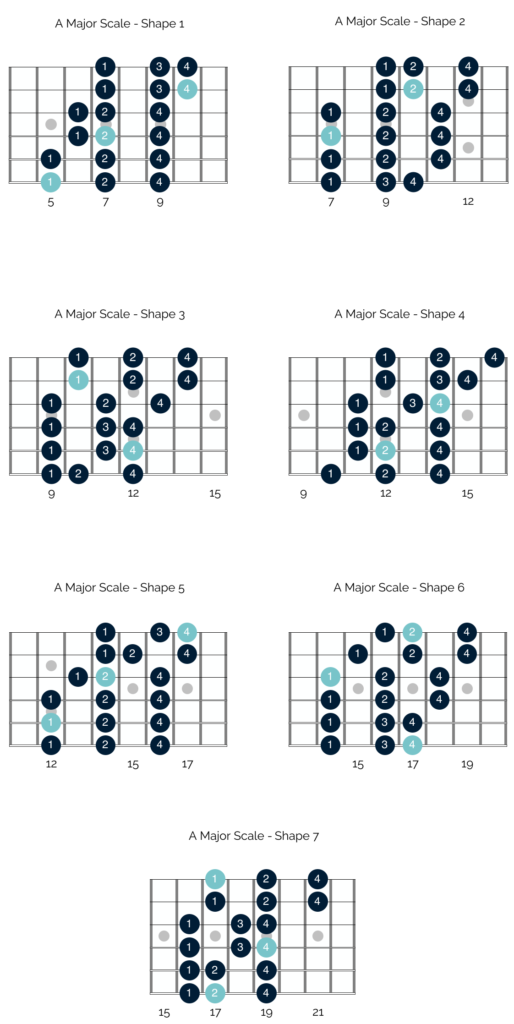
As you can see, these shapes are quite different to those that utilise the closed position fingerings.
Unlike the scale shapes above, these fingerings do not form compact shapes on your guitar. They stretch across large portions of the fretboard and there is a lot of crossover between the different scale shapes.
Pros of 3 notes per string scale shapes
There are three significant benefits of adopting 3 note per string scale shapes.
The first of these is that the scale shapes cover large portions of the fretboard. This helps you to break out of small sections of your neck, and prevents you from getting stuck always playing a single scale shape.
These 3 note scale shapes also help to build strength and dexterity in your fretting hand. They require you to use all of your fretting fingers, and to make big stretches between the notes. This is particularly the case on the lower parts of the fretboard, where there is more space between the frets.
This can make the fingerings suggested above feel a little awkward at first – particularly if you are not used to using your fourth finger a lot in your playing.
However once you get used to them, they will help you to build strength and stamina in your fretting hand. And this will benefit all areas of your guitar playing.
Once you get used to these scale shapes, they are also easier to play at speed. The balanced shape of the scales and the consistency of the fingerings makes it easier to play them quickly.
And it is for this reason that ‘shred’ guitarists often favour these fingerings. They are particularly suited to fast legato runs that utilise lots of hammer ons and pull offs.
Admittedly, fast legato style runs aren’t often used in the blues. Yet they do appear a lot in fusion, where guitarists use them to great effect to give a smooth, almost liquid feel to their playing.
The solo in the song ‘Dolemite‘ by fusion guitarist Scott Henderson provides a brilliant example of the potential of the technique.
As such, if you want to create a different feel in your guitar solos, whilst still maintaining a bluesy sound, getting to grips with these scale shapes is a great idea.
Cons of 3 notes per string scale shapes
For blues guitar players, the biggest con of these major scale shapes is that they are less conducive to string bending. If you are combining them with closed position fingerings this isn’t a problem.
However if you are solely using these shapes, then you might find it more challenging to execute accurate string bends. These scale shapes force you to stretch your fretting hand. And this puts it into a weaker position for string bending.
From a practical point of view, I think these scale shapes are also more difficult to learn and memorise. This is not just because there are 2 more shapes to learn. Rather it is because they are likely to be quite different from all of the other scale shapes with which you might be familiar.
They are not at all similar to the pentatonic scales. And you can’t find the pentatonic scales ‘hidden’ in these scale shapes.
Additionally, there is a lot of crossover between the scale shapes. As noted above, in many ways this is beneficial. However it does make it more challenging to commit these scales to memory when you are first starting out.
Lastly, if you have small hands, you might struggle to play these shapes accurately. This is particularly true on the lower sections of the fretboard, where there is more space between the frets.
Closed position fingerings vs. 3 notes per string
As you can hopefully see, there are pros and cons to both approaches.
Having said that though, I would recommend closed fingerings for the majority of blues guitarists. Their shapes overlap nicely with those of the major pentatonic scale.
This not only makes them easier to learn, but also provides you with reference points that you can use in your playing when you get to grips with the major scale.
Finally and significantly, string bending is easier when you play these compact scale shapes. They allow you to execute powerful string bends, and to combine these with additional intensity techniques to craft varied and interesting solos.
To my knowledge, the vast majority of blues guitarists that play the major and modal scales, use closed position fingerings. As such, if you have limited practice time, prioritise these scale shapes.
Get totally comfortable with them in the key of A, and then experiment moving them around the fretboard and playing them in different keys.
In an ideal world though, I would recommend learning both sets of scale shapes. The greater your understanding of the fretboard, the easier it will be for you to craft effective guitar solos.
You won’t feel trapped in certain areas of the neck. And whilst you might not want to include a series of blistering legato licks in your solos, learning the 3 note scale shapes will give you the option.
This is my recommended approach. But it is also worth noting that we are all different and have different playing strengths. As such, if you find one of the two sets of scale shapes to be much easier to play than the other, be pragmatic.
Provided that you are not making your choice because of a glaring weakness in your playing (like the strength of your little finger for example), this makes sense. There is no need to suffer or struggle unnecessarily!

How to use the major scale in your playing
Once you have learnt the shapes of the major scale on your guitar, you will understandably be wondering how you can incorporate the scale in your improvisations.
Now, unlike some of the other guitar scales with which you might be familiar, it is more challenging to use the major scale in your guitar playing straight away.
And in fact, if you are predominantly interested in playing blues and blues rock, it is unlikely that you will use the major scale in your playing with any frequency.
Instead it is much more likely that you will use one of the modes of the major scale.
To cover these modes in detail is a lengthy topic. As such, it is one that I will address separately in a series of articles.
In short though, the modes are scales that are built using the same notes and shapes as the major scale. They contain all of the same notes as the major scale. The key difference is that the note on which the scale starts alters in each of the modal scales.
This has a significant impact on the intervals between the notes in the scale. And this changes the sound and character of each of the modal scales. This is true – even though the notes in each of these modal scales is the same.
I will cover the modes in much more detail in future articles. I will also go into greater depth on those modes which are most relevant for blues guitarists. So for now don’t worry too much about the modes and how they function.
The first and significant step to understanding them is to get comfortable with the major scale and how to play it on your guitar.
Further applications of the major scale
Learning the major scale on your guitar is not just helpful for lead guitar. As noted at the beginning of this article – the major scale provides the foundation for western music.
The major scale is used to build individual chords, as well as chord progressions. These are the progressions that you hear being played all the time in popular music.
As a result, learning the major scale will help to deepen your understanding of music theory on the guitar.
And although there is more theory to work through to understand how to use the scale to create chords and chord progressions, learning the shapes is one of the first and necessary steps you need to take to get to grips with this further material.
As such, just focus on getting to grips with the various shapes of the major scale included here. Although this will not immediately put you in a position to start using the scale practically, it is a crucial step that you need to take.
It will provide you with the foundation for understanding the further theory, and for using that theory in a practical playing context.
If your time is limited, then focus first on getting to grips with the closed position fingerings. These are the most common fingerings. They are also easier to learn and are more useful in a blues context. If you have a little more time to commit to practice, then learn both versions of the scale.
Either way, and as I often recommend – break down the challenge of learning the major scale on your guitar into manageable chunks.
There is no rush, so take your time. It is much better to take a little longer learning the shapes of the major scale but to grasp them properly, than it is to rush through and have gaps in your knowledge.
This is particularly important with the major scale. For as noted above, these shapes are used in a number of further modal scales. And so when you are learning the shapes of the major scale on your guitar, you are actually learning the shapes for 7 different scales, not 1.
I will cover the details on those further scales in my upcoming articles, But in the meantime, good luck getting to grips with these scale shapes!
Let me know how you get on, and if you have any questions at all please do get in touch. Drop a note in the comments section, or send me an email on aidan@happybluesman.com. I’d love to help 😁
Images & References
Unsplash, Applied Guitar Theory, Justin Guitar, Dummies,The Beato Book, Guitar Theory For Dummies, Modern Music Theory For Guitarists, Justin Guitar, YouTube


Responses
In your article on Getting Started with the Major Scales, you make the following comment: “To my knowledge, the vast majority of blues guitartists that play the major and modal scales, use open position fingerings. As such, if you have limited practice time, prioritize these scales shapes.”
But throughout the rest of the article you seem to imply that the closed shapes are much more useful and important to learn, especially with limited time. Did you intend to say that most blues guitartists use the closed positions? I’m familiar with the closed shapes and trying to decide whether to work on the open shapes, or work more on the modes. What do you think?
Thanks very much for the comment David and for spotting the typo, and apologies for any confusion! What I intended to write was that to my knowledge the vast majority of guitarists use closed position fingerings.
The alternate fingerings are normally referred to as ‘3 notes per string’ or ‘3 NPS’ scale shapes, rather than open fingerings. So the use of the word ‘open’ was nothing more than a typo – I should have written ‘closed’ but I instead wrote ‘open!’ 😅
To answer your question about learning the 3 notes per string shape, I would say there are 2 main factors to consider:
The first of these is how easily you can implement closed position fingerings in a proper playing context. If you are able to jam and improvise freely using a variety of modal scales all over the fretboard, then learning the 3 notes per string approach could work well. It will give you more options and put your fretting hand into different positions when you are improvising – which in turn will lead you to create slightly different licks and phrases.
The second is how much time you have available to practice. If you are somewhat limited and are struggling to cover all of the material that you would like, then learning the 3 NPS scale shapes would probably not be my top priority. I would instead recommend focusing on other elements of your playing which are more relevant to blues soloing (playing the changes, targeting chord tones, rhythm and feel etc) and come back to the 3 NPS scale shapes a little further down the road.
I hope that helps, but if you have any more questions or if you’d like to chat this through it in a bit more detail, just send me an email. You can reach me on aidan@happybluesman.com and I am always around and happy to help! 😁
Aidan, thanks so much for your thoughtful and informative response! I appreciate it, as well as all the work you have put in to develop these courses. I’m working my way through them, learning a lot, and following the links as they appear for even more helpful pages!
Best regards
David
It’s my pleasure David! I am so glad to hear that you are finding the articles helpful, and thank you so much for your kind words, they really mean a lot. If you do ever have any questions that I can help with as you’re working through them, just let me know. You can reach me on aidan@happybluesman.com and I am always around and happy to help. Otherwise I hope you have a brilliant time over the holidays and I look forward to catching up again soon! 😁
Hi Aidan,
I search to find details that would help me understand a way to visualize, and put into an accurate perspective what is meant by the fact that a simple chord consist of the root, the 3rd and 5th notes of their scale. I am learning on my own. I came across that statement in another site and searched for a clearer explanation. In my search… I came across your site here https://happybluesman.com/getting-started-major-scale-guitar/ and I am so glad I did! You explain things in a way I understand! With that said, as a new beginner that I am, what would you suggest the order of my topics or steps be to set myself to success with learning to play the guitar. As an example in terms of scales what should the order be? I like to learn to play the music from Bob Dylan, New Order, Johnny Cash and their likes.